Samsung S700 User Manual (ENGLISH) - Page 44
Setting up the play back function using the LCD monitor, Starting the slide show
 |
UPC - 044701007012
View all Samsung S700 manuals
Add to My Manuals
Save this manual to your list of manuals |
Page 44 highlights
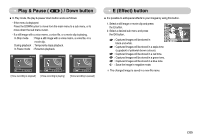
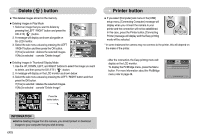
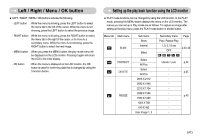
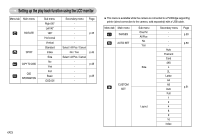
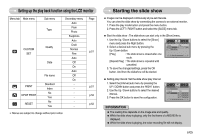
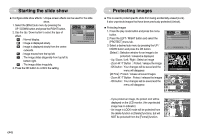
Setting up the play back function using the LCD monitor Menu tab Main menu Sub menu Type CUSTOM SET Quality Date PRINT DPOF PRINT RESET File name Standard Index No Yes No Yes Secondary menu Auto Plain Photo Fastphoto Auto Draft Normal Fine Auto Off On Auto Off On - Page p.51 p.51 p.52 p.52 ſ Menus are subject to change without prior notice. Starting the slide show ƈ Images can be displayed continuously at pre-set intervals. You can view the slide show by connecting the camera to an external monitor. 1. Press the play mode button and press the menu button. 2. Press the LEFT / RIGHT button and select the [SLIDE] menu tab. ƃ Start the slide show : The slide show can start only in the [Show] menu. 1. Use the Up / Down buttons to select the [Show] menu and press the Right button. 2. Select a desired sub menu by pressing the Up / Down button. Show Interval Effect SLIDE Play Repeat Play [Play] : The slide show is closed after one Back: Set:OK cycle. [Repeat Play] : The slide show is repeated until cancelled. 3. To save the changed settings, press the OK button. And then the slideshow will be started. ƃ Setting play interval: Set the slide show play interval. 1. Select the [Interval] sub menu by pressing the UP / DOWN button and press the RIGHT button. 2. Use the Up / Down buttons to select the desired interval. 3. Press the OK button to save the configuration. Show Interval Effect Back: SLIDE 1 sec 3 sec 5 sec 10 sec Set:OK INFORMATION ƃ The loading time depends on the image size and quality. ƃ While the slide show is playing, only the first frame of a MOVIE file is displayed. ƃ While the slide show is playing, the voice recording file will not display. ŝ43Ş
-
 1
1 -
2
-
3
-
4
-
5
-
6
-
7
-
8
-
9
-
10
-
11
-
12
-
13
-
14
-
15
-
16
-
17
-
18
-
19
-
20
-
21
-
22
-
23
-
24
-
25
-
26
-
27
-
28
-
29
-
30
-
31
-
32
-
33
-
34
-
35
-
36
-
37
-
38
-
 39
39 -
 40
40 -
 41
41 -
 42
42 -
 43
43 -
 44
44 -
 45
45 -
 46
46 -
 47
47 -
 48
48 -
 49
49 -
50
-
51
-
52
-
53
-
54
-
55
-
56
-
57
-
58
-
59
-
60
-
61
-
62
-
63
-
64
-
65
-
66
-
67
-
68
-
69
-
70
-
71
-
72
-
73
-
74
-
75
-
76
-
77
-
78
 |
 |