Samsung S700 User Manual (ENGLISH) - Page 51
PictBridge : Picture Selection, PictBridge : Print Setting
 |
UPC - 044701007012
View all Samsung S700 manuals
Add to My Manuals
Save this manual to your list of manuals |
Page 51 highlights
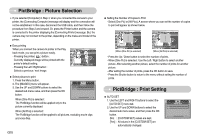
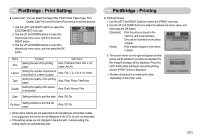
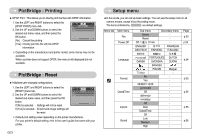
PictBridge : Picture Selection ſ If you selected [Computer] in Step 4, when you connected the camera to your printer, the [Connecting Computer] message will display and the connection will not be established. In this case, disconnect the USB cable, and then follow the procedure from Step 2 and onward. Or, press the Printer button and the camera is connected to the printer displaying the [Connecting Printer] message. But, the camera may not connect to the printer, depending on the make and model of the printer. ƈ Easy printing When you connect the camera to printer in the Play back mode, you can print a picture easily. - Pressing the printer( ) button : Currently displayed image will be printed with the printer's default setting. - Pressing the Left / Right button : Print: Menu:OK Selects a previous / next image. ƈ Select pictures to print 1. Press the Menu button. 2. The [IMAGES] menu will appear. 3. Use the UP and DOWN buttons to select the desired sub menu value, and then press the OK button. When [One Pic] is selected : The PictBridge function will be applied only to the picture currently displayed. One Pic All Pics IMAGES Exit:MENU Move: When [All Pics] is selected : The PictBridge function will be applied to all pictures, excluding movie clips and voice files. ŝ50Ş ƃ Setting the Number of Copies to Print - Select [One Pic] or [All Pics]. A screen where you can set the number of copies to print will appear as shown below. 0 0 PREV Exit:Shutter NEXT Set:OK [When [One Pic] is selected] Exit:Shutter Set:OK [When [All Pics] is selected] - Press the Up / Down button to select the number of prints. - When [One Pic] is selected : Use the Left / Right button to select another picture. After selecting another picture, select the number of prints for another picture. - After setting the number of prints, press the OK button to save. - Press the Shutter button to return to the menu without setting the number of prints. PictBridge : Print Setting ƈ AUTO SET 1. Use the LEFT and RIGHT buttons to select the [AUTO SET] menu tab. 2. Use the UP and DOWN buttons to select the desired sub menu value, and then press the OK button. [No] : [CUSTOM SET] values are kept. [Yes] : All values in the [CUSTOM SET] are automatically changed. AUTO SET No Yes Exit:MENU Move:
-
 1
1 -
2
-
3
-
4
-
5
-
6
-
7
-
8
-
9
-
10
-
11
-
12
-
13
-
14
-
15
-
16
-
17
-
18
-
19
-
20
-
21
-
22
-
23
-
24
-
25
-
26
-
27
-
28
-
29
-
30
-
31
-
32
-
33
-
34
-
35
-
36
-
37
-
38
-
39
-
40
-
41
-
42
-
43
-
44
-
45
-
 46
46 -
 47
47 -
 48
48 -
 49
49 -
 50
50 -
 51
51 -
 52
52 -
 53
53 -
 54
54 -
 55
55 -
 56
56 -
57
-
58
-
59
-
60
-
61
-
62
-
63
-
64
-
65
-
66
-
67
-
68
-
69
-
70
-
71
-
72
-
73
-
74
-
75
-
76
-
77
-
78
 |
 |
