Samsung SCD303 User Manual (user Manual) (English, Twi) - Page 57
SHUTTER SPEED & EXPOSURE, Recommended Shutter speeds when recording
 |
View all Samsung SCD303 manuals
Add to My Manuals
Save this manual to your list of manuals |
Page 57 highlights
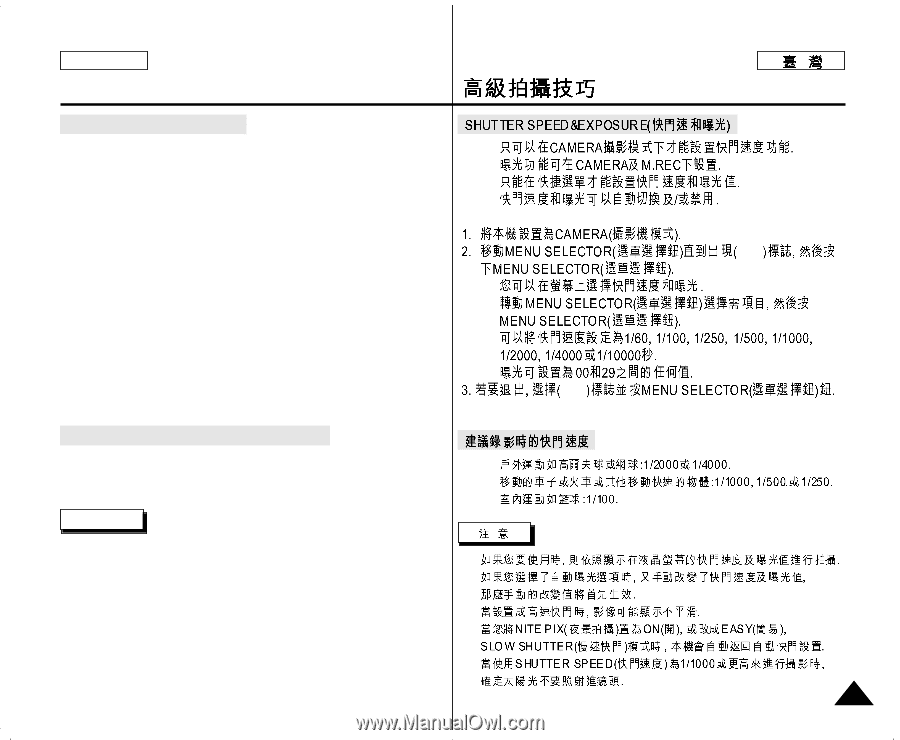
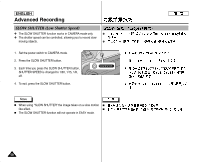
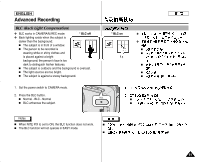
ENGLISH Advanced Recording SHUTTER SPEED & EXPOSURE ✤ You can set SHUTTER SPEED only in CAMERA mode. ✤ ✤ The EXPOSURE function works in both CAMERA and M.REC modes. ✤ SHUTTER SPEED and EXPOSURE values can only be set in the ✤ ✤ Quick Menu. ✤ ✤ SHUTTER SPEED and EXPOSURE are automatically switched and/or deactivated. 1. Set the power switch to CAMERA mode. 2. Move the MENU SELECTOR until you see the ( ) icon, and then push the MENU SELECTOR. I I You see a screen on which you can select SHUTTER SPEED and I EXPOSURE. I Move the MENU SELECTOR to select the item you want and then push the MENU SELECTOR. I I SHUTTER SPEED can be set to 1/60, 1/100, 1/250, 1/500, 1/1000, 1/2000, 1/4000 or 1/10000. I I EXPOSURE can be set between 00 and 29. 3. To exit from the setting screen, select the icon ( ) and push the MENU SELECTOR. Recommended Shutter speeds when recording ✤ Outdoor sports such as golf or tennis : 1/2000 or 1/4000. ✤ Moving cars or trains or other rapidly moving vehicles such as roller ✤ coasters : 1/1000, 1/500 or 1/250 ✤ ✤ Indoor sports such as basketball : 1/100 ✤ Notes I If you want to use the selected shutter speed and exposure value, you should begin the recording with the shutter speed and the exposure I I adjustment screens displayed on the LCD. If you manually change the shutter speed and the exposure value when I Auto-exposure option is selected, manual changes are applied first. I The image may not seem as smooth when a high shutter speed is set. I I The camcorder returns to the auto shutter setting and auto exposure I setting when you set the NITE PIX to ON, or change to the EASY, SLOW SHUTTER modes. I When recording with a SHUTTER SPEED of 1/1000 or higher, make I sure the sun is not shining into the lens. 57
-
 1
1 -
2
-
3
-
4
-
5
-
6
-
7
-
8
-
9
-
10
-
11
-
12
-
13
-
14
-
15
-
16
-
17
-
18
-
19
-
20
-
21
-
22
-
23
-
24
-
25
-
26
-
27
-
28
-
29
-
30
-
31
-
32
-
33
-
34
-
35
-
36
-
37
-
38
-
39
-
40
-
41
-
42
-
43
-
44
-
45
-
46
-
47
-
48
-
49
-
50
-
51
-
 52
52 -
 53
53 -
 54
54 -
 55
55 -
 56
56 -
 57
57 -
 58
58 -
 59
59 -
 60
60 -
 61
61 -
 62
62 -
63
-
64
-
65
-
66
-
67
-
68
-
69
-
70
-
71
-
72
-
73
-
74
-
75
-
76
-
77
-
78
-
79
-
80
-
81
-
82
-
83
-
84
-
85
-
86
-
87
-
88
-
89
-
90
-
91
-
92
-
93
-
94
-
95
-
96
-
97
-
98
-
99
-
100
-
101
-
102
-
103
-
104
-
105
-
106
 |
 |