Samsung SF-760 User Guide - Page 56
Resolution, Receiving a fax, Adjusting the document settings
 |
View all Samsung SF-760 manuals
Add to My Manuals
Save this manual to your list of manuals |
Page 56 highlights
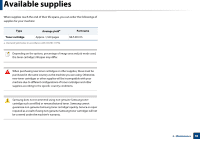
Basic faxing 7 To enter more fax numbers, press OK when Yes appears and repeat steps 5 and 6. You can add up to 10 destinations. Once you have entered a group dial number, you cannot enter another group dial number. 8 When you have finished entering fax numbers, select No at the Another No.? prompt and press OK. The machine begins sending the fax to the numbers you entered in the order in which you entered them. send report is printed after sending faxes. 20 Receiving a fax Your machine is preset Fax mode at the factory. When you receive a fax, the machine answers the call on a specified number of rings and automatically receives the fax. 21 Adjusting the document settings Before starting a fax, change the following settings according to your original's status to get the best quality. It may be necessary to press OK to navigate to lower-level menus for some models. Resolution The default document settings produce good results when using typical textbased originals. However, if you send originals that are of poor quality, or contain photographs, you can adjust the resolution to produce a higher quality fax. The resolution setting is applied to the current fax job. To change the default setting (see "Fax menu" on page 121). 1 Select panel. (fax) > (Menu) > Fax Feature > Resolution on the control 2 Select the option you want and press OK. • Standard: Originals with normal sized characters. • Fine: Originals containing small characters or thin lines or originals printed using a dot-matrix printer. • Super Fine: Originals containing extremely fine detail. Super Fine mode is enabled only if the machine with which you are communicating also supports the Super Fine resolution. 2. Menu Overview and Basic Setup 56
-
 1
1 -
2
-
3
-
4
-
5
-
6
-
7
-
8
-
9
-
10
-
11
-
12
-
13
-
14
-
15
-
16
-
17
-
18
-
19
-
20
-
21
-
22
-
23
-
24
-
25
-
26
-
27
-
28
-
29
-
30
-
31
-
32
-
33
-
34
-
35
-
36
-
37
-
38
-
39
-
40
-
41
-
42
-
43
-
44
-
45
-
46
-
47
-
48
-
49
-
50
-
 51
51 -
 52
52 -
 53
53 -
 54
54 -
 55
55 -
 56
56 -
 57
57 -
 58
58 -
 59
59 -
 60
60 -
 61
61 -
62
-
63
-
64
-
65
-
66
-
67
-
68
-
69
-
70
-
71
-
72
-
73
-
74
-
75
-
76
-
77
-
78
-
79
-
80
-
81
-
82
-
83
-
84
-
85
-
86
-
87
-
88
-
89
-
90
-
91
-
92
-
93
-
94
-
95
-
96
-
97
-
98
-
99
-
100
-
101
-
102
-
103
-
104
-
105
-
106
-
107
-
108
-
109
-
110
-
111
-
112
-
113
-
114
-
115
-
116
-
117
-
118
-
119
-
120
-
121
-
122
-
123
-
124
-
125
-
126
-
127
-
128
-
129
-
130
-
131
-
132
-
133
-
134
-
135
-
136
-
137
-
138
-
139
-
140
-
141
-
142
-
143
-
144
-
145
-
146
-
147
-
148
-
149
-
150
-
151
-
152
-
153
-
154
-
155
-
156
-
157
-
158
-
159
-
160
-
161
-
162
-
163
-
164
-
165
-
166
-
167
-
168
-
169
-
170
-
171
-
172
-
173
-
174
-
175
-
176
-
177
-
178
-
179
-
180
-
181
-
182
-
183
-
184
-
185
-
186
-
187
-
188
-
189
-
190
-
191
-
192
-
193
-
194
-
195
-
196
-
197
-
198
-
199
-
200
-
201
-
202
-
203
-
204
-
205
-
206
-
207
-
208
-
209
-
210
-
211
-
212
-
213
-
214
-
215
-
216
-
217
-
218
-
219
-
220
-
221
-
222
-
223
-
224
 |
 |
