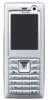
Sharp 550SH User Guide
Sharp 550SH Manual
 |
View all Sharp 550SH manuals
Add to My Manuals
Save this manual to your list of manuals |
Sharp 550SH manual content summary:
- Sharp 550SH | User Guide - Page 1
, Sharp Telecommunications of Europe Limited, declares that this 550SH is in compliance with the essential requirements and other relevant provisions of Directive 1999/5/EC. A copy of the original declaration of conformity can be found at the following Internet address: http://www.sharp-mobile.com - Sharp 550SH | User Guide - Page 2
550SH phone. About This User Guide This user guide is carefully designed to help you learn about your phone repairs, defects, battery replacement, use after the specified battery life has expired user guide may not be supported by all networks. • We assume no responsibility for downloaded contents, - Sharp 550SH | User Guide - Page 3
of the Bluetooth SIG, Inc. The Bluetooth word mark and logos are owned by the Bluetooth SIG, Inc. and any use of such marks by Sharp is under license. Other trademarks and trade names are those of their respective owners. Licensed by QUALCOMM Incorporated under one or more of the following - Sharp 550SH | User Guide - Page 4
IIS and Thomson. Useful Functions and Services Your phone offers you the following features: • Video calls. You can talk while viewing each other on respective screens. • 3D and colour Java™ games. You can also download various games and applications from Vodafone live!. • Thin Film Transistor (TFT - Sharp 550SH | User Guide - Page 5
Battery .... 11 Removing the SIM Card and the Battery 12 Charging the Battery 13 Inserting/Removing the Memory Card ..... 14 Connecting the Stereo Handsfree 16 Turning Your Phone Call Menu (Video Call 27 Entering Characters 30 Changing the Input Language Handset 36 Finding a Name 36 4 Contents - Sharp 550SH | User Guide - Page 6
with those on the Internet 42 Dialling a Service Phone Number 43 Camera 44 Taking Pictures 44 Recording Vodafone live 68 Navigating a WAP Page 69 Music 72 Music Player 72 My Items 75 Pictures 75 Music & Ringtones 76 Videos 77 Themes 78 Other Documents 78 Common Option Menus 79 Games - Sharp 550SH | User Guide - Page 7
138 Call Timers 139 Data Counter 139 Call Costs 139 Connecting 550SH to Your PC 141 System Requirements 141 3G/GSM Modem 141 Handset Manager 142 Sync Manager 142 Software Installation 143 Software Support 143 Troubleshooting 144 Safety Precautions and Conditions of Use 146 CONDITIONS OF - Sharp 550SH | User Guide - Page 8
/1800/1900 GPRS phone • Rechargeable Li-ion Battery • AC Charger • Stereo Hands-free Kit • CD-ROM • microSD™ Memory Card* • User Guide • Quick Start Guide* * This item is not provided in some areas. Optional Accessories • Li-ion Spare Battery (XN-1BT30) • Cigarette Lighter Charger (XN-1CL30) • USB - Sharp 550SH | User Guide - Page 9
(Arrow Keys): Moves cursor to highlight a menu item, etc.* Up/Down arrow keys: Displays Contacts List a b entries in standby. a and b indicate in this manual these keys. 19 20 21 22 23 Left arrow key: c Right arrow key: d Displays the "Create Message" screen in standby. c indicates in this - Sharp 550SH | User Guide - Page 10
four modes: Abc, ABC, 123 and abc on the text entry screen. Press to enter P, ?, - or * in standby. Press and hold in standby to initiate keypad lock Executes the function in the C lower right of the screen. Accesses "Vodafone live!" by opening the browser in standby.* 12.End/Power Key: Ends - Sharp 550SH | User Guide - Page 11
connect either the charger or a USB data cable. 18.Microphone 19.Built-in Aerial: Warning: Do not cover the top of the phone with your hand when in use as this may interfere with the performance of the built-in aerial. 20.RF Connector 21.Camera (External Camera) 22.Battery - Sharp 550SH | User Guide - Page 12
2 2. Slide the SIM card into the SIM holder. 3. Hold the battery so that the metal contacts of the battery are facing down, slide the guides on the top of the battery into the battery slots , and then insert it . 4. Replace the battery cover. Note • Make sure that only 3V SIM cards are used. • Make - Sharp 550SH | User Guide - Page 13
Removing the SIM Card and the Battery 1. Ensure that the phone is turned off and that the charger and other accessories are disconnected. Slide off the battery cover. 2. Lift the battery using the protruding edge and remove the battery from the phone. 3. Hold down gently while sliding the SIM card - Sharp 550SH | User Guide - Page 14
arrows, and connect to an AC outlet. To Disconnect the Charger When charging is complete, the battery indicator icon displays the full charge status. 1. Unplug the charger from the AC outlet, then unplug the charger connector from the phone. 2. Close the cover. Note • Do not use any non-approved - Sharp 550SH | User Guide - Page 15
in the upper right of the display. Low Battery during Use When the battery is running low, an alarm will sound and " " is displayed on the display. If you are using your phone and you hear the low battery alarm, attach your charger as soon as possible. The phone may not be able to continue normal - Sharp 550SH | User Guide - Page 16
) and insert the memory card as shown in to . To Remove the Memory Card 1. Turn off the phone. 2. Slide off the battery cover. Lift the battery using the protruding edge and remove the battery from the phone. 3. While pressing down lightly on the cover, slide the card holder as shown below in (OPEN - Sharp 550SH | User Guide - Page 17
is enabled you are asked to enter the PIN code each time the phone is switched on. For details on setting the PIN code, see "Enabling/Disabling the PIN Code" on page 119. 1. Enter your PIN code. The PIN code is 4 to 8 digits. 2. Press B. Note • If your PIN code is entered incorrectly three times in - Sharp 550SH | User Guide - Page 18
1. Select "From SIM to Handset". Keypad Lock You can lock the keypad to prevent it from being pressed accidentally. Locking the Keypad 1. Press and hold P in standby. Unlocking the Keypad 1. Press and hold P in standby. Tip • Emergency numbers (112, etc.) can be entered and dialled regardless of the - Sharp 550SH | User Guide - Page 19
/Service out handset) 9. : Logging in the Instant messenger 10. : "Voice Calls" diverts set to "Always" 11. / / / / : Connection status [USB cable/Bluetooth wireless setting [enabled (in standby or except in standby)/exchanging information/ talking with the Bluetooth headset/Hide my phone - Sharp 550SH | User Guide - Page 20
[silent/ increasing volume/vibration enabled/ silent and vibration enabled] 15. / / : Speaker mode [speaker phone/speaker activated/microphone muted] 16. : Memory card inserted 17. : Battery level 18. : Daily alarm enabled 19. / : Schedule entry enabled [with/without reminder alarm] 20 - Sharp 550SH | User Guide - Page 21
soft key if it displays Back. To close the Main menu, press the right soft key if it displays Exit. Each section in this user guide starts with a list of items you will need to select in order (indicated in italics) before performing the procedures shown. Select each item to reveal - Sharp 550SH | User Guide - Page 22
delete the number to the left of the cursor. Emergency Calls 1. Enter 112 (international emergency number) using the keypad and press D to dial. Note • Emergency calls may not be able to be made on all mobile phone networks when certain network services and/or phone features are in use. Contact your - Sharp 550SH | User Guide - Page 23
phone number saved in the speed dial list is dialled. Redialling You can redial numbers in the call log. Select from specific categories or "All Calls". Specific • If you have subscribed to the Calling Line Identification (CLI) service and the caller's network sends the number, the caller's number is - Sharp 550SH | User Guide - Page 24
The current call is put on hold. 2. Press [Options] and select "Dial New Number". 3. Enter the phone number you wish to make another call to, then press D. Tip • You can also make another call by entering the phone number during a call instead of step 1. The current call is automatically put on hold - Sharp 550SH | User Guide - Page 25
, or "Inbox", "Sent" or "Drafts" to access these folders. For details on SMS and MMS, see "SMS" and "MMS" on page 51. Call Waiting This service notifies you of another incoming call while you have a call in progress. 1. During a call, press [Options] and select "Hold & Answer" to answer the second - Sharp 550SH | User Guide - Page 26
To Add New Participants to the Conference Call 1. Press [Options] and select "Dial New Number". 2. Enter the number you wish to include in the conference call and press D to dial. 3. Press [Options] and select "Join All Calls" to join the conference - Sharp 550SH | User Guide - Page 27
both parties have 3G capable phones and 3G coverage. See "Display Indicators" on page 18. • Make sure that the battery is fully charged and the party's screen 4. Calling party's name or phone number Making a Video Call 1. Enter the area code and the phone number you wish to dial. 2. Press [Options - Sharp 550SH | User Guide - Page 28
Video Call When an incoming call is detected, the phone rings. 1. Press D to answer the call with video or press [Options] and select "Hide Picture" to answer with voice only. Tip • If you have subscribed to the Calling Line Identification (CLI) service and the caller's network sends the number, the - Sharp 550SH | User Guide - Page 29
image selected in "Alternative Image" of "Video Call Settings" is used. Turning the Speaker On and Off You can talk via the loudspeaker on the phone when it is on. 1. During a video call, press [Options] and select "Loudspeaker On". Note • In a high-noise environment, you may not be able to continue - Sharp 550SH | User Guide - Page 30
To Turn the Backlight On or Off You can turn on the backlight of your screen. 1. During a video call, press [Options] and select "Video Call Settings". 2. Select "Backlight". 3. Select "Always On", "Always Off" or "As Normal Setting". When "Always On" is selected, the backlight will always be on - Sharp 550SH | User Guide - Page 31
TUV8 tuv8 8 O WXYZ9 wxyz9 9 Q (space 0 0 P R Switches character case between four modes: Abc, ABC, 123 and abc. space) ↵ G- O: Q P: R: Press and hold to enter 0 - 9 numbers. Press and hold to shift between multi-tap and T9 mode. Press and hold to display the Input Language screen. 30 - Sharp 550SH | User Guide - Page 32
abc). 4. Press each key once for any letter you require on that key. To enter the word "How", press JLO. 5. If the word shown isn't the one you select the word. Note • If the correct word is not shown in step 5, enter the correct word again after switching to the multi-tap input method. Tip • If - Sharp 550SH | User Guide - Page 33
word list for T9 text input. 1. On the text entry screen in T9 mode, press [Options] and select "My Dictionary". 2. Select "Add New Word" and enter a new word. Editing a Word in the List 1. On the text entry screen in T9 mode, press [Options] and select "My Dictionary". 2. Highlight the desired word - Sharp 550SH | User Guide - Page 34
). See "List of Menu Functions" on page 158. Shortcuts are listed in the headings of this user guide. Examples: To Access "Voice Message" Sub Menu (M 5-1-2) Using Shortcut Keys Press B KGH. To Access "Phone Help" Sub Menu (M 7-10) Using Shortcut Keys Press B MP. Note • The shortcut keys work for the - Sharp 550SH | User Guide - Page 35
can store up to 500 entries. In a Contacts List, you can save the following items: Items Saved in the Handset Memory First Name Last Name Phone Number Email Address Category Street & Number City State/Province Postal Code Country Note Birthday Picture up to 32 characters up to 32 characters up to - Sharp 550SH | User Guide - Page 36
field you wish to fill in, and enter the relevant information. 2. Press [Save], when finished. Tip • To create an entry, at least one field must be filled ("First Name", "Last Name", "Phone Number" or "Email Address" for the handset memory; "Name" or "Phone Number" for the SIM memory). Contacts List - Sharp 550SH | User Guide - Page 37
Handset (M 8-9-1) "Contacts" → "Manage Contacts" → "Copy All Entries" 1. Select "From SIM to Handset" or "From Handset to SIM". Note • When you insert the SIM card into your phone . Finding a Name "Contacts" → "Contacts List" 1. Enter the first few letters of the name. Search results are displayed - Sharp 550SH | User Guide - Page 38
3. Select "Picture". 4. Select "Assign Picture". 5. Select the desired picture. 6. Press [Save] when finished. Note • If you delete a picture in the handset memory, the corresponding thumbnail is also deleted. • To store a picture right after it was taken, select "Take Picture" in step 4. Assigning - Sharp 550SH | User Guide - Page 39
Entries (M 8-9-3) "Contacts" → "Manage Contacts" → "Delete All Entries" 1. Select from "Handset Entries", "SIM Entries" or "Both Entries". 2. Enter your handset code. For details on the handset code, see "Changing the Handset Code" on page 120. Deleting a Contact Entry "Contacts" → "Contacts List - Sharp 550SH | User Guide - Page 40
registered. Creating a New Mailing List "Contacts" → "Contact Groups" → "Add New Group" 1. Enter the group name. The new group name is displayed following the last group on the Group List entry. The detailed screen is displayed. 4. Select the desired phone number or Email address. Contacts List 39 - Sharp 550SH | User Guide - Page 41
you to check the memory used in the Contacts List. "Contacts" → "Manage Contacts" → "Memory Status" Speed Dial List You can set a maximum of 8 phone numbers in the Speed Dial list (p. 22). Setting Contacts List Entries in the Speed Dial List "Contacts" → "Contacts List" 1. Select the desired entry - Sharp 550SH | User Guide - Page 42
, see "Bluetooth" on page 121. Receiving a Contacts List Entry When the phone receives a Contacts List entry, a confirmation message is displayed in standby. 1. List. Press [No] to reject. Tip • For details on entering Bluetooth wireless settings, see "Connectivity" on page 121. Sending a Voice - Sharp 550SH | User Guide - Page 43
rules for this method of synchronisation can be obtained from your network service centre or via the Internet server web page. Backing up the phone (SIM contacts are not affected). You will be asked to verify the handset code before the Restore action is performed. If an incorrect code is entered - Sharp 550SH | User Guide - Page 44
setting for synchronisation. "Contacts DB Name": Contacts List database name on the server Note • Synchronisation settings may have already been entered in your phone depending on your service provider. You may have restrictions on viewing, deleting, copying or modifying the settings. Contact your - Sharp 550SH | User Guide - Page 45
Camera (M 4) Your phone has a built-in digital camera that allows you to "To Media Album" from the send option. (The Postcard and Media Album service is not available with some service providers. Contact your service provider for more information.) Note • When the video camera is launched, press - Sharp 550SH | User Guide - Page 46
To Media Album". (The Media Album service is not available with some service providers. Contact your service provider for more information.) For further Function To Adjust the Zooming Ratio 1. Press a or b. Once the phone has returned to standby, the zoom settings return to default. Adjusting the - Sharp 550SH | User Guide - Page 47
option. "Camera" → [Options] → "Settings" → "Save New Pictures" "Camera" → [Options] → "Settings" → "Save New Videos" 1. Select the desired location from "To Handset Memory", "To Memory Card" or "Choose bef. Saving". Note • If you select "Choose bef. Saving", select the desired location every time - Sharp 550SH | User Guide - Page 48
Auto Save You can set the phone to save pictures and video clips automatically. "Camera" → [Options] → "Settings" → "Auto Save" 1. Select "On" or "Off". Selecting the Anti-flicker Mode "Camera" → [Options] → "Settings" → "Antiflicker" 1. - Sharp 550SH | User Guide - Page 49
one picture and makes an afterimage. After selecting this mode, select "Fast" or "Normal". Note • When you select "Manual" to take continuous pictures, press B manually at the desired speed. • When the Timer and Continuous Shoot functions are simultaneously set, " " (for "4 Pictures", for example - Sharp 550SH | User Guide - Page 50
Selecting a Frame You can select the frame from preset patterns or My Pictures. "Camera" → [Options] → "Modes" → "Add Frame" 1. Select "Preset Frames" or "My Pictures". 2. Select the desired frame. The selected frame is confirmed on the display. 3. Press B. Note • Images larger than 240 dots [W] × - Sharp 550SH | User Guide - Page 51
than 30 minutes (depending on the memory). Note • If you select "For Message" for the recording time, the file size is limited depending on the service provider. Therefore, the quality is also limited for the setting. • "Save and Send" is not displayed after recording in the Extended Video mode - Sharp 550SH | User Guide - Page 52
Messaging (M 5) Your phone allows you to send and receive text, multimedia and Email. It is Note • Some MMS functions may not always be available depending on your network. Contact your service provider for more information. • Maximum message size varies depending on the restrictions set by the - Sharp 550SH | User Guide - Page 53
" → "Email" 1. Select the address field. 2. Select the desired method to enter the address. 3. For MMS, enter or select the Email address or phone number from the Contacts List. For SMS, enter or select a phone number. For Email, enter or select an Email address. • To add multiple Email addresses or - Sharp 550SH | User Guide - Page 54
to add more slides, select "Add Slide After" or "Add Slide Before". 2. Enter the message. If you wish to set the duration of each slide, highlight the space option, as the maximum message size for sending varies depending on the service provider. To Remove or Replace Attachments 1. In step 6 in " - Sharp 550SH | User Guide - Page 55
To Attach a Contacts List Entry 1. In step 6 in "Creating a New Message" on page 52, highlight the "Others" indicator in the lower right of the screen. Press B and select "Attach Contact". 2. Select the desired entry. If you wish to select your own Contacts List entry, select "My Contact Details". - Sharp 550SH | User Guide - Page 56
Note • The current message size displayed while you are creating the message is an approximation. • If a message cannot be sent for some reason, the message stays in the Outbox and the " " is displayed in standby. Tip • To save the message without sending, press [Options] and select "Save to Drafts" - Sharp 550SH | User Guide - Page 57
"Add New Contact" on page 35. Calling the Phone Number of a Sender Embedded in the Message "Messaging" → "Inbox" 1. Highlight the message containing the phone number you wish to dial. 2. Press [Options] and select "Call". Downloading a Single MMS "Messaging" → "Inbox" 1. Highlight the message alert - Sharp 550SH | User Guide - Page 58
select "Reply" or "Reply All". 3. Select "Reply" or "Reply with History". 4. Enter the message. 5. Highlight "Send" in the lower left of the screen. Press B and ". 3. Select the desired sort option. Locking or Unlocking the Messages "Messaging" → "Inbox" 1. Highlight the message you wish to lock or - Sharp 550SH | User Guide - Page 59
Vodafone specific Postcard service centre that prints the picture and mails it to the recipient's home address specified in the MMS message. (Your phone is provided with the address of a Vodafone specific Postcard service up to 50 bytes • "Postal Code" (optional): Postal code up to 20 bytes • "State/ - Sharp 550SH | User Guide - Page 60
the message is sent, and spaces cannot be entered in the Postal Code. • Files in Animation GIF format cannot be used for the Postcard service. • The picture quality of Postcards varies depending on the picture size. Vodafone Messenger (M 5-6) With Vodafone Messenger you can stay in touch and have - Sharp 550SH | User Guide - Page 61
"Messaging" → "Vodafone Messenger" 1. Enter your screen name and press B. Your phone is connected to Instant messenger server. 2. Select one of the following methods to add members to your contact list. "Enter Phone Number": Enters the contact's phone number. "Enter Messenger ID": Enters the contact - Sharp 550SH | User Guide - Page 62
by steps 2 and 3 in "1st Sign in" on page 60. Adding a Group of Contacts "Messaging" → "Vodafone Messenger" 1. Display the Group Conversations tab by c/d. 2. Press [Options] and select "Add New Group". 3. Enter the group name and press B. The Online Contacts list opens. 4. Highlight each member you - Sharp 550SH | User Guide - Page 63
Reading a Message "Messaging" → "Vodafone Messenger" 1. Display the Conversations tab by c/d. 2. Select the desired message you wish to read. Tip • You can continue a conversation after you have received a message by entering a message in the lower window. Saving a Conversation 1. Display the - Sharp 550SH | User Guide - Page 64
Options] and select "Block User". Client Settings "Messaging" → "Vodafone Messenger" 1. Press [Options] and select "Settings". 2. Select . "Automatic Sign In": Sets whether or not to sign in when you turn your phone on. "Block List": Views and removes contacts from the Block List. Sign Out You - Sharp 550SH | User Guide - Page 65
send may remain undelivered to the message recipient. During this period, the message service centre will continually try to deliver the message to the recipient. • "Edit Signature": Opens the screen to enter the signature. • "Auto Delete": Deletes the oldest message automatically, when the Inbox - Sharp 550SH | User Guide - Page 66
"Messaging" → "Messaging Settings" → "SMS Settings" 1. Select the item you wish to set up. • "Message Centre": Enter the message centre number. If you wish to enter a country code for a message to an international number, press and hold Q until a + sign is displayed. • "Message Format": Select the - Sharp 550SH | User Guide - Page 67
• "MMS Accounts": Select the desired account or select "Create New" to enter the following settings. "Profile Name": MMS profile name (Unique name) "Proxy": sending MMS messages exceeding that size. • "Creation Mode": When set to "Free", you can attach files of any format to the mail. When set to - Sharp 550SH | User Guide - Page 68
point for Email "Email Address": Email address • "Download Interval": Sets the download interval. • "Max Message Size": Sets the maximum the settings. • Messenger settings have already been entered in your phone depending on your service provider. You may have restrictions on viewing, deleting - Sharp 550SH | User Guide - Page 69
in an area where 3G is available. * If you have problems getting connected, please phone Vodafone Customer Support. Main Menu "Vodafone live!" → "Vodafone live!" The Vodafone live! service page is displayed. "Vodafone live!" → "Enter URL" The URL entry screen is displayed, allowing you to jump - Sharp 550SH | User Guide - Page 70
live!" by opening the browser. • F (short press): Exits the browser. (press and hold): Turns off the phone. Editing Bookmarks (M 2-3) "Vodafone live!" → "Bookmarks" 1. Select the desired URL, and press [Options]. You can edit the list of Bookmarks by the following options: "Open": Selects - Sharp 550SH | User Guide - Page 71
": See page 69. "Mark Page": Marks the selected WAP page. "Save This Link": Downloads the linked WAP page data. "Save Items": Saves items from WAP pages. "Enter URL": Goes to the WAP page that you enter the URL address of. "Access History": Shows the history where you have browsed - Sharp 550SH | User Guide - Page 72
information of the WAP page. "Browser Data": Edits the browser data. You can clear the cache/cookies/ history. "Search This Page": Searches for specific words in the WAP page. "Copy Text": Copies the text on the WAP page. "Browser Settings": Displays the Settings menus. "Restart Browser - Sharp 550SH | User Guide - Page 73
Music (M 3) Music Player (M 3-2) Music Player supports MP3, MPEG-4 and 3GPP format sound files. While " → "My Music" → "Playlists" 1. Press [Options] and select "Add New Playlist". 2. Enter the desired playlist name. Note • To delete the playlist, highlight the playlist and press [Options]. Then - Sharp 550SH | User Guide - Page 74
while playing back the file in the background. • You can create your playlist by listing only the desired files (p. 72). • Sound files in both the handset and the memory card are displayed in a single view. • You can select the playback pattern in step 2. Press [Options] and select "Playback Pattern - Sharp 550SH | User Guide - Page 75
number of files stored on your phone cannot exceed 350 files. Downloading Music Files (M 3-3) "Music" → "Browse Music Store" The music file download site is displayed. Note • This service is not available with some service providers. Please contact your service provider for more information. 74 - Sharp 550SH | User Guide - Page 76
phones. Pictures (M 6-1) Pictures that are taken by a digital camera or images that are downloaded from mobile Entries You can use this option only for pictures saved in the handset memory. "My Items" → "Pictures" 1. Highlight the file entering a name, see "Add New Contact" on page 35. My Items 75 - Sharp 550SH | User Guide - Page 77
Ringtones. Only the sound files that can be played back on the phone are stored in Music & Ringtones. Playing Back Sound Files "My Items" → "Music & Ringtones" 1. Press d to display the list from the memory card and c to return to the handset memory. 2. Select the file you wish to play back. To stop - Sharp 550SH | User Guide - Page 78
6-4) Video clips that are recorded by a video camera or downloaded from mobile Internet sites can be managed. Playing Back Video Clip Files "My Items" → "Videos" 1. Press d to display the list from the memory card and c to return to the handset memory. 2. Select the file you wish to play back. To - Sharp 550SH | User Guide - Page 79
the display of 550SH, by using the theme files. The theme files that are downloaded from mobile Internet sites can be managed. Viewing Previews "My Items" → "Themes" 1. Press d to display the list from the memory card and c to return to the handset memory. 2. Highlight the theme file you wish - Sharp 550SH | User Guide - Page 80
not open even when an attempt is made to activate it. Sending My Items Data Select the appropriate option. For Files except Theme Files "My Items" → "Pictures" "My Items" → "Music & Ringtones" "My Items" → "Videos" "My Items" → "Other Documents" 1. Highlight the desired file. 2. Press [Options] and - Sharp 550SH | User Guide - Page 81
pairing, you need to enter your passcode when establishing service is not available with some providers. Contact your service provider for more information. Receiving My Items Data When the phone "My Items" → "Videos" "My Items" → "Themes" "My Items" → "Other Documents" 1. Highlight the desired - Sharp 550SH | User Guide - Page 82
To See the My Items Details Select the appropriate option. "My Items" → "Pictures" "My Items" → "Music & Ringtones" "My Items" → "Videos" "My Items" → "Themes" "My Items" → "Other Documents" 1. Highlight the file you wish to view the details of. 2. Press [Options] and select "Details". My Items 81 - Sharp 550SH | User Guide - Page 83
Media Album". Note • This service is not available with some service providers. Please contact your service provider for more information. • Picture . Note • The following procedure applies when the entries other than any theme file or "More Pictures"/ "More Sounds"/"More Videos" are highlighted. - Sharp 550SH | User Guide - Page 84
Vodafone specific applications, see "Games "Add New Template" 1. Enter the text and press B. Handset Memory: Applications, Pictures, Videos, Sounds, Themes, Others, Total and Free Memory Card: Pictures, Videos, Sounds, Themes, Others, Total and Free "My Items" → "Memory Status" 1. Select "Handset - Sharp 550SH | User Guide - Page 85
(M 1-1) Using Applications Various kinds of Vodafone specific applications can be used on this phone. To use applications, download the applications via the mobile Internet. Some applications offer the ability to connect to a network either within a game or a network-based application. Note - Sharp 550SH | User Guide - Page 86
& Applications" → "Games" or "Applications" 1. Highlight the desired Java™ application. 2. Press [Options] and select "Permission". 3. Select one of the following options: "Phone Call": Sets permission to make voice calls. "Network Access": Sets permission to access the network. "Messaging - Sharp 550SH | User Guide - Page 87
for all Java™ applications. Viewing Application Information You can check the information of Java™ applications. "Entertainment" → "Games & Applications" → "Games" or "Applications" 1. Highlight the desired Java™ application. 2. Press [Options] and select "Information". Moving or Deleting an - Sharp 550SH | User Guide - Page 88
backlight to be controlled by the application. If set to "Off", the backlight cannot be turned on from the application. "Entertainment" → "Games & Applications" → "Settings" → "Backlight" → "Blink" 1. Select "On" or "Off". Vibration When the vibrator is set in the application, you can choose whether - Sharp 550SH | User Guide - Page 89
know there is a suspended application. Screensavers You can download screensaver applications for the standby screen and set the time Set the Activation Time "Entertainment" → "Games & Applications" → "Settings" → "Screensavers" → "Activation Time" 1. Enter the activation time in two digits using - Sharp 550SH | User Guide - Page 90
All Clear" 1. Enter your handset code. For details on the handset code, see "Changing the Handset Code" on page 120. Java™ Information (M 1-1-4) "Entertainment" → "Games & Applications" → "Java™ Information" The information about the licences belonging to Java™ is displayed. Mobile TV (M 1-2) You - Sharp 550SH | User Guide - Page 91
Entertainment Searching a File to Be Played Back "Entertainment" → "Videos" → "My Videos" 1. Select "Handset Memory" or "Memory Card". 2. Select "All Videos" or the desired playlist. 3. Press [Options] and select "Search". 4. Enter the first few letters of the title. Search results are displayed in - Sharp 550SH | User Guide - Page 92
can create a playlist and register desired files in it. "Entertainment" → "Videos" → "My Videos" 1. Select "Handset Memory" or "Memory Card". 2. Press [Options] and select "Add New Playlist". 3. Enter the desired playlist name. 4. Press B. Note • To delete the playlist, highlight the playlist and - Sharp 550SH | User Guide - Page 93
Downloading Video Clip Files (M 1-4-2) "Entertainment" → "Videos" → "Get New Videos" The video clip file download site is displayed. Playing Back the Video Clip Files To Play Back the Last File (M 1-4-1) "Entertainment" → "Videos" → "Last Played Video" 92 Entertainment - Sharp 550SH | User Guide - Page 94
desired day to which you want to add an event. 2. Select "Add New Entry". 3. Enter the subject. 4. Select the desired category. 5. Enter the start date and time. 6. Select the duration. When selecting "Other", enter the desired end date and time. 7. Select the reminder time. When selecting "Other - Sharp 550SH | User Guide - Page 95
of the Reminder Tone or Video 1. On the New Entry screen, select "Reminder". 2. Select "Duration". 3. Select the time period. When you select "Other", you can enter the desired time in two digits using the keypad. To Change the Repeat Option of the Reminder 1. On the New Entry screen, select "Repeat - Sharp 550SH | User Guide - Page 96
. 2. Select the desired entry. To Search by Date 1. In any view, press [Options] and select "Go to". 2. Select "Today" to display today or "Enter Date" to enter the desired date. Tip • In the monthly or weekly view, you can control the view by using the following: Monthly view P: Displays the - Sharp 550SH | User Guide - Page 97
colour. • Up to 100 days can be set for the highlights. Finding a Schedule Entry "Calendar" 1. In any view, press [Options] and select "Find". 2. Enter a few letters of the subject. Search results are displayed in time order. Editing a Schedule Entry "Calendar" 1. Select the day you wish to edit - Sharp 550SH | User Guide - Page 98
device for the first time. Receiving a Schedule Entry When the phone receives a schedule entry, a confirmation message is displayed in saved in the Calendar. Press [No] to reject. Tip • For details on entering Bluetooth wireless settings, see "Connectivity" on page 121. Viewing the Memory Status 1. - Sharp 550SH | User Guide - Page 99
the alarm function if it has not been done already. "Organiser & Tools" → "Alarms" 1. Select the blank line (--:--) you wish to set an alarm to. 2. Enter the desired time. 3. Press [Save]. To Change the Type of Repeat Options 1. On the Set Alarm screen, select "Repeat". 2. Select from "Once Only - Sharp 550SH | User Guide - Page 100
calculations using up to 12 digits. "Organiser & Tools" → "Calculator" Key operations for calculation are as follows: To enter a decimal point, press P. To clear the entered number or function, press [Clear]. To do the calculations, press B. To start a new calculation, press [Clear]. Organiser - Sharp 550SH | User Guide - Page 101
Conversion You can also use the calculator as a currency calculator to convert from/to a home currency using a conversion rate that you enter. To Set a Currency Conversion Rate "Organiser & Tools" → "Calculator" → [Options] → "Currency Converter" → "Exchange Rate" 1. Select "Domestic" or "Foreign - Sharp 550SH | User Guide - Page 102
For details on creating a message, see "Creating a New Message" on page 52. (The Media Album service is not available with some service providers. Please contact your service provider for more information.) Selecting the Record Time "Organiser & Tools" → "Voice Recorder" → [Options] → "Record Time - Sharp 550SH | User Guide - Page 103
116). To Select the Reminder Time 1. On the New Entry screen, select "Reminder". 2. Select "Reminder Time". 3. Select the reminder time. When selecting "Other", enter the desired reminder date and time. To Change the Type of Alarm Tone or Video Clip File 1. On the New Entry screen, select "Reminder - Sharp 550SH | User Guide - Page 104
Select "As Message" or "Via Bluetooth". For "Via Bluetooth" For details, see "Bluetooth" on page 121. Note • When pairing, you need to enter your passcode when establishing contact with a Bluetooth wireless technology enabled device for the first time. Viewing the Memory Status "Organiser & Tools - Sharp 550SH | User Guide - Page 105
Time Zone "Organiser & Tools" → "World Clock" 1. Press [Edit] and select "Set Time Zone". 2. Press [Options] and select "Set Custom Zone". 3. Enter the desired city name and time. Setting the Daylight Saving "Organiser & Tools" → "World Clock" 1. Press [Edit] and select "Daylight Saving". 2. Select - Sharp 550SH | User Guide - Page 106
"E-Book" 1. Select the desired file. 2. Press [Options] and select "Bookmark". 3. Select "Bookmark1" or "Bookmark2". Note • E-Book files cannot be viewed while "Music", "Games" or "Applications" is in use. • If you remove the memory card while the E-Book in the memory card is in use, a confirmation - Sharp 550SH | User Guide - Page 107
the desired item. 2. Press [Options] and select "Change Amount". 3. Enter the desired amount using the digit keys. To Delete a Recorded Item or the name. Phone Help (M 7-10) You can view the help list and use it to guide you in the phone's functions. "Organiser & Tools" → "Phone Help" 1. Press - Sharp 550SH | User Guide - Page 108
SIM Application (M 10) You can refer to the information on the SIM. Contact your service provider for further details. SIM Application 107 - Sharp 550SH | User Guide - Page 109
profile according to your environment. There are 6 profiles: "Normal", "Meeting", "Activity", "Car", "Headset" and "Silent". Activating a Profile "Settings" → "Phone Settings" → "Profiles" 1. Select the desired profile. Note • When a profile is set, the corresponding indicator described on page 19 - Sharp 550SH | User Guide - Page 110
Resetting Profile Settings "Settings" → "Phone Settings" → "Profiles" 1. Highlight the profile you wish to reset. 2. Press [Options] and select "Set to Default". 3. Enter your handset code. For details on the handset code, see "Changing the Handset Code" on page 120. Volume You can adjust the volume - Sharp 550SH | User Guide - Page 111
for incoming voice and video calls. You can set a video clip in Saved Videos as the default ring video clip. "Settings" → "Phone Settings" → "Profiles" 1. Highlight the profile you wish to customise. 2. Press [Options] and select "Personalise". 3. Select "Ringtone/Ringvideos". 4. Select "For Voice - Sharp 550SH | User Guide - Page 112
or "Select". 8. Select "For New Message" and select "Duration". 9. Enter the desired duration of message notification in 2 digits using the digit keys. Keypad a confirmation tone each time you press any keys. "Settings" → "Phone Settings" → "Profiles" 1. Highlight the profile you wish to customise. - Sharp 550SH | User Guide - Page 113
My Sounds". For "Duration", enter the desired duration of sound in 2 digits using the digit keys. Vibration "Settings" → "Phone Settings" → "Profiles" melody to pulse in time with the melody. Please note that not all melodies support the "Link to Sound" option. • When you select "On" or "Link - Sharp 550SH | User Guide - Page 114
an incoming call, or when operating the alarm. Pictures taken with the digital camera or images downloaded from a WAP site can be used. To Use Preset Animation/Pattern "Settings" → "Phone Settings" → "Display" → "System Graphics" 1. Select the desired scene to set the picture to. 2. Select "Preset - Sharp 550SH | User Guide - Page 115
can easily customise the display by using the theme files. The theme files downloaded from a WAP site can be used. "Settings" → "Phone Settings" → "Display" → "Themes" 1. Select "Preset Themes" or "My Themes". 2. Select the desired theme file. Tip • Even after a theme is set, you can set a wallpaper - Sharp 550SH | User Guide - Page 116
enter the message (up to 10 characters). Backlight (M 12-2-6) The backlight will shut off if you do not press the keypad for a certain length of time. You can specify a desired time to elapse before the backlight shuts off, which will help conserve battery life. Tip • When you purchase this phone - Sharp 550SH | User Guide - Page 117
help conserve battery life. "Settings" → "Phone Settings" → "Display" → "Display Saving" 1. Select the desired time. When you purchase this phone, Display press only cancels this function. You must press another key in order to enter any numerical or text value. Sounds & Alerts (M 12-3) You can use - Sharp 550SH | User Guide - Page 118
or d to select the home city to set. 2. Press B. Customising the Time Zone "Settings" → "Phone Settings" → "Date & Time" → "Set Time Zone" → [Options] → "Set Custom Zone" 1. Enter the city name. 2. Enter the time-zone differences using the digit keys. Press a or b to switch between − and +. 3. Press - Sharp 550SH | User Guide - Page 119
" in step 1, the language preset on the SIM card is selected. • If the language preset on the SIM card is not supported, then the default language of the phone is selected. Shortcuts (M 12-6) You can change the default shortcut action/assignment of the a, b, c, d, A and C soft keys and the U key - Sharp 550SH | User Guide - Page 120
option on, your phone or certain features on your phone are locked until the correct handset code is entered. "Settings" → "Phone Settings" → "Locks" → "Handset Lock" 1. Select "On" or "Off". 2. Enter your handset code. For details on the handset code, see "Changing the Handset Code" on page 120 - Sharp 550SH | User Guide - Page 121
prevents unauthorised use of your Contacts List. "Settings" → "Phone Settings" → "Locks" → "Contacts Lock" 1. Select "On" to lock or "Off" to unlock. 2. Enter your handset code. For details on the handset code, see "Changing the Handset Code". Showing Secret Data (M 12-7-7) By setting this option - Sharp 550SH | User Guide - Page 122
All Settings from M1 to M12 and All Created Data (M 12-8-2) "Settings" → "Phone Settings" → "Master Reset" → "Reset All" 1. Enter your handset code. For details on the handset code, see "Changing the Handset Code" on page 120. Connectivity (Tab 2) Bluetooth (M 12-1) By configuring the settings in - Sharp 550SH | User Guide - Page 123
phone turns the Bluetooth wireless function on automatically. • You can only select one device for pairing. To change the paired device, see "To Activate the Paired Device". Tip • You can save battery Options], select "Transfer Audio" and then "To Handset" or "To Bluetooth". To Activate the Paired - Sharp 550SH | User Guide - Page 124
the desired device. If a device is not specified, searching starts automatically. 2. Enter your handset code. For details on the handset code, see "Changing the Handset Code" on page 120. 3. Select the desired data to send. 4. Enter the device passcode for unpaired devices. Note • If the handsfree - Sharp 550SH | User Guide - Page 125
wireless function off automatically to save battery power, etc. To Rename Your Phone You can rename your phone. The name is shown in other devices when your phone is detected. "Settings" → "Connectivity" → "Bluetooth" → "Bluetooth Settings" → "Device Name" 1. Enter the new device name. To Turn - Sharp 550SH | User Guide - Page 126
card inserted in your phone, you can make backup files of Bookmarks, Text, Contacts, Calendar and Tasks in the handset memory card to the "Backup/Restore" → "Restore" 1. Enter your handset code. For details on the handset code, see "Changing the Handset Code" on page 120. 2. Select the desired - Sharp 550SH | User Guide - Page 127
Settings (M 12-1) Set various types of functions and services for video calls. Selecting an Image for the Alternative Frame Rate Priority" to perform faster communication. Backlight (M 12-1-5) With this setting On, the phone's backlight is on when making a video call. "Settings" → "Call Settings" → - Sharp 550SH | User Guide - Page 128
You can display an image saved in the phone on your display while you are putting a phone number or to your Voicemail system. Note • This service may not be available on all mobile phone networks. Contact your service roaming network area. Note • This service depends on the SIM card. Contact your - Sharp 550SH | User Guide - Page 129
Select "Activate" or "By Service". If you select "By Service", you can select further divert options. 2. Select from "Always", "When Busy", "No Answer" or "Not Reachable". If you select "No Answer", select the period of time from 6 levels (05 to 30 seconds). 3. Enter a phone number to which you wish - Sharp 550SH | User Guide - Page 130
This lets you control whether to show your phone number when calling another party or not. "Settings" → "Call Settings" → "Show My Number" 1. Select "On", "Off" or "Status". Note • Some networks do not support this service. Please check with your service provider for availability. Time & Cost (M 12 - Sharp 550SH | User Guide - Page 131
service provider. 3. Select one of the following options: "All Services": "Voice Calls": "Video Calls": "Data": "Fax": "Messages": Restricts all services ". 2. Select "Cancel All". 3. Enter the network password. Rejecting an Incoming Call You can register phone numbers you do not wish to answer - Sharp 550SH | User Guide - Page 132
Enter the old network password. 2. Enter a new network password. 3. Enter the new network password again. If you enter the incorrect password, you are asked to enter Dialling Number" 1. Enter your PIN2 code. 2. Select "Switch "Fixed Dialling Number" 1. Enter your PIN2 code. 2. Select "Edit Dial - Sharp 550SH | User Guide - Page 133
Note • This service may not be available on all mobile phone networks. Contact your service provider for more phone selects a service automatically. "Settings" → "Network Settings" → "Select Service" 1. Select "Auto". Selecting a Service Manually "Settings" → "Network Settings" → "Select Service - Sharp 550SH | User Guide - Page 134
games or music even when you fly. "Settings" → "Network Settings" → "Flight Mode" 1. Select "On" or "Off". Internet Settings (M 12-4) Note • In normal operations, you do not need to change the settings. • Internet settings have already been entered in your phone depending on your service provider - Sharp 550SH | User Guide - Page 135
WAP Settings (M 12-4-1) "Settings" → "Network Settings" → "Internet Settings" → "WAP Settings" → "Create New" "Profile Name": WAP profile name (Unique name) "Proxy": Proxy setting for WAP (When "Use Proxy" is On) "Access Point": Access point for WAP (When "Use Proxy" is Off) "Use Proxy": - Sharp 550SH | User Guide - Page 136
", "Streaming Settings", "Proxy Settings" or "Access Point Settings". 2. Highlight the desired profile. 3. Press [Options] and select the desired option. "Edit": "Copy": Modify the desired item Enter the new file name "Delete": Press [Yes] to delete Settings 135 - Sharp 550SH | User Guide - Page 137
areas. This function may not be available on all mobile phone networks. Contact your service provider for more information. To Enable/Disable Cell Broadcasts Subject" in step 1, then enter the subject code to add a page. For details on the subject code, contact your service provider. 136 Settings - Sharp 550SH | User Guide - Page 138
receive Area Info, the message (area code) is displayed in standby. To Enable/Disable Area Info "Settings" → "Network Settings" → "Area Info" 1. Select "On" or "Off". Note • This function may not be available on all mobile phone networks. Contact your service provider for more information. • If Area - Sharp 550SH | User Guide - Page 139
1. Select from "All Calls", "Dialled Numbers", "Missed Calls" or "Received Calls". The selected call log list is displayed. To switch logs, press c or d. 2. Select the phone number you wish to view. If you wish to dial the number, press D to make a voice call or S to make a video call. Tip • You can - Sharp 550SH | User Guide - Page 140
Timers" → "Clear Timers" 1. Enter your handset code. For details on the handset code, see "Changing the Handset Code" on page 120. Data Counter (M charges for your calls. Some networks do not support Charging Advice. Please check with your service provider for availability. Checking the Cost of the - Sharp 550SH | User Guide - Page 141
wish to make sure you do not exceed a certain charge limit. "Call Log" → "Call Costs" → "Max Cost" → "Set Limit" 1. Enter your PIN2 code. 2. Enter a value. Checking the Residual Credit (M 9-7-3) "Call Log" → "Call Costs" → "Residual Credit" Resetting All Call Costs (M 9-7-4) "Call Log" → "Call Costs - Sharp 550SH | User Guide - Page 142
Bluetooth wireless technology port: • 3G/GSM modem • Handset Manager for 550SH • Sync Manager for 550SH System Requirements Operating System: Windows 2000*, Windows XP** * Service Pack 4 or later ** Service Pack 2 or later Supported Software: Microsoft Outlook/Outlook Express Interface: USB port - Sharp 550SH | User Guide - Page 143
Handset Manager via Bluetooth wireless technology or USB interface. • Your phone exhausts the battery when connected to a PC, even when not communicating. Handset entries To use the Handset Manager function, see "Connecting 550SH to Your PC" on page 141 and set your phone to standby. Sync Manager - Sharp 550SH | User Guide - Page 144
when the phone is connected to the PC via Bluetooth wireless technology interface or USB data cable. • Data under copyright protection may not be sent successfully. Software Support For details on software support, refer to the following site: http://www.sharp-mobile.com Connecting 550SH to Your - Sharp 550SH | User Guide - Page 145
Troubleshooting Problem The phone does not turn on. PIN code or PIN2 code is rejected. The SIM card becomes locked. Solution • Make sure the battery is properly inserted and charged. • Make sure you have entered the correct code (4 to 8 digits). • Your SIM card/protected functions will become - Sharp 550SH | User Guide - Page 146
card or the SIM card is damaged. Contact your dealer or network service provider. • Check your call barring, fixed dialling setting, remaining battery and call forwarding settings. • Check if your phone is currently performing data communication using Bluetooth wireless technology interface or a USB - Sharp 550SH | User Guide - Page 147
following instructions. CONDITIONS OF USE Electromagnetic waves • Do not switch on your phone aboard an aircraft (as your phone may ANYTIME the phone is switched on. • Do not switch on your phone near gas or flammable substances. • Observe the rules concerning the use of mobile phones at gasoline - Sharp 550SH | User Guide - Page 148
only with batteries, chargers and accessories recommended by the manufacturer. The manufacturer disclaims any liability for damage caused by the use of other chargers, batteries or accessories. • Network configuration and phone usage will affect talk-time and standby time. Using the games or camera - Sharp 550SH | User Guide - Page 149
BATTERIES ACCORDING TO THE INSTRUCTIONS See "Battery Disposal" on page 12. Memory Card • Do not remove or insert a memory card while data on the card is being edited. Do not turn off the phone Keep it away from water and high temperatures. • SHARP holds no responsibility for the loss or damage of - Sharp 550SH | User Guide - Page 150
level than is necessary. • Use only the aerial supplied or one approved by Sharp for your mobile phone. Using unauthorised or modified aerials may damage the mobile phone. Moreover, since the mobile phone may violate the appropriate regulations, it may lose performance or exceed the limitation of - Sharp 550SH | User Guide - Page 151
phone with a PC or a peripheral unit, read the operation manual for the other unit carefully. • If the phone's battery has been removed for some time, or the phone such problem occurs, please check with your dealer or car manufacturer before connecting your phone. • Only allow qualified service - Sharp 550SH | User Guide - Page 152
known as the Specific Absorption Rate, or SAR. The SAR limit for mobile devices is 2 mobile devices offer a range of functions, they can be used in other positions, such as on the body as described in this user guide calls or using a 'hands-free' device to keep the mobile phone away from the head and - Sharp 550SH | User Guide - Page 153
your local retailer may also take back your old product free of charge if you purchase a similar new one. *) Please contact your local authority for further details. If your used electrical or electronic equipment has batteries or accumulators, please dispose of these separately beforehand according - Sharp 550SH | User Guide - Page 154
for business purposes and you want to discard it: Please contact your SHARP dealer who will inform you about the take-back of the product. age and health. The exposure standard for wireless mobile phones employs a unit of measurement known as the Specific Absorption Rate, or SAR. The SAR limit set - Sharp 550SH | User Guide - Page 155
on FCC ID APYHRO00047. Additional information on Specific Absorption Rates (SAR) can be found on the Cellular Telecommunications & Internet Association (CTIA) web-site at http://www.phonefacts.net. * In the United States and Canada, the SAR limit for mobile phones used by the public is 1.6 watts/kg - Sharp 550SH | User Guide - Page 156
Battery 11 Battery Level Indicator 14 C Calculator 99 Calendar 93 Call Costs 139 Call Log 138 Call Settings 126 Auto Redial 132 Call Waiting 132 Minute Minder 132 My Phone Games & Applications 84 Java™ Information 89 Setting Permission 85 Viewing Application Information 86 H Handset Code 120 Handset - Sharp 550SH | User Guide - Page 157
Messaging 51 Calling the Phone Number 56 156 Index Downloading 56 Email Settings 67 Forwarding 57 General Settings 64 Locking or Unlocking 57 MMS Settings 66 Organiser & Tools 98 Other Documents 78 P PC Connection 141 Phone Help 106 Phone Settings 108 Date & Time 116 Language Setting 118 Locks 118 - Sharp 550SH | User Guide - Page 158
108 SIM Application 107 SIM Card 11 Speed Dialling 22 Stopwatch 101 T Tasks 102 Text Templates 83 Themes 78 Troubleshooting 144 V Videos 77, 90 Vodafone live! 68 Navigating a WAP Page 69 Vodafone Messenger 59 Adding a New Contact 61 Client Settings 63 Messenger Settings 67 Starting a Conversation 60 - Sharp 550SH | User Guide - Page 159
Entertainment 2 Vodafone live! 3 Music 4 Camera Menu No./Sub Menu1 1 Games & Applications 2 Mobile TV 3 Streaming 4 Videos 1 Vodafone live! 2 Enter URL 3 Games 4 Videos 5 Applications 6 Themes 7 Text Templates 8 Other Documents 9 Memory Status * This menu is not available with some service - Sharp 550SH | User Guide - Page 160
Contact Details 6 Contact Groups 7 Synchronise 8 Settings 9 Manage Contacts 10 Service Dialling No.* 1 All Calls 2 Dialled Numbers 3 Missed Calls 4 Menu Menu No./Sub Menu1 10 SIM Application 11 Calendar 12 Settings (Tab 1: Phone Settings) 1 Profiles 2 Display 3 Sounds & Alerts 4 Date & Time 5 - Sharp 550SH | User Guide - Page 161
indications for the Postcard, Media Album and other services vary in the United Kingdom and Ireland and South Africa as follows: Current indications in the user guide "Postcard" "Additional Information" "Street & Number" "State/Province" "Postal Code" "Media Album" "To Media Album" Indications in
-
 1
1 -
 2
2 -
 3
3 -
 4
4 -
 5
5 -
 6
6 -
 7
7 -
8
-
9
-
10
-
11
-
12
-
13
-
14
-
15
-
16
-
17
-
18
-
19
-
20
-
21
-
22
-
23
-
24
-
25
-
26
-
27
-
28
-
29
-
30
-
31
-
32
-
33
-
34
-
35
-
36
-
37
-
38
-
39
-
40
-
41
-
42
-
43
-
44
-
45
-
46
-
47
-
48
-
49
-
50
-
51
-
52
-
53
-
54
-
55
-
56
-
57
-
58
-
59
-
60
-
61
-
62
-
63
-
64
-
65
-
66
-
67
-
68
-
69
-
70
-
71
-
72
-
73
-
74
-
75
-
76
-
77
-
78
-
79
-
80
-
81
-
82
-
83
-
84
-
85
-
86
-
87
-
88
-
89
-
90
-
91
-
92
-
93
-
94
-
95
-
96
-
97
-
98
-
99
-
100
-
101
-
102
-
103
-
104
-
105
-
106
-
107
-
108
-
109
-
110
-
111
-
112
-
113
-
114
-
115
-
116
-
117
-
118
-
119
-
120
-
121
-
122
-
123
-
124
-
125
-
126
-
127
-
128
-
129
-
130
-
131
-
132
-
133
-
134
-
135
-
136
-
137
-
138
-
139
-
140
-
141
-
142
-
143
-
144
-
145
-
146
-
147
-
148
-
149
-
150
-
151
-
152
-
153
-
154
-
155
-
156
-
157
-
158
-
159
-
160
-
161
 |
 |

Declaration of Conformity
Hereby, Sharp Telecommunications of Europe Limited,
declares that this 550SH is in compliance with the essential
requirements and other relevant provisions of Directive
1999/5/EC.
A copy of the original declaration of conformity can be
found at the following Internet address: