Sharp MX-M850 Maintenance Manual
Sharp MX-M850 Manual
 |
View all Sharp MX-M850 manuals
Add to My Manuals
Save this manual to your list of manuals |
Sharp MX-M850 manual content summary:
- Sharp MX-M850 | Maintenance Manual - Page 1
MODEL: MX-M850 MX-M950 MX-M1100 DIGITAL MULTIFUNCTIONAL SYSTEM Maintenance Guide REGULAR MAINTENANCE REPLACING SUPPLIES REMOVING MISFEEDS REMOVING STAPLE JAMS Keep this manual close at hand for reference whenever needed. - Sharp MX-M850 | Maintenance Manual - Page 2
This manual explains procedures for machine maintenance, such as how to replace supplies and remove paper misfeeds. Please note • Considerable care has been taken in preparing this manual. If you have any comments or concerns about the manual, please contact your dealer or nearest authorised service - Sharp MX-M850 | Maintenance Manual - Page 3
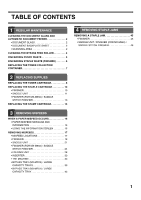
6 REPLACING THE TONER COLLECTION CONTAINER 7 4 REMOVING STAPLE JAMS REMOVING A STAPLE JAM 45 • FINISHER 45 • SADDLE UNIT / FINISHER (FOR MX-M850) / SADDLE STITCH FINISHER 46 2 REPLACING SUPPLIES REPLACING THE TONER CARTRIDGE 8 REPLACING THE STAPLE CARTRIDGE 10 • FINISHER 10 • SADDLE UNIT - Sharp MX-M850 | Maintenance Manual - Page 4
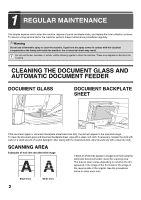
This chapter explains how to clean the machine, dispose of punch and staple waste, and replace the toner collection container. To ensure a long service life for the machine, perform these maintenance procedures regularly. Warning Do not use a flammable spray to clean the machine. If gas from - Sharp MX-M850 | Maintenance Manual - Page 5
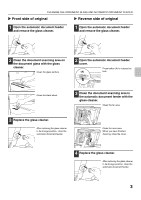
CLEANING THE DOCUMENT GLASS AND AUTOMATIC DOCUMENT FEEDER X Front side of original X Reverse side of original 1 Open the automatic document feeder and remove the glass cleaner. 1 Open the automatic document feeder and remove the glass cleaner. 2 Clean the document scanning area on the document - Sharp MX-M850 | Maintenance Manual - Page 6
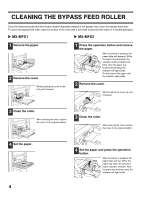
feed roller. To clean the bypass feed roller, wipe the surface of the roller with a soft cloth moistened with water or a neutral detergent. X MX-MFX1 X MX-MFX2 1 Remove the paper. 2 Remove the cover. While pushing the cover to the left, pull it forward. 1 Press the operation button and remove - Sharp MX-M850 | Maintenance Manual - Page 7
is collected in the punch waste box. Follow the steps below to discard the punch waste. X Finisher 1 Open the cover. X Finisher (for MX-M850) a plastic bag or other container, taking care not to let the waste scatter. Discard the punch waste in a plastic bag or other container, taking care not to - Sharp MX-M850 | Maintenance Manual - Page 8
(FINISHER) When the finisher is used for stapling, staple waste is produced. The staple waste is collected in the staple waste box. Follow the steps below to discard the staple waste. 1 Open the cover. 3 Replace the staple waste box. Make sure the staple waste box is replace correctly. 2 Pull - Sharp MX-M850 | Maintenance Manual - Page 9
reused. Using waste toner may degrade image quality and cause machine failure. • Place the removed toner collection container in a plastic bag and keep it until the next time your service technician comes to perform maintenance. Your service technician will collect the toner collection container. 7 - Sharp MX-M850 | Maintenance Manual - Page 10
how to replace the following supplies: • Toner cartridge • Staple cartridge (page 10) • Stamp cartridge (page 15) REPLACING THE TONER CARTRIDGE Be sure to replace the toner cartridge when the message "Change the toner cartridge." appears. The toner cartridge can be replaced while the machine is - Sharp MX-M850 | Maintenance Manual - Page 11
out. If the cartridge is pulled out abruptly, toner may spill. Keep the used toner cartridge in a plastic bag until your service technician comes to perform maintenance. Your service technician will collect the used cartridge. 3 Insert the new toner cartridge straight down. The ends of the cartridge - Sharp MX-M850 | Maintenance Manual - Page 12
numbers of the supplies, see "SUPPLIES" in the Safety Guide. FINISHER 1 Open the cover. 4 Install a new staple cartridge. Push the staple cartridge in until it clicks into place. 2 Grasp the green part of the staple case and pull the staple case out. Slowly pull out the unit until it stops - Sharp MX-M850 | Maintenance Manual - Page 13
cartridge before inserting the cartridge into the case. 7 Push the staple case firmly back in. Replace the cartridges in the front and back staple cases (two cartridges). 4 Release the staple case cover lock. While holding both sides of the staple case, pull up the upper unit. 8 Pull the seal that - Sharp MX-M850 | Maintenance Manual - Page 14
REPLACING THE STAPLE CARTRIDGE 9 Install the staple case. (1) Push the staple case in (2) until it clicks into place. (2) Grasp the green part and push in. (1) 10 Push in the unit. 11 Close the cover. 12 - Sharp MX-M850 | Maintenance Manual - Page 15
REPLACING THE STAPLE CARTRIDGE FINISHER (FOR MX-M850) / SADDLE STITCH FINISHER 1 Open the cover. 4 Release the staple case cover lock. While holding both sides of the staple case, pull up the upper unit. 2 Pull out the unit. Slowly pull out the unit until it stops. When staples remain, the lock - Sharp MX-M850 | Maintenance Manual - Page 16
REPLACING THE STAPLE CARTRIDGE 7 Push the staple case firmly back in. 10 Push in the staple unit. 8 Pull the seal that holds the staples straight out. 11 Close the cover. 9 Install the staple case. Staple section Push the staple case in until it clicks into place. Saddle stitch section (2) - Sharp MX-M850 | Maintenance Manual - Page 17
REPLACING THE STAMP CARTRIDGE When the stamp on scanned originals becomes faint, replace the stamp cartridge (AR-SV1). * When the stamp unit (AR-SU1) is installed on the automatic document feeder 1 Open the automatic document feeder. 5 Install the new stamp cartridge. 2 Remove the document - Sharp MX-M850 | Maintenance Manual - Page 18
(in this example, a misfeed in the automatic document feeder is indicated). In this event, touch the [Information] key in the touch panel. Instructions for removing the misfeed will appear. When the misfeed is cleared, the message will automatically clear. Information • While the message appears - Sharp MX-M850 | Maintenance Manual - Page 19
below. In this manual, procedures for removing misfeeds are explained by device. FINISHER (FOR MX-M850) / SADDLE STITCH FINISHER FOLDING UNIT ☞ page 28 BYPASS TRAY (MX-MFX2) / LARGE CAPACITY TRAYS ☞ page 39 • Do not damage or touch the transfer belt while removing misfed paper. • Be careful - Sharp MX-M850 | Maintenance Manual - Page 20
REMOVING MISFEEDS FINISHER When a mark below blinks, a misfeed has occurred at that location. Output trays Inside X Output trays 1 Remove the misfed paper. X Inside 1 Open the cover. 2 Remove the misfed paper. 2 Pull the R1 lever up in the direction of the arrow. 18 3 Remove the misfed paper. - Sharp MX-M850 | Maintenance Manual - Page 21
of the arrow. REMOVING MISFEEDS 9 Remove the misfed paper. 5 Remove the misfed paper. After removing the paper, return the R2 lever to its original position. 10 Move the R5 lever in the direction of the arrow. 6 Pull the R3 lever up in the direction of the arrow. 11 Remove the misfed - Sharp MX-M850 | Maintenance Manual - Page 22
REMOVING MISFEEDS 14 Move the R7 lever in the direction of the arrow. 15 Remove the misfed paper. After removing the paper, return the R7 lever to its original position. 16 Grasp the R8 lever and pull out the unit. Pull the unit out until it stops. 17 Remove the misfed paper. 18 Replace the unit and - Sharp MX-M850 | Maintenance Manual - Page 23
SADDLE UNIT When a mark below blinks, a misfeed has occurred at that location. REMOVING MISFEEDS Transport area Stapler section (page 22) X Transport area 1 Open the cover. 4 Pull the M2 lever up in the direction of the arrow. 2 Pull the M1 lever up in the direction of the arrow. 5 Remove the - Sharp MX-M850 | Maintenance Manual - Page 24
M3 lever up in the direction of the arrow. 3 Remove the misfed paper. After removing the paper, return the M4 lever to its original position. 10 Remove the misfed paper. When released, the M3 lever automatically returns to its original position. 11 Close all covers. 4 Move the M5 lever in the - Sharp MX-M850 | Maintenance Manual - Page 25
6 Turn the M8 knob in the direction of the arrow. REMOVING MISFEEDS 10 Remove the misfed paper. After removing the paper, return the M10 lever to its original position. Before performing step 7, be sure to turn the M8 - Sharp MX-M850 | Maintenance Manual - Page 26
REMOVING MISFEEDS FINISHER (FOR MX-M850) / SADDLE STITCH FINISHER When a mark blinks in the image below, a misfeed has occurred at that location. Output trays Inside X Output trays 1 Remove the misfed paper. X - Sharp MX-M850 | Maintenance Manual - Page 27
misfed paper. After removing the paper, return the R1 lever to its original position. 5 Pull the R4 lever up in the direction of the arrow. 10 Move the R5 lever in the direction of the arrow. 6 Remove the misfed paper. After removing the paper, return the R3/R4 levers to their - Sharp MX-M850 | Maintenance Manual - Page 28
R3 lever to its original position. If you are using the finisher (for the MX-M850), go to step 24. 20 Open the R11 lever in the direction of the arrow. If you are using the finisher (for the MX-M850), go to step 18. 17 Rotate the R9 knob in the direction of the - Sharp MX-M850 | Maintenance Manual - Page 29
22 Open the R12 lever in the direction of the arrow. 23 Remove the misfed paper. After removing the paper, return the R12 lever to its original position. 24 Return the unit to its original position and close the cover. REMOVING MISFEEDS 27 - Sharp MX-M850 | Maintenance Manual - Page 30
REMOVING MISFEEDS FOLDING UNIT When the mark blinks in the image below, a misfeed has occurred at that location. Transport area X Transport area 1 Open the cover. 4 Pull out the unit. Gently pull out the unit until it stops. 2 Pull the N1 lever up in the direction of the arrow. 3 Remove the - Sharp MX-M850 | Maintenance Manual - Page 31
6 Remove the misfed paper. After removing the paper, close the cover. REMOVING MISFEEDS 7 Grasp the N3 lever and open the cover in the direction of the arrow. 8 Remove the misfed paper. After removing the paper, close the cover. 9 Return the unit to its original position, push down the N1 lever, - Sharp MX-M850 | Maintenance Manual - Page 32
REMOVING MISFEEDS INSERTER When a mark below blinks, a misfeed has occurred at that location. Paper trays Transport area (page 31) X Paper trays 1 Open the cover. 4 Remove the misfed paper. 2 Remove the misfed paper. 3 Open the cover. 5 Open the covers. Open the front paper feeder cover and the - Sharp MX-M850 | Maintenance Manual - Page 33
1 Open the cover. 8 Turn the Q2 knob in the direction of the arrow. 9 Remove the misfed paper. 2 Press the Q3 button to open the paper guide in the direction of the arrow. When the Q3 button is pressed, the lock is released and the paper - Sharp MX-M850 | Maintenance Manual - Page 34
4 Press the Q4 button to lower the paper guide in the direction of the arrow. When the Q4 button is pressed, the lock is released and the paper guide automatically moves down. 5 Remove the misfed paper. After removing the paper, return all paper guides to their original positions. 6 Close the cover - Sharp MX-M850 | Maintenance Manual - Page 35
THE MACHINE When a mark below blinks, a misfeed has occurred at that location. REMOVING MISFEEDS Automatic document feeder Transport unit (page 34) Transport area (page 37) Trays 1 to 4 (page 38) X Automatic document feeder 1 Open the cover. 4 Turn the conveyor roller in the direction of the - Sharp MX-M850 | Maintenance Manual - Page 36
REMOVING MISFEEDS 7 Remove the misfed original. After removing the original, close the cover and then close the automatic document feeder. After removing the misfeed, open and close the automatic document feeder (or the document feeding area cover) to clear the misfeed display from the touch panel. - Sharp MX-M850 | Maintenance Manual - Page 37
unit. Keeping the lever horizontal, gently pull out the unit until it stops. When removing misfed paper, do not touch or damage the transfer belt. 7 Push the paper guide down in the direction of the arrow. After pulling the unit all the way out, make sure that the lever is points down slightly - Sharp MX-M850 | Maintenance Manual - Page 38
MISFEEDS 10 Remove the misfed paper. When released, the paper guide automatically returns to its original position. 14 Pull the paper guide up in the direction of the arrow. 11 While pressing on the lever, open the unit. 15 Remove the misfed paper. When released, the paper guide automatically - Sharp MX-M850 | Maintenance Manual - Page 39
original position. REMOVING MISFEEDS X Transport area 1 Open the cover. 20 Pull the paper guide up in the direction of the arrow. 2 Open the paper guide. While pressing on the green release button, open the paper guide in the direction of the arrow. 21 Remove the misfed paper. When released, the - Sharp MX-M850 | Maintenance Manual - Page 40
REMOVING MISFEEDS X Trays 1 to 4 Before pulling the tray out, be sure to verify that a misfeed has not occurred in the paper conveyor. If you pull the tray out without checking, you may tear misfed paper and make it more difficult to remove the pieces that remain in the machine. ☞ Transport area ( - Sharp MX-M850 | Maintenance Manual - Page 41
occurred at that location. Bypass tray (MX-MFX2) Large capacity trays (MX-LCX4) / Large capacity trays (MX-LCX5) (page 41) X Bypass tray (MX-MFX2) 1 Pull out the tray. Gently pull out the tray until it stops. X Large capacity trays (MX-LCX4) 1 Open the cover. 2 Remove the misfed paper. 2 - Sharp MX-M850 | Maintenance Manual - Page 42
its original position. 9 Push down the U6 lever in the direction of the arrow. 5 Push down the U3 lever in the direction of the arrow. 10 Turn the U7 knob in the direction of the arrow. 6 Turn the U4 knob in the direction of the arrow. 7 Turn the U5 knob in - Sharp MX-M850 | Maintenance Manual - Page 43
X Large capacity trays (MX-LCX5) 1 Open the cover. REMOVING MISFEEDS 5 Push down the U3 lever in the direction of the arrow. 2 Push down the U1 lever in the direction - Sharp MX-M850 | Maintenance Manual - Page 44
paper. When released, the U7 lever automatically returns to its original position. After removing the paper, return the U3 lever to its original position. 10 Remove the misfed paper. After removing the paper, return the U5 lever to its original position. 14 Close the cover. 11 Push down the U7 - Sharp MX-M850 | Maintenance Manual - Page 45
a mark below blinks, a misfeed has occurred at that location. Bypass tray (MX-MFX1) Large capacity tray (MX-LCX3N)/ Large capacity tray (MX-LCX6) (page 44) X Bypass tray (MX-MFX1) 1 Remove the misfed paper. X Large capacity tray (MX-LCX3N) 1 Open the cover. 2 Open the bypass tray. Push the lever - Sharp MX-M850 | Maintenance Manual - Page 46
tray. Push the lever on the top of the tray to the left to release the lock. 6 Close the bypass tray cover. X Large capacity tray (MX-LCX6) 1 Open the cover. 5 Remove the misfed paper. After removing the paper, close the tray. 6 Close the bypass tray cover. 2 Remove the misfed paper. After - Sharp MX-M850 | Maintenance Manual - Page 47
JAMS This chapter explains what to do when a staple jam occurs in the machine. To remove a staple jam, follow the steps below. REMOVING A STAPLE JAM FINISHER 1 Open the cover. 4 Grasp the green part of the staple case and pull the staple case out. 2 Pull out the unit. Slowly pull out the unit - Sharp MX-M850 | Maintenance Manual - Page 48
see "SADDLE UNIT" (page 11) or "FINISHER (FOR MX-M850) / SADDLE STITCH FINISHER" (page 13). 1 Lower the lever at the front end of the staple case and remove the jammed staple. Remove the leading staple if it is bent. If bent staples remain, a staple jam will occur again. 2 Return the lever to its - Sharp MX-M850 | Maintenance Manual - Page 49
MAINTENANCE HISTORY Date Description Notes - Sharp MX-M850 | Maintenance Manual - Page 50
MAINTENANCE HISTORY Date Description Notes - Sharp MX-M850 | Maintenance Manual - Page 51
MAINTENANCE HISTORY Date Description Notes - Sharp MX-M850 | Maintenance Manual - Page 52
MX-M850/MX-M950/MX-M1100 Maintenance Guide PRINTED IN FRANCE TINSE3773GHZZ
-
 1
1 -
 2
2 -
 3
3 -
 4
4 -
 5
5 -
 6
6 -
 7
7 -
8
-
9
-
10
-
11
-
12
-
13
-
14
-
15
-
16
-
17
-
18
-
19
-
20
-
21
-
22
-
23
-
24
-
25
-
26
-
27
-
28
-
29
-
30
-
31
-
32
-
33
-
34
-
35
-
36
-
37
-
38
-
39
-
40
-
41
-
42
-
43
-
44
-
45
-
46
-
47
-
48
-
49
-
50
-
51
-
52
 |
 |
REGULAR MAINTENANCE
REPLACING SUPPLIES
REMOVING MISFEEDS
REMOVING STAPLE JAMS
DIGITAL MULTIFUNCTIONAL SYSTEM
Keep this manual close at hand for reference
whenever needed.
Maintenance Guide
Maintenance Guide
MX-M850
MX-M950
MX-M1100
MODEL: