Singer 4220 Inspiration Instruction Manual - Page 23
Hilvanado, Puntada Recta
 |
View all Singer 4220 Inspiration manuals
Add to My Manuals
Save this manual to your list of manuals |
Page 23 highlights
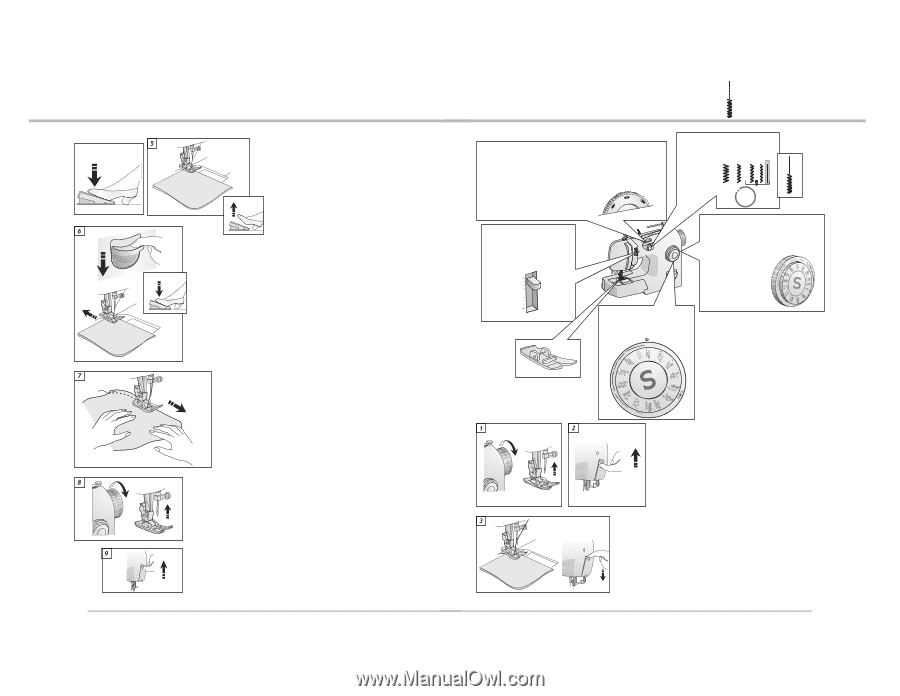
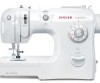
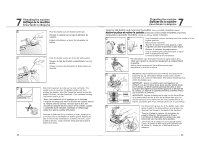
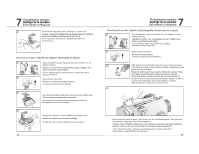
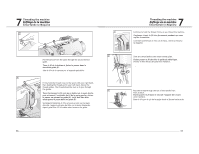
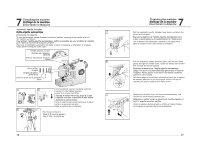
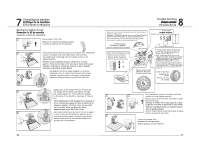
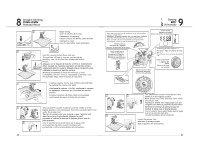
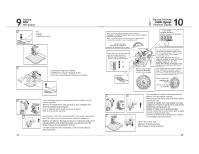
8 Straight Stitching Points droits Puntada Recta Begin sewing. Sew 5-6 stitches, then stop. Commencer la couture. Cousez cinq ou six points, puis arrêtez. Comience a coser. Cosa 5-6 puntadas, luego deténgase. Hold the reverse button down, and sew. The machine will sew in reverse, reinforcing the stitching. Sew 5-6 stitches then release the reverse button. Appuyez sur le bouton de marche arrière et maintenez-le ainsi. Cousez. La machine coud alors en marche arrière, renforçant ainsi la couture. Piquez cinq ou six points, puis relâchez le bouton de marche arrière. Mantenga presionado el botón de retroceso, y cosa. La maquina coserá en reversa, reforzando la puntada. Cosa 5-6 puntadas luego libere el botón de retroceso. Continue sewing. At the end, reinforce the stitching by pushing the reverse dial again. Continuez la couture. À la fin, renforcez la couture en appuyant à nouveau sur le bouton de marche arrière. Continúe cosiendo. Al final, refuerce la puntada presionando de nuevo el botón de retroceso. Turn handwheel counter clockwise until the needle is in the highest position, raise the presser foot lifter and slide fabric from under the presser foot. Tournez le volant vers vous jusqu'à ce que l'aiguille soit dans la position la plus haute. Relevez le pied presseur et retirez le tissu en le faisant glisser sous le pied presseur. Gire el volante hacia usted hasta que la aguja esté en la posición más alta, levante la palanca del prensatelas y retire la tela debajo del prensatelas. 42 9 Basting Bâtir Hilvanado Note: Any of the three needle positions can be selected when sewing a straight stitch. Remarque : n'importe laquelle des trois positions d'aiguille peut être sélectionnée pour la couture au point droit. Nota: Cualquiera de las tres posiciones de la aguja puede seleccionarse cuando se cose con puntada recta. Stitch width Largeur du point Selector de ancho de puntada Needle position Position de l'aiguille Selector de posición de la aguja For Basting set Stitch length to "5". Needle thread tension Push to Negative (-) Tension du fil d'aiguille: poussez vers le signe (-) Selector de tensión del hilo Presione a negativo(-) AUTO Pour bâtir, régler la longueur de point sur « 5 ». Para hilvanar ajuste el largo de puntada a "5". Stitch length Dial Longueur du point Selector de largo de puntada Pattern selector Dial Sélecteur de point Selector de puntadas 5 4 3 2 0 1 Turn handwheel counter clockwise until the needle is in the highest position. Raise presser foot lifter and slide fabric under the presser foot. Tournez le volant vers vous jusqu'à ce que l'aiguille soit dans la position la plus haute. Relevez le releveur du pied presseur et mettez le tissu sous le pied presseur. Gire el volante hacia usted hasta que la aguja esté en la posición más alta. Levante la palanca del prensatelas. Lower the presser foot. Abaissez le pied presseur. Baje la palanca del prensatelas. 43
-
 1
1 -
2
-
3
-
4
-
5
-
6
-
7
-
8
-
9
-
10
-
11
-
12
-
13
-
14
-
15
-
16
-
17
-
 18
18 -
 19
19 -
 20
20 -
 21
21 -
 22
22 -
 23
23 -
 24
24 -
 25
25 -
 26
26 -
 27
27 -
 28
28 -
29
-
30
-
31
-
32
-
33
-
34
-
35
-
36
-
37
-
38
-
39
-
40
 |
 |