Singer 7470 Confidence Instruction Manual - Page 28
Functions Of Control Panel - review
 |
View all Singer 7470 Confidence manuals
Add to My Manuals
Save this manual to your list of manuals |
Page 28 highlights
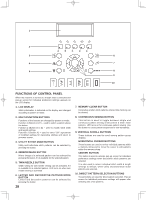
1 2 A B C D E 3 6 4 7 5 8 9 10 FUNCTIONS OF CONTROL PANEL When the machine is turned on, straight stitch is selected and pop-up screen for individual preference settings appears on the LCD display. 1. LCD DISPLAY Stitch information is indicated on the display and changed according to pattern or mode. 2. MULTI-FUNCTION BUTTONS Functions of the buttons are changed by pattern or mode. Function 1 (Button A to E) - used to select a pattern above the button. Function 2 (Button B to E) - used to modify stitch width and length settings. Function 3 (Button A) - used to enter "OK" agreement of modified settings for decorative stitches and return to previous screen. 3. UTILITY STITCH MODE BUTTON Utility and buttonhole stitch patterns can be selected by pressing the button. 4. MIRROR IMAGE BUTTON Mirror image of a selected pattern can be selected by pressing the button, if it is available for the selected pattern. 5. TWIN NEEDLE BUTTON Width setting for twin needle sewing can be activated, if it is available for a selected pattern. LED turns on when twin needle sewing is activated. 6. LETTER AND DECORATIVE PATTERN MODE BUTTON Letters and decorative patterns can be selected by pressing the button. 28 7. MEMORY CLEAR BUTTON Decorative & letter stitch patterns entered into memory can be cleared. 8. CONTINUOUS SEWING BUTTON This button is used to toggle between single and continuous pattern sewing of decorative & letter stitch patterns. LED turns on for continuous pattern sewing. Use this button to cause pattern sequences to sew repeatedly. 9. VERTICAL SCROLL BUTTONS These buttons are used to scroll among pattern group displays. HORIZONTAL CURSOR BUTTONS These buttons are used to review individual patterns within a memory string and to move the cursor to edit patterns within the memory string. CENTER BUTTON This button is used to activate pop-up screen for individual preference settings when decorative stitch patterns are selected. It is also used to return individual stitch width & length settings to default, when utility and buttonhole stitch patterns are selected. 10. DIRECT PATTERN SELECTION BUTTONS These buttons are used for direct pattern selection. Pop-up screen for individual preference settings will appear after selecting one of six patterns.
-
 1
1 -
2
-
3
-
4
-
5
-
6
-
7
-
8
-
9
-
10
-
11
-
12
-
13
-
14
-
15
-
16
-
17
-
18
-
19
-
20
-
21
-
22
-
 23
23 -
 24
24 -
 25
25 -
 26
26 -
 27
27 -
 28
28 -
 29
29 -
 30
30 -
 31
31 -
 32
32 -
 33
33 -
34
-
35
-
36
-
37
-
38
-
39
-
40
-
41
-
42
-
43
-
44
-
45
-
46
-
47
-
48
-
49
-
50
-
51
-
52
-
53
-
54
-
55
-
56
-
57
-
58
-
59
-
60
-
61
-
62
-
63
-
64
-
65
-
66
-
67
-
68
-
69
-
70
-
71
-
72
-
73
-
74
-
75
-
76
-
77
-
78
-
79
-
80
-
81
-
82
-
83
-
84
-
85
-
86
-
87
-
88
-
89
-
90
-
91
-
92
-
93
-
94
 |
 |
