Sony DCR DVD205 Operating Guide - Page 47
To record in dark places (NightShot plus), To adjust the exposure for backlit subjects (BACK LIGHT) - active interface shoe
 |
UPC - 027242691254
View all Sony DCR DVD205 manuals
Add to My Manuals
Save this manual to your list of manuals |
Page 47 highlights
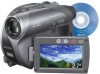
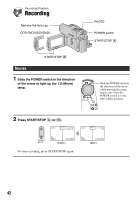
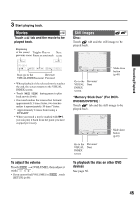
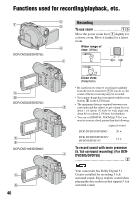
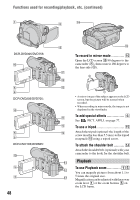
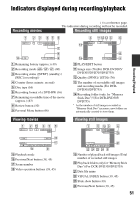
Recording/Playback When recording in 5.1ch surround sound, attach the supplied surround microphone to your camcorder. Without a surround microphone, your camcorder records in 2ch sound. • is displayed on the screen during 5.1ch recording/playback. 5.1ch sound is converted to 2ch when played back on your camcorder. Dolby Digital 5.1 Creator, 5.1ch surround sound Glossary (p.146) Recording with the supplied microphone Firmly attach the ECM-L100 surround microphone (supplied) to the Active Interface Shoe 2 on the camcorder in the direction of the arrow. When the microphone is correctly attached to your camcorder, appears on the screen. To detach the microphone, slide it in the opposite direction of the arrow in the illustration above. • Do not hold your camcorder by the microphone. This may cause a malfunction. • Because each supplied microphone is tuned at the factory with one camcorder, another microphone of the same model cannot record properly in 5.1ch surround sound with your camcorder. • If your supplied microphone is lost or damaged, contact your Sony dealer or local authorized Sony service facility. You must also leave your camcorder with us so that we can tune your new or repaired microphone. To record in dark places (NightShot plus 3 Set the NIGHTSHOT PLUS switch 3 to ON. ( and ["NIGHTSHOT PLUS"] appear.) • To record an image brighter, use Super NightShot plus function (p.73). To record an image brighter in dim light, use Color Slow Shutter function (p.73). • The NightShot plus and Super NightShot plus use infrared light. Therefore, do not cover the infrared port 4 with your fingers or other objects. • Remove the conversion lens (optional). • Adjust the focus manually ([FOCUS], p.72) when it is hard to focus automatically. • Do not use these functions in bright places. This may cause a malfunction. To adjust the exposure for backlit subjects (BACK LIGHT 7 To adjust the exposure for backlit subjects, press BACK LIGHT 7 to display .. To cancel the back light function, press BACK LIGHT again. To adjust the focus for an off center subject 6 See [SPOT FOCUS] on page 72. To fix the exposure for the selected subject 6 See [SPOT METER] on page 70. 47
-
 1
1 -
2
-
3
-
4
-
5
-
6
-
7
-
8
-
9
-
10
-
11
-
12
-
13
-
14
-
15
-
16
-
17
-
18
-
19
-
20
-
21
-
22
-
23
-
24
-
25
-
26
-
27
-
28
-
29
-
30
-
31
-
32
-
33
-
34
-
35
-
36
-
37
-
38
-
39
-
40
-
41
-
 42
42 -
 43
43 -
 44
44 -
 45
45 -
 46
46 -
 47
47 -
 48
48 -
 49
49 -
 50
50 -
 51
51 -
 52
52 -
53
-
54
-
55
-
56
-
57
-
58
-
59
-
60
-
61
-
62
-
63
-
64
-
65
-
66
-
67
-
68
-
69
-
70
-
71
-
72
-
73
-
74
-
75
-
76
-
77
-
78
-
79
-
80
-
81
-
82
-
83
-
84
-
85
-
86
-
87
-
88
-
89
-
90
-
91
-
92
-
93
-
94
-
95
-
96
-
97
-
98
-
99
-
100
-
101
-
102
-
103
-
104
-
105
-
106
-
107
-
108
-
109
-
110
-
111
-
112
-
113
-
114
-
115
-
116
-
117
-
118
-
119
-
120
-
121
-
122
-
123
-
124
-
125
-
126
-
127
-
128
-
129
-
130
-
131
-
132
-
133
-
134
-
135
-
136
-
137
-
138
-
139
-
140
-
141
-
142
-
143
-
144
-
145
-
146
-
147
-
148
-
149
-
150
-
151
-
152
-
153
-
154
-
155
-
156
 |
 |