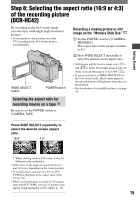
Sony DCR-HC42 Operating Guide - Page 18
Step 7: Inserting a tape or a “Memory Stick Duo”, Cassette tape, Memory Stick Duo - mini dv camcorder
 |
UPC - 027242669758
View all Sony DCR-HC42 manuals
Add to My Manuals
Save this manual to your list of manuals |
Page 18 highlights
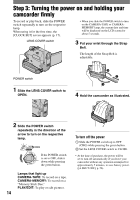
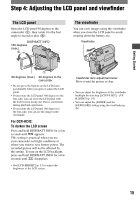
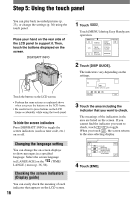
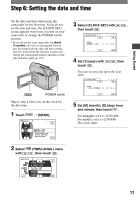
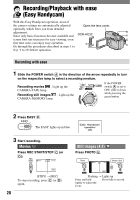
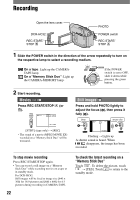
Step 7: Inserting a tape or a "Memory Stick Duo" Cassette tape when inserting a cassette tape. You can use mini DV cassettes only (p. 106). • The recordable time varies depending on [REC MODE] (p. 53). 1 Slide and hold the OPEN/EJECT lever in the direction of the arrow and open the lid. OPEN/EJECT lever Lid "Memory Stick Duo" You can use only a "Memory Stick Duo" marked with or (p. 107). • The number and time of recordable pictures varies depending on the image quality or the image size. For details, see page 45. Insert the "Memory Stick Duo" into the "Memory Stick Duo" slot in the right direction until it clicks. The cassette compartment automatically comes out and opens up. 2 Insert a cassette with its window facing up, then press . Access lamp Window-side Push the center of the back of the cassette lightly. The cassette compartment automatically slides back in. Do not force the cassette into the compartment. This may cause a malfunction. 3 Close the lid. To eject the cassette Proceed with the same steps as you would 18 With the mark in the left • If you force the "Memory Stick Duo" into the slot in the wrong direction, the "Memory Stick Duo," the "Memory Stick Duo" slot, or image data may be damaged. To eject a "Memory Stick Duo" Lightly push the "Memory Stick Duo" in once. • When the access lamp is lit or flashing, your camcorder is reading/writing data. Do not shake or knock your camcorder, turn the power off, eject the "Memory Stick Duo," or remove the battery pack. Otherwise, image data may be damaged.
-
 1
1 -
2
-
3
-
4
-
5
-
6
-
7
-
8
-
9
-
10
-
11
-
12
-
 13
13 -
 14
14 -
 15
15 -
 16
16 -
 17
17 -
 18
18 -
 19
19 -
 20
20 -
 21
21 -
 22
22 -
 23
23 -
24
-
25
-
26
-
27
-
28
-
29
-
30
-
31
-
32
-
33
-
34
-
35
-
36
-
37
-
38
-
39
-
40
-
41
-
42
-
43
-
44
-
45
-
46
-
47
-
48
-
49
-
50
-
51
-
52
-
53
-
54
-
55
-
56
-
57
-
58
-
59
-
60
-
61
-
62
-
63
-
64
-
65
-
66
-
67
-
68
-
69
-
70
-
71
-
72
-
73
-
74
-
75
-
76
-
77
-
78
-
79
-
80
-
81
-
82
-
83
-
84
-
85
-
86
-
87
-
88
-
89
-
90
-
91
-
92
-
93
-
94
-
95
-
96
-
97
-
98
-
99
-
100
-
101
-
102
-
103
-
104
-
105
-
106
-
107
-
108
-
109
-
110
-
111
-
112
-
113
-
114
-
115
-
116
-
117
-
118
-
119
-
120
-
121
-
122
-
123
 |
 |
