Sony DCR-HC42 Operating Guide - Page 64
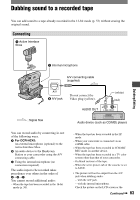
Recording sound, Dubbing sound to a recorded tape, continued
 |
UPC - 027242669758
View all Sony DCR-HC42 manuals
Add to My Manuals
Save this manual to your list of manuals |
Page 64 highlights
Dubbing sound to a recorded tape (continued) viewfinder. • For DCR-HC42: When you attach an external microphone (optional) to the Active Interface Shoe, you can check the picture and the sound by connecting your camcorder to a TV using the A/V connecting cable. However, sound you are recording afterwards is not output from your camcorder. Check the sound using a TV or other device. • Do not connect A/V connecting cables to both your camcorder and the Handycam Station at the same time. The sound may be distorted. Recording sound Insert a recorded cassette into your camcorder beforehand. 1 Slide the POWER switch down to turn on the PLAY/EDIT lamp. 2 Touch (Play/Pause) to play back the tape, then touch it again at the point where you want to start recording the sound. 3 Touch [MENU] (EDIT/PLAY) [AUD DUB CTRL] [AUDIO DUB]. appears 6 0 min AUD DUB CTRL 0:00:00:00 AUDIO DUB 4 Touch (play) and start playing back the audio you want to record at the same time. appears while recording the new sound in stereo 2 (ST2) during the playback of the tape. 5 Touch (stop) when you want to stop recording. To dub on other scenes, repeat step 2 to select scenes, then touch [AUDIO DUB]. 6 Touch . 64
-
 1
1 -
2
-
3
-
4
-
5
-
6
-
7
-
8
-
9
-
10
-
11
-
12
-
13
-
14
-
15
-
16
-
17
-
18
-
19
-
20
-
21
-
22
-
23
-
24
-
25
-
26
-
27
-
28
-
29
-
30
-
31
-
32
-
33
-
34
-
35
-
36
-
37
-
38
-
39
-
40
-
41
-
42
-
43
-
44
-
45
-
46
-
47
-
48
-
49
-
50
-
51
-
52
-
53
-
54
-
55
-
56
-
57
-
58
-
 59
59 -
 60
60 -
 61
61 -
 62
62 -
 63
63 -
 64
64 -
 65
65 -
 66
66 -
 67
67 -
 68
68 -
 69
69 -
70
-
71
-
72
-
73
-
74
-
75
-
76
-
77
-
78
-
79
-
80
-
81
-
82
-
83
-
84
-
85
-
86
-
87
-
88
-
89
-
90
-
91
-
92
-
93
-
94
-
95
-
96
-
97
-
98
-
99
-
100
-
101
-
102
-
103
-
104
-
105
-
106
-
107
-
108
-
109
-
110
-
111
-
112
-
113
-
114
-
115
-
116
-
117
-
118
-
119
-
120
-
121
-
122
-
123
 |
 |
