Sony DCR-HC42 Operating Guide - Page 80
Connecting an analog VCR to the computer via your camcorder (Signal convert function), PLAY/EDIT lamp. - video transfer
 |
UPC - 027242669758
View all Sony DCR-HC42 manuals
Add to My Manuals
Save this manual to your list of manuals |
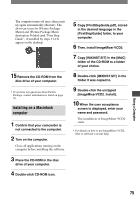
Page 80 highlights
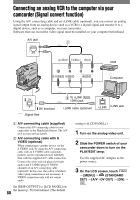
Connecting an analog VCR to the computer via your camcorder (Signal convert function) Using the A/V connecting cable and an i.LINK cable (optional), you can convert an analog signal output from an analog device such as a VCR to a digital signal and transfer it to a digital device, such as a computer, via your camcorder. Software that can record the video signal must be installed on your computer beforehand. A/V jack 1 (yellow) (white) (Red) VCR Computer DV Interface :Signal flow 2 To i.LINK (IEEE 1394) jack i.LINK cable (optional) i.LINK jack A/V connecting cable (supplied) Connect the A/V connecting cable to your camcorder or the Handycam Station. The A/V jack accepts analog signals. A/V connecting cable with S VIDEO (optional) When connecting to another device via the S VIDEO jack, by using the A/V connecting cable with an S VIDEO cable (optional), pictures can be reproduced more faithfully than with the supplied A/V cable connection. Connect the white and red plugs (left/right audio) and S VIDEO plug (S VIDEO channel) of an A/V connecting cable (optional). In this case, the yellow (standard video) plug connection is not necessary. S VIDEO connection only will not output audio. Set [DISP OUTPUT] to [LCD PANEL] on the menu (p. 56) beforehand. (The default 80 setting is [LCD PANEL].) 1 Turn on the analog video unit. 2 Slide the POWER switch of your camcorder down to turn on the PLAY/EDIT lamp. Use the supplied AC Adaptor as the power source. 3 On the LCD screen, touch [MENU] (STANDARD SET) [A/VDV OUT] [ON] .
-
 1
1 -
2
-
3
-
4
-
5
-
6
-
7
-
8
-
9
-
10
-
11
-
12
-
13
-
14
-
15
-
16
-
17
-
18
-
19
-
20
-
21
-
22
-
23
-
24
-
25
-
26
-
27
-
28
-
29
-
30
-
31
-
32
-
33
-
34
-
35
-
36
-
37
-
38
-
39
-
40
-
41
-
42
-
43
-
44
-
45
-
46
-
47
-
48
-
49
-
50
-
51
-
52
-
53
-
54
-
55
-
56
-
57
-
58
-
59
-
60
-
61
-
62
-
63
-
64
-
65
-
66
-
67
-
68
-
69
-
70
-
71
-
72
-
73
-
74
-
 75
75 -
 76
76 -
 77
77 -
 78
78 -
 79
79 -
 80
80 -
 81
81 -
 82
82 -
 83
83 -
 84
84 -
 85
85 -
86
-
87
-
88
-
89
-
90
-
91
-
92
-
93
-
94
-
95
-
96
-
97
-
98
-
99
-
100
-
101
-
102
-
103
-
104
-
105
-
106
-
107
-
108
-
109
-
110
-
111
-
112
-
113
-
114
-
115
-
116
-
117
-
118
-
119
-
120
-
121
-
122
-
123
 |
 |
