Sony DVO1000MD User Manual (Instructions For Use)
Sony DVO1000MD Manual
 |
View all Sony DVO1000MD manuals
Add to My Manuals
Save this manual to your list of manuals |
Sony DVO1000MD manual content summary:
- Sony DVO1000MD | User Manual (Instructions For Use) - Page 1
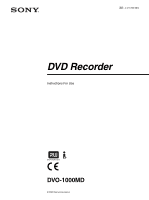
4-121-398-14(1) DVD Recorder Instructions For Use DVO-1000MD © 2005 Sony Corporation - Sony DVO1000MD | User Manual (Instructions For Use) - Page 2
address. This symbol is intended to alert the user to the presence of important operating and maintenance (servicing) instructions in the literature accompanying the appliance. Refer to the operating instructions Follow the directions in the operating instructions for parts of the unit on which this - Sony DVO1000MD | User Manual (Instructions For Use) - Page 3
or signal output part configures a medical system, and is therefore, responsible standard IEC60601-1-1. If in doubt, consult the qualified service personnel. This unit can not be used in not installed and used in accordance with the instruction manual, it may cause interference to other equipment. - Sony DVO1000MD | User Manual (Instructions For Use) - Page 4
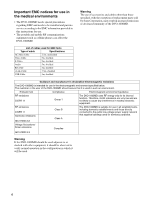
Important EMC notices for use in the medical environments • The DVO-1000MD needs special precautions regarding EMC and needs to be installed and put into service according to the EMC information provided in this instructions for use. • The portable and mobile RF communications equipment such as - Sony DVO1000MD | User Manual (Instructions For Use) - Page 5
. Mains power quality should be that of a typical commercial or hospital environment. If the user of the DVO-1000MD requires continued operation during power mains interruptions, it is recommended that the DVO-1000MD be powered from an uninterruptible power supply or a battery. 70% UT (30% dip in - Sony DVO1000MD | User Manual (Instructions For Use) - Page 6
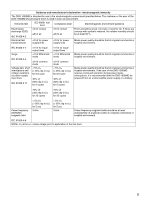
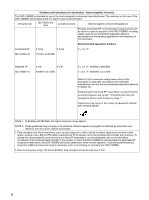
the electromagnetic environment specified below. The customer or the user of the DVO-1000MD should assure that it is used in such as in which the DVO-1000MD is used exceeds the applicable RF compliance level above, the DVO-1000MD should be observed to verify normal operation. If abnormal performance - Sony DVO1000MD | User Manual (Instructions For Use) - Page 7
The customer or the user of the DVO-1000MD can help prevent electromagnetic must be secured in consideration of the ventilation and service operation. • Do not block the ventilation slots at the may result in hazardous radiation exposure. This DVD RECORDER is classified as a CLASS 1 LASER PRODUCT - Sony DVO1000MD | User Manual (Instructions For Use) - Page 8
instructions , the user is encouraged manual could void your authority to operate SONY Model: DVO-1000MD Responsible Party: Sony Electronics Inc. Address: 16530 Via Esprillo, San Diego, CA 92127 U.S.A. Telephone Number: 858-942-2230 This device complies with part 15 of the FCC Rules. Operation - Sony DVO1000MD | User Manual (Instructions For Use) - Page 9
for Recording 29 Selecting Input Signals 29 Selecting the Recording Mode 30 Recording 31 Recording Titles 31 Marking Indexes During Recording 32 List 51 Basic Menu Operations 55 Miscellaneous Messages 58 Error Messages 58 Alarm Messages 58 Troubleshooting 62 Specifications 63 General - Sony DVO1000MD | User Manual (Instructions For Use) - Page 10
to a warm place, or use it in a damp location, condensation may form on the optical pickup. Then, if the unit is operated in this state, the unit does not record or play correctly. When the power is turned on, the following message appears, wait until it disappears before loading a disc. On the - Sony DVO1000MD | User Manual (Instructions For Use) - Page 11
the unit is operated, the shorter the life expectancy. Regarding part replacement, consult your Sony dealer or a Sony service representative. On Problems may occur if you perform the following operations: • When you use a disc recorded or edited using the unit with another DVD recorder or the DVD - Sony DVO1000MD | User Manual (Instructions For Use) - Page 12
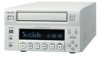
DVO-1000MD compresses video signals sent from the external equipment with an MPEG-2 format and audio signals with Dolby Digital format (2CH), and records video and audio signals on a DVD trademarks of Sony Corporation and medical instruments which are designed for use in limited spaces. 12 Features - Sony DVO1000MD | User Manual (Instructions For Use) - Page 13
control unit (not supplied) to this connector for remote control. 5 REMOTE 2 connector (mini jack) Connect a foot switch (not supplied) to this connector. You can control recording and pausing using this foot switch. 13 Location and Function of Parts - Sony DVO1000MD | User Manual (Instructions For Use) - Page 14
disc is selected, "REMAIN" is lit. I Main display section During menu operation or list operation, the selected item is displayed. If an abnormal operation occurs, an error code or alarm message is displayed. In this manual, menu operation is explained using the monitor display. On the main display - Sony DVO1000MD | User Manual (Instructions For Use) - Page 15
button again or pressing the BPLAY button allows you to restart the playback operation. During recording, press this button to pause the recording operation. Pressing this button again allows you to restart the recording operation. F zREC button When you press this button, this button lights and - Sony DVO1000MD | User Manual (Instructions For Use) - Page 16
input analog audio signals. 9 REMOTE IN RS-232C connector (9-pin) This is a 9-pin RS-232C interface which is compatible with the SVO-9500MD video cassette recorder protocol. 16 Location and Function of Parts - Sony DVO1000MD | User Manual (Instructions For Use) - Page 17
is USB 2.0 which supports Full- speed USB (12Mbps). qs Equipotential ground terminal connector This connector is used to connect to the equipotential plug to bring the various parts of the system to the same potential. See "Important safeguards/notices for use in the medical environments" on page - Sony DVO1000MD | User Manual (Instructions For Use) - Page 18
selection Select the input signal "ANALOG" using the INPUT SELECT sub menu of SETUP MENU (see page 29). • Foot switch mode selection Select the operation mode of the foot switch from among LOW EDGE (factory setting), HIGH EDGE and LOW ACTIVE (see page 33). 1 S-video cable (not supplied) 2 Audio - Sony DVO1000MD | User Manual (Instructions For Use) - Page 19
equipment Settings required for using this connection example Make the following settings before operating in this connection example using SETUP MENU. For detailed information on menu operation, see "Basic Menu Operations" on page 55. • Audio output selection Select the audio output channel using - Sony DVO1000MD | User Manual (Instructions For Use) - Page 20
loading..." When the message changes finally to "NO DISC!," you can start the next operation. When a disc is loaded in the unit, "0101 0:00:00" is displayed NO DISC!." To turn the unit on or set it to standby mode during normal operations Turn the unit on or set it to standby mode using the 1 (on/ - Sony DVO1000MD | User Manual (Instructions For Use) - Page 21
ENHANCED MENU of the SETUP MENU allows you to select either the NTSC or PAL video signal system. For detailed information on menu operations, see "Basic Menu Operations" (page 55). Note At the factory setting, the NTSC video signal is selected as the default. Even if your monitor does not correspond - Sony DVO1000MD | User Manual (Instructions For Use) - Page 22
added under the last item of the basic setup menu. Overview 4 Select "MENU GRADE" from the SETUP MENU display. Each time you press the v or V button . TV SYSTEM NTSC PAL Content To record or play back with the NTSC video signal system. (Factory setting) To record or play back with the PAL video - Sony DVO1000MD | User Manual (Instructions For Use) - Page 23
Overview The message "NOW SAVING...." appears and the unit starts to save the setting. When saving is completed, the message disappears. Then, "TV SYSTEM WAS CHANGED PLEASE POWER OFF." appears on the monitor display, and "POWER OFF!" appears on the front panel display. Note The TV system is not - Sony DVO1000MD | User Manual (Instructions For Use) - Page 24
/year) Highlighted display (digit to be changed) you press the B button, the rightmost digit of the date column is highlighted. Front panel display during menu operation The date column appears when you set the date in the date column on the DATE/TIME PRESET sub menu. And the time column appears - Sony DVO1000MD | User Manual (Instructions For Use) - Page 25
Overview Selecting the Remote Interface The REMOTE I/F sub menu of the SETUP MENU allows you to select the interface to be used to control the unit remotely. The factory setting is RS-232C. 71 The SETUP MENU appears. 4 Select "REMOTE I/F" by pressing the v button. 1 Press the MENU button. The - Sony DVO1000MD | User Manual (Instructions For Use) - Page 26
Overview a) This protocol is compatible with the SVO9500MD video cassette recorder protocol. b) This setting is not related to the setting for the input signal. c) This protocol is equivalent to the RS-232C protocol. 7 Press the SET - Sony DVO1000MD | User Manual (Instructions For Use) - Page 27
for both data and video. Formatting discs An unused disc requires no formatting operation. The disc is automatically formatted when loaded into the unit. When you use a disc formatted by a computer or recorded by using other DVD equipment, format the disc using the FORMAT sub menu of DISC INFO. Note - Sony DVO1000MD | User Manual (Instructions For Use) - Page 28
load another disc, press the OPEN/CLOSE button to close the disc tray. Recording With the recording/playback surface facing down 4 Press the OPEN/CLOSE button. Or push the cannot be used with the unit The message "Not Supported!" appears. In such a case, unload the disc and insert a disc that - Sony DVO1000MD | User Manual (Instructions For Use) - Page 29
Selecting Input Signals The INPUT SELECT sub menu of SETUP MENU allows you to select the input signal to be recorded. 61 The SETUP MENU appears. 3 Select "INPUT SELECT" by pressing the V or v button. 2,3,5 2,4 1 Press the MENU button. The TOP menu appears. 4 Press the b button. The - Sony DVO1000MD | User Manual (Instructions For Use) - Page 30
v button and press the b button with "SETUP MENU" highlighted. The SETUP MENU appears. 51 1 Press the MENU button. The TOP menu appears. 2,4 3 30 Preparations for Recording 3 Confirm that the REC MODE is highlighted and press the b button. The REC MODE sub menu appears. 4 Select the desired - Sony DVO1000MD | User Manual (Instructions For Use) - Page 31
whether or not the unit records correctly. Recording Titles 13 2,4 65 1 Press the 1 (on/standby) switch to turn the power on. The message "Welcome" appears on the front panel. When the message changes to "Now loading...," and then to "NO DISC!," go to the next operation. Note If the power is - Sony DVO1000MD | User Manual (Instructions For Use) - Page 32
the KEY INHIBIT item to "OFF." However, when the unit is in menu operation status, you can use the B, b, V, v, and SET buttons. Marking Indexes During Recording You can mark indexes at desired points during recording. This allows you to search for the desired points instantly during playback, and - Sony DVO1000MD | User Manual (Instructions For Use) - Page 33
page 54) of the ENHANCED MENU is set to "OFF." • Once you press the XPAUSE button to pause the recording operation, data is not recorded until you press the XPAUSE button again to restart recording. To use the SVRM-100A remote control unit Press the MARK button on the SVRM-100A remote control unit - Sony DVO1000MD | User Manual (Instructions For Use) - Page 34
of the remote control unit. Thus, you can record additional information for a title. To use the keyboard of an RS-232C remote control device for editing/adding title name and information You should carry out the following operation and menu settings: • Connect the remote control device to the - Sony DVO1000MD | User Manual (Instructions For Use) - Page 35
V or v button. 5 Select the desired mode by pressing the V or v button. Mode OFF ON Setting To record the video signal promptly after you start recording. (Factory setting) To start recording using the last 5 seconds of video data saved previously. 6 Press the SET button. The message "NOW SAVING - Sony DVO1000MD | User Manual (Instructions For Use) - Page 36
to the beginning of the disc. To return to the beginning of the last title, and end recording automatically. However, the disc is not ejected, and the disc remains in the tray. To stop recording and eject the disc automatically. (Factory setting) 6 Press the SET button. The message "NOW SAVING - Sony DVO1000MD | User Manual (Instructions For Use) - Page 37
unit must be finalized to play it on other equipment compatible with DVD+RW equipment. Proceed as follows to finalize the disc. Even if the disc is finalized, you can use that disc for recording again or you can edit data recorded on the disc. 1 Load the disc to be finalized into the - Sony DVO1000MD | User Manual (Instructions For Use) - Page 38
You can erase all the data recorded on the DVD+RW disc and format that disc so as to be able to use it with the unit. Note When a recorded disc is formatted, all the data, such as title names is erased. You cannot resume it to the status before formatted. 1 Load the - Sony DVO1000MD | User Manual (Instructions For Use) - Page 39
Playback Playback Playback Usable Discs You can use the 4 x DVD+RW discs. Note The recorded discs may not be able to be played back due to scratch on the disc, dust accumulated on the disc, conditions recorded or recording equipment. Playback a Disc 13 2,4 5 xSTOP button 1 Press the 1 (on/ - Sony DVO1000MD | User Manual (Instructions For Use) - Page 40
unit jumps to the start point of the previous chapter. Example Playback direction A B C D Chapter 1 Chapter 2 Chapter 3 Chapter 4 a) PREV NEXT P a) The last chapter recorded on a disc When you press the .PREV/UP button or the >NEXT/DOWN button at the current position (point P), the unit - Sony DVO1000MD | User Manual (Instructions For Use) - Page 41
of the last chapter. Thus, in this case, the unit jumps to point D. Repeat Playback You can conduct the following repeat playback operations using the menu. • Repeat playback between two points (A-B repeat) • Repeat playback of the chapter currently being played • Repeat playback of the title - Sony DVO1000MD | User Manual (Instructions For Use) - Page 42
The following two methods are available to stop repeat playback between two points. • Using the B, b, .PREV/UP, or >NEXT/ DOWN button • Using a menu operation To stop repeat playback using the B, b, .PREV/UP, or >NEXT/DOWN button Jump to a title or a chapter located outside of the section specified - Sony DVO1000MD | User Manual (Instructions For Use) - Page 43
A and B starts. When either point A or B has not yet been set The error message "NO AB POINT!" appears on the front panel display and "NO A.B POINT. current chapter starts. To stop repeat playback of the chapter Perform the operation descried in "Stopping repeat playback between points A and B" on - Sony DVO1000MD | User Manual (Instructions For Use) - Page 44
the title that you want to repeat comes up. Repeat playback of the current title starts. To stop repeat playback of the title Perform the operation descried in "Stopping repeat playback between points A and B" on page 42. When there are plural pages There are two methods how to move to another - Sony DVO1000MD | User Manual (Instructions For Use) - Page 45
Playback The following display appears. 5 Select the chapter that you want to play, by pressing the V or v button, and then press the SET button. Playback of the selected chapter starts. Displaying the next page When there are plural pages of title list displayed in step 3 and chapter list - Sony DVO1000MD | User Manual (Instructions For Use) - Page 46
titles recorded on a disc (display only). FIRST: Oldest recording date among titles recorded in one disc. LATEST: Latest recording date among titles recorded information on RS-232C remote control devices, see "To use the keyboard of an RS232C remote control device for editing/adding title name and - Sony DVO1000MD | User Manual (Instructions For Use) - Page 47
Editing Editing Editing Titles The TITLE LIST menu allows you to carry out the following editing tasks on titles. • Verifying information about titles and editing titles You can verify information about titles and edit titles as required. For details, see "Verifying/Editing Information About the - Sony DVO1000MD | User Manual (Instructions For Use) - Page 48
title selected in step 3 is displayed. When "TITLE NAME" is selected: Title name currently displayed Title name automatically recorded on the disc When "TITLE INFO" is selected: Title name keyboard of an RS-232C remote control device for editing/adding title name and information" on page 34. When - Sony DVO1000MD | User Manual (Instructions For Use) - Page 49
. (factory setting) 7 Press the SET button. Erasing a Title Proceed as follows. 1 Load the disc on which titles that you want to erase are recorded. 2 Press the LIST button. The TITLE LIST display appears. The list of titles is displayed. Editing 5 Press the b button. The setting display appears - Sony DVO1000MD | User Manual (Instructions For Use) - Page 50
. 8 Press the SET button. The message "ERASING THIS TITLE. PLEASE WAIT" appears highlighted, and the unit starts erasing the title selected. Note The unit can record up to 49 titles on one disc. When the last title is erased, the capacity of the disc is increased by the size of that - Sony DVO1000MD | User Manual (Instructions For Use) - Page 51
front panel display during menu operation This manual uses the monitor display for explaining the menu operation. The items currently highlighted on recorded on a disc (display only) FIRST: Oldest recording date among titles recorded in one disc. LATEST: Latest recording date among titles recorded - Sony DVO1000MD | User Manual (Instructions For Use) - Page 52
not use the keyboard. Item Function Setting BAUDRATE To select a 9600 /[19200]/38400/57600/ communication 115200 speed (baud rate) when controlling the unit by equipment connected to the RS-232C connector FOOT SW To select the [LOW EDGE]: Starts operation to be recording, or pauses - Sony DVO1000MD | User Manual (Instructions For Use) - Page 53
To select the operation when the disc becomes full during recording GOTO TOP: Returns recording and the disc is automatically ejected. To select the region code for playbackb) [1]: Plays a disc recorded in North America. (This region code menu. 1 Select "MENU GRADE" on the SETUP MENU by pressing the - Sony DVO1000MD | User Manual (Instructions For Use) - Page 54
the PRE REC recording sub menu (see page 53) of the operation SETUP MENU is again after compulsorily set to "OFF," recording was when Sony SVO-9500MD video cassette recorder. received DVD To select the WRITEMODE method in which data is written to the DVD. [NORMAL]: Data is recorded - Sony DVO1000MD | User Manual (Instructions For Use) - Page 55
b) The following screen is displayed. Basic Menu Operations This section describes the basic menu operations which are common to each display. This manual describes some menu operations elsewhere. Read those sections too. 61 3,5 2,4 1 Press the MENU button. The TOP menu appears. The item selected - Sony DVO1000MD | User Manual (Instructions For Use) - Page 56
and selected. Example: "ANALOG" is selected as the input signal on the following screen. Menu 56 Basic Menu Operations To continue the settings, go to step 5. To end the menu operation, go to step 6. 5 Access the desired sub menu by pressing the B, b, V or v buttons, and repeat step 4. When you - Sony DVO1000MD | User Manual (Instructions For Use) - Page 57
settings made. When saving is completed, the message disappears, and the unit returns to the normal display. When the following screen appears during a menu operation When you highlight "ESC" and press the SET button: The unit returns to the menu display one level higher than the current one without - Sony DVO1000MD | User Manual (Instructions For Use) - Page 58
of the front panel display. When the error code is displayed, contact your nearest Sony service facilities. Monitor screen Error indication Main display section of the front panel display Error code Error message Error code Alarm Messages When operating the unit, the unit may sometimes output - Sony DVO1000MD | User Manual (Instructions For Use) - Page 59
instructions on the screen. Memo If the RECOVERY screen appears, we recommend selecting USE NEW DISC (perform recovery to a new disc). This can help you avoid being unable to play titles that were recorded before the error occurred. Message Monitor screen LOW BATTERY. PLEASE CONTACT SERVICE Sony - Sony DVO1000MD | User Manual (Instructions For Use) - Page 60
99 INDEXES. MAKE A NEW TITLE. NO A.B POINT. SET THE A & B POINT. THIS TITLE IS PROTECTED. CANNOT RECORD THIS SIGNAL. NO AB POINT! Protected! Can't REC! PLAYBACK PROHIBITED BY REGION REGION CODE! CODE. KEY INHIBIT MODE IS SELECTED. SET KEY INHIBIT MODE TO OFF. KEY INHIBIT! Cause and remedies You - Sony DVO1000MD | User Manual (Instructions For Use) - Page 61
. NO DISC! PAL DISC! DISC CANNOT BE PLAYED BACK. USE DISC WITH PAL RECORDING. NTSC DISC! NOT SUPPORTED DISC. USE DVD+RW DISC. LOADING TIME OVER. DISC ERROR. RECOVERING THE DISC. PLEASE WAIT. CANNOT RECOVER. CHANGE THE DISC. FINALIZING THE DISC. PLEASE WAIT. CANNOT FINALIZE THIS DISC. CHECK - Sony DVO1000MD | User Manual (Instructions For Use) - Page 62
Troubleshooting If the unit appears to be malfunctioning, please check the following before contacting your Sony dealer. Symptom than the one recorded with the DVD+RW format. • A disc with a region code different from that of the unit has been loaded. tPlay a disc with a region code that is the - Sony DVO1000MD | User Manual (Instructions For Use) - Page 63
Specifications General Recording /playback format DVD +VR format Video: MPEG-2 @ML(CBR, VBR) Audio: Dolby digital 2 CH Signal format system NTSC/PAL (switchable using the menu) Power requirements 100 to 240 V AC, 50/60 Hz Input current 0.56 A to 0.28 A Operating temperature 5 °C to 40 °C - Sony DVO1000MD | User Manual (Instructions For Use) - Page 64
DVD InfoEditor Editing Software (1) Before Using This Unit (1) CD-ROM (1) Warranty booklet (1) Accessories not supplied SVRM-100A Remote Control Unit Medical Mode of operation: Continuous Recommended disc Sony recommends Sony-branded DVD+RW recording media for use with your DVO-1000MD. Design and - Sony DVO1000MD | User Manual (Instructions For Use) - Page 65
Location and Function of Parts This section describes the functions used for operating the unit. The buttons on the SVRM-100A corresponding to ones on , it pauses playback. When the unit receives this command during recording, it pauses recording. 8 F FWD button Has the same function as the >NEXT - Sony DVO1000MD | User Manual (Instructions For Use) - Page 66
,B and b buttons of the unit and the SVRM-100. Cuing a Particular Image by Specifying an Index Number - Index Search 1 Load a disc on which indexes are recorded. 2 Set the unit in stop or playback mode. 3 Press the INDEX button on the remote control unit twice. The unit enters in the index search - Sony DVO1000MD | User Manual (Instructions For Use) - Page 67
only when the region codes of both the player and the recorder are the same. Title The largest unit of images or music recorded on a DVD. Normally, for image software, one film is one title, and for music software, one album (or a piece of music) is one title. With the DVO-1000MD, one title is the - Sony DVO1000MD | User Manual (Instructions For Use) - Page 68
39 marking 65 marking during recording 32 Input signal setting 29 L Locations and function of parts front panel 13 rear panel 16 M Menu basic operation 55 configuration 51 DISC verifying/editing title information 47 Troubleshooting 62 V Video signal system setting 21 Miscellaneous 68 Index - Sony DVO1000MD | User Manual (Instructions For Use) - Page 69
Sony Corporation
-
 1
1 -
 2
2 -
 3
3 -
 4
4 -
 5
5 -
 6
6 -
 7
7 -
8
-
9
-
10
-
11
-
12
-
13
-
14
-
15
-
16
-
17
-
18
-
19
-
20
-
21
-
22
-
23
-
24
-
25
-
26
-
27
-
28
-
29
-
30
-
31
-
32
-
33
-
34
-
35
-
36
-
37
-
38
-
39
-
40
-
41
-
42
-
43
-
44
-
45
-
46
-
47
-
48
-
49
-
50
-
51
-
52
-
53
-
54
-
55
-
56
-
57
-
58
-
59
-
60
-
61
-
62
-
63
-
64
-
65
-
66
-
67
-
68
-
69
 |
 |
4-121-398
-14
(1)
DVD Recorder
© 2005 Sony Corporation
DVO-1000MD
Instructions For Use