Sony ICD-R100PC ICD-PCLink Software Instructions - Page 10
Installing the ICD-PCLINK Software continued, Click [Next].
 |
View all Sony ICD-R100PC manuals
Add to My Manuals
Save this manual to your list of manuals |
Page 10 highlights
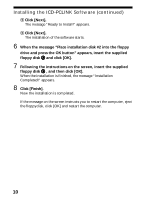
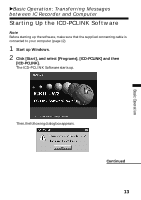
Installing the ICD-PCLINK Software (continued) 5 Click [Next]. The message "Ready to Install!" appears. 6 Click [Next]. The installation of the software starts. 6 When the message "Place installation disk #2 into the floppy drive and press the OK button" appears, insert the supplied floppy disk 2 and click [OK]. 7 Following the instructions on the screen, insert the supplied floppy disk 3 , and then click [OK]. When the installation is finished, the message "Installation Completed!" appears. 8 Click [Finish]. Now the installation is completed. If the message on the screen instructs you to restart the computer, eject the floppydisk, click [OK] and restart the computer. 10
-
 1
1 -
2
-
3
-
4
-
 5
5 -
 6
6 -
 7
7 -
 8
8 -
 9
9 -
 10
10 -
 11
11 -
 12
12 -
 13
13 -
 14
14 -
 15
15 -
16
-
17
-
18
-
19
-
20
-
21
-
22
-
23
-
24
-
25
-
26
-
27
-
28
-
29
-
30
-
31
-
32
-
33
-
34
-
35
-
36
-
37
-
38
-
39
-
40
-
41
-
42
-
43
-
44
-
45
-
46
-
47
-
48
-
49
-
50
-
51
-
52
-
53
-
54
-
55
-
56
-
57
-
58
-
59
-
60
 |
 |

10
5
Click [Next].
The message “Ready to Install!” appears.
6
Click [Next].
The installation of the software starts.
6
When the message “Place installation disk #2 into the floppy
drive and press the OK button” appears, insert the supplied
floppy disk
2
and click [OK].
7
Following the instructions on the screen, insert the supplied
floppy disk
3
, and then click [OK].
When the installation is finished, the message “Installation
Completed!” appears.
8
Click [Finish].
Now the installation is completed.
If the message on the screen instructs you to restart the computer, eject
the floppydisk, click [OK] and restart the computer.
Installing the ICD-PCLINK Software (continued)