Sony ICD-R100PC ICD-PCLink Software Instructions - Page 35
When the dialog box shown in If you did not specify the, position above appears
 |
View all Sony ICD-R100PC manuals
Add to My Manuals
Save this manual to your list of manuals |
Page 35 highlights
Basic Operation 1 If you did not specify the position (if you dropped somewhere in the "IC RECORDER" Area) The following dialog box will appear. Select the Message File (A or B) to which you wish to transfer the messages and click [OK]. The messages in the transferred folder will be added at the end of the selected Message File. To transfer the messages using the [ICD
-
 1
1 -
2
-
3
-
4
-
5
-
6
-
7
-
8
-
9
-
10
-
11
-
12
-
13
-
14
-
15
-
16
-
17
-
18
-
19
-
20
-
21
-
22
-
23
-
24
-
25
-
26
-
27
-
28
-
29
-
 30
30 -
 31
31 -
 32
32 -
 33
33 -
 34
34 -
 35
35 -
 36
36 -
 37
37 -
 38
38 -
 39
39 -
 40
40 -
41
-
42
-
43
-
44
-
45
-
46
-
47
-
48
-
49
-
50
-
51
-
52
-
53
-
54
-
55
-
56
-
57
-
58
-
59
-
60
 |
 |

35
Basic Operation
1
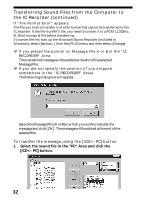
If you did not specify the position (if you dropped
somewhere in the “IC RECORDER” Area)
The following dialog box will appear.
Select the Message File (A or B) to which you wish to transfer the
messages and click [OK].
The messages in the transferred folder will be
added at the end of the selected Message File.
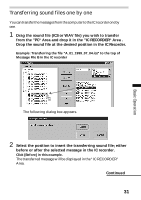
To transfer the messages using the [ICD<– PC] button
1
Select the folder in the ”PC“ Area and click the [ICD<– PC]
button.
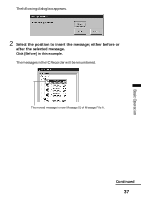
2
When the dialog box shown in ”If you did not specify the
position” above appears, select the Message File (A or B) to
which you wish to transfer the message and click [OK].
Note
If there are some files in that folder that cannot be transferred due to an
incompatible format, or if there is not enough memory available on the IC
recorder, only the sound files that can be transferred will be transferred, and
then an error message will appear. To transfer a WAV file to the IC recorder,
transfer it one by one following the procedure on page 31.