Sony MZ-NF810CK Service Manual - Page 17
rP PUS, RMC OK
 |
View all Sony MZ-NF810CK manuals
Add to My Manuals
Save this manual to your list of manuals |
Page 17 highlights
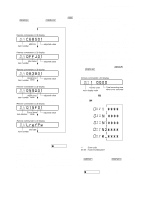
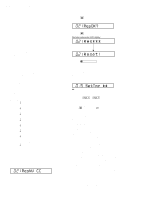
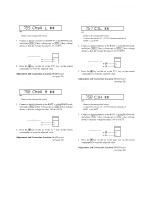
MZ-NF810/NF810CK Sound Skip Check Result Display Mode This set can display the count of errors that occurred during the recording/playing for checking. • Setting method of sound skip check result display mode 1. Set the test mode (see page 13). 2. Press the N ENTER key or [REC] key, and the playing or recording sound skip result display mode becomes active respectively where the LCD displays the following. Remote commander LCD display 000 P * * R * * Total count of record system errors (hex.) Total count of play system errors (hex.) 3. When the N ENTER key is pressed, total error count is displayed on the LCD, and each time the > t key is pressed, the display item moves down by one as shown below. Also, if the . T key is pressed, the display item moves up by one, then if the [REC] key is pressed, the display in the record mode appears. When the [REC] key is pressed, total error count is displayed on the LCD, and each time the > t key is pressed, the dis- play item moves down by one as shown below. Also, if the . T key is pressed, the display item moves up by one, then if the N ENTER key is pressed, the display in the play mode appears. Playing sound skip result display Recording sound skip result display 000 P * * R * * 000 P * * R * * 000 E I B * * 000 B O v r * * 000 S t a t * * 000 B f u l * * 000 A d r s * * 000 R t r y * * 000 B E m p * * 000 # # # # # # 000 # # # # # # P**R**: Total play/record errors (hex.) ** : Counter of sound skip check each item (hex.) ######: 6-digit address where sound was skipped last (hex.) • Cause of sound skip error Play Record Cause of error EIB Stat Adrs BEmp BOvr Bful Rtry Description of error Sound error correction error Decoder status error Address access error Buffer is empty Buffer is full, and sounds were dumped Buffer capacity becomes less, and forcible writing occurred Retry times over 4. To quit the sound skip check result display mode and to return to the test mode (display check mode), press the xCANCEL/ CHG key. Key Check Mode This set can check if the set and remote commander function normally. • Setting method of key check mode 1. Set the test mode (see page 13). 2. Pressing the [T MARK] key or [DISPLAY] key on the remote commander for several seconds (about 3 seconds) activates the key check mode. (At the last two digits, AD value of remote commander key line is displayed in hexadecimal) Remote commander LCD display 000 ** **: AD value of the remote commander key (hexadecimal 00 to FF) 3. When each key on the set and on remote commander is pressed, its name is displayed on the remote commander LCD. (The operated position is displayed for 4 seconds after the slide switch is operated. If any other key is pressed during this display, the remote commander LCD switches to its name display) Example1: When the > t key on the set is pressed: Remote commander LCD display 000 FF ** **: AD value of the remote commander key (hexadecimal 00 to FF) Example2: When the NX/ENT key on the remote commander is pressed: Remote commander LCD display 000 rP PUS ** **: AD value of the remote commander key (hexadecimal 00 to FF) 4. When all the keys on the set and on the remote commander are considered as OK, the following displays are shown. Example1: When the keys on the set are considered as OK: Remote commander LCD display 888 SET OK ** **: AD value of the remote commander key (hexadecimal 00 to FF) Example2: When the keys on the remote commander are considered as OK: Remote commander LCD display 888 RMC OK ** **: AD value of the remote commander key (hexadecimal 00 to FF) 5. When all keys were checked or if the upper panel is opened, the key check mode quits and the test mode (display check mode) comes back. 17
-
 1
1 -
2
-
3
-
4
-
5
-
6
-
7
-
8
-
9
-
10
-
11
-
 12
12 -
 13
13 -
 14
14 -
 15
15 -
 16
16 -
 17
17 -
 18
18 -
 19
19 -
 20
20 -
 21
21 -
 22
22 -
23
-
24
-
25
-
26
-
27
-
28
-
29
-
30
-
31
-
32
-
33
-
34
-
35
-
36
-
37
-
38
-
39
-
40
-
41
-
42
-
43
-
44
-
45
-
46
-
47
-
48
-
49
-
50
-
51
-
52
-
53
-
54
-
55
-
56
-
57
-
58
-
59
-
60
-
61
-
62
-
63
-
64
-
65
-
66
-
67
-
68
 |
 |
