Sony MZ-NF810CK Service Manual - Page 29
Click the [Write + Read] button.
 |
View all Sony MZ-NF810CK manuals
Add to My Manuals
Save this manual to your list of manuals |
Page 29 highlights
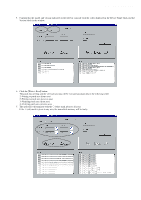
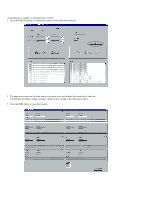
MZ-NF810/NF810CK 5. Confirm that the model and version indicated on the title bar coincide with the codes displayed in the Device Name block and the Version block in the window. 6. Click the [Write + Read] button. The patch data writing and the verify processing will be executed automatically in the following order: 1) Writing to patch area (front area) 2) Writing to patch area (reverse area) 3) Verifying patch area (front area) 4) Verifying patch area (reverse area) 7. The operation will terminate with the a (blue) mark given to all areas. If the × (red) mark is given to any area, the nonvolatile memory will be faulty. 29
-
 1
1 -
2
-
3
-
4
-
5
-
6
-
7
-
8
-
9
-
10
-
11
-
12
-
13
-
14
-
15
-
16
-
17
-
18
-
19
-
20
-
21
-
22
-
23
-
 24
24 -
 25
25 -
 26
26 -
 27
27 -
 28
28 -
 29
29 -
 30
30 -
 31
31 -
 32
32 -
 33
33 -
 34
34 -
35
-
36
-
37
-
38
-
39
-
40
-
41
-
42
-
43
-
44
-
45
-
46
-
47
-
48
-
49
-
50
-
51
-
52
-
53
-
54
-
55
-
56
-
57
-
58
-
59
-
60
-
61
-
62
-
63
-
64
-
65
-
66
-
67
-
68
 |
 |

29
MZ-NF810/NF810CK
5.
Confirm that the model and version indicated on the title bar coincide with the codes displayed in the Device Name block and the
Version block in the window.
6.
Click the [Write + Read] button.
The patch data writing and the verify processing will be executed automatically in the following order:
1) Writing to patch area (front area)
2) Writing to patch area (reverse area)
3) Verifying patch area (front area)
4) Verifying patch area (reverse area)
7.
The operation will terminate with the
a
(blue) mark given to all areas.
If the
×
(red) mark is given to any area, the nonvolatile memory will be faulty.