Sony PCV-MXS20 Getting Started Guide - Page 54
Recording songs to a MiniDisc Check-out
 |
View all Sony PCV-MXS20 manuals
Add to My Manuals
Save this manual to your list of manuals |
Page 54 highlights
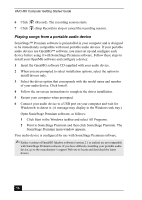
VAIO MX Computer Getting Started Guide Recording songs to a MiniDisc (Check-out) When you record songs from an audio CD to a MiniDisc, the songs are recorded into a Playlist on your hard disk drive, and then checked out to the MiniDisc. ✍ Before recording to a MiniDisc, verify that the media is not write-protected. To record songs to a MiniDisc 1 Insert the audio CD into the optical drive. 2 Insert the MiniDisc media into the MiniDisc drive. 3 Select and drag (CD), and drop it on window appears. (MiniDisc). The Record 4 Click Show List on the Record window. The songs on the audio CD are listed in the List panel. You can click the CD Info button to view information about the songs on your CD if you are connected to the Internet. 5 Select the format and bit rate for your recording session. 6 Click . The MD Recording Mode dialog box appears. Choose the appropriate recording mode, depending on format and bit rate selected previously. For details on setting the format and bit rate, see the SonicStage Premium online Help file. ❑ LP2 Stereo Recording mode ❑ LP4 Stereo Recording mode ❑ Stereo Recording mode ❑ Mono Recording mode 7 Select the recording (check-out) mode. Click OK. 8 Click (Stop Record) to stop or cancel the recording session. ✍ For more information on recording to a MiniDisc (Check-out), see the SonicStage Premium online Help file. 54
-
 1
1 -
2
-
3
-
4
-
5
-
6
-
7
-
8
-
9
-
10
-
11
-
12
-
13
-
14
-
15
-
16
-
17
-
18
-
19
-
20
-
21
-
22
-
23
-
24
-
25
-
26
-
27
-
28
-
29
-
30
-
31
-
32
-
33
-
34
-
35
-
36
-
37
-
38
-
39
-
40
-
41
-
42
-
43
-
44
-
45
-
46
-
47
-
48
-
 49
49 -
 50
50 -
 51
51 -
 52
52 -
 53
53 -
 54
54 -
 55
55 -
 56
56 -
 57
57 -
 58
58 -
 59
59 -
60
-
61
-
62
-
63
-
64
-
65
-
66
-
67
-
68
-
69
-
70
-
71
-
72
-
73
-
74
-
75
-
76
-
77
-
78
-
79
-
80
-
81
-
82
-
83
-
84
-
85
-
86
-
87
-
88
-
89
-
90
-
91
-
92
-
93
-
94
-
95
-
96
-
97
-
98
-
99
-
100
-
101
-
102
-
103
-
104
-
105
-
106
-
107
-
108
-
109
-
110
-
111
-
112
-
113
 |
 |
