Sony PEG-T615C Read This First Operating Instructions - Page 33
Setting up your Sony CLI, Handheld, Basics, Click Next. - driver
 |
UPC - 027242598119
View all Sony PEG-T615C manuals
Add to My Manuals
Save this manual to your list of manuals |
Page 33 highlights
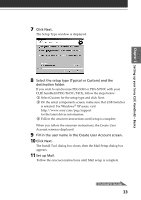
Chapter 2 Setting up your Sony CLIÉ Handheld - Basics 7 Click Next. The Setup Type window is displayed. 8 Select the setup type (Typical or Custom) and the destination folder. If you wish to synchronize PEG-S300 or PEG-N710C with your CLIÉ handheld (PEG-T615C/T415), follow the steps below: 1 Select Custom for the setup type and click Next. 2 On the select components screen, make sure that USB Switcher is selected. For Windows® XP users, visit http://www.sony.com/peg/support for the latest driver information. 3 Follow the onscreen instructions until setup is complete. When you follow the onscreen instructions, the Create User Account screen is displayed. 9 Fill in the user name in the Create User Account screen. 10 Click Next. The Install Tool dialog box closes, then the Mail Setup dialog box appears. 11 Set up Mail. Follow the onscreen instructions until Mail setup is complete. Continued on next page 33
-
 1
1 -
2
-
3
-
4
-
5
-
6
-
7
-
8
-
9
-
10
-
11
-
12
-
13
-
14
-
15
-
16
-
17
-
18
-
19
-
20
-
21
-
22
-
23
-
24
-
25
-
26
-
27
-
 28
28 -
 29
29 -
 30
30 -
 31
31 -
 32
32 -
 33
33 -
 34
34 -
 35
35 -
 36
36 -
 37
37 -
 38
38 -
39
-
40
-
41
-
42
-
43
-
44
-
45
-
46
-
47
-
48
-
49
-
50
-
51
-
52
-
53
-
54
-
55
-
56
-
57
-
58
-
59
-
60
-
61
-
62
-
63
-
64
 |
 |
