Sony SLT-A77VM Instruction Manual (Large File - 18.35 MB) - Page 200
Cleaning the image sensor, Cleaning the image sensor automatically using
 |
View all Sony SLT-A77VM manuals
Add to My Manuals
Save this manual to your list of manuals |
Page 200 highlights
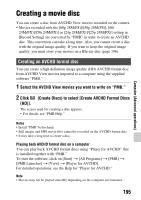
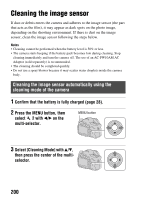
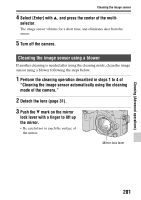
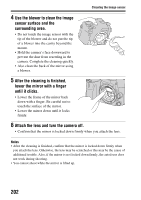
Cleaning the image sensor If dust or debris enters the camera and adheres to the image sensor (the part that acts as the film), it may appear as dark spots on the photo image, depending on the shooting environment. If there is dust on the image sensor, clean the image sensor following the steps below. Notes • Cleaning cannot be performed when the battery level is 50% or less. • The camera starts beeping if the battery pack becomes low during cleaning. Stop cleaning immediately and turn the camera off. The use of an AC-PW10AM AC Adaptor (sold separately) is recommended. • The cleaning should be completed quickly. • Do not use a spray blower because it may scatter water droplets inside the camera body. Cleaning the image sensor automatically using the cleaning mode of the camera 1 Confirm that the battery is fully charged (page 28). 2 Press the MENU button, then select 2 with b/B on the multi-selector. MENU button 3 Select [Cleaning Mode] with v/V, then press the center of the multiselector. 200
-
 1
1 -
2
-
3
-
4
-
5
-
6
-
7
-
8
-
9
-
10
-
11
-
12
-
13
-
14
-
15
-
16
-
17
-
18
-
19
-
20
-
21
-
22
-
23
-
24
-
25
-
26
-
27
-
28
-
29
-
30
-
31
-
32
-
33
-
34
-
35
-
36
-
37
-
38
-
39
-
40
-
41
-
42
-
43
-
44
-
45
-
46
-
47
-
48
-
49
-
50
-
51
-
52
-
53
-
54
-
55
-
56
-
57
-
58
-
59
-
60
-
61
-
62
-
63
-
64
-
65
-
66
-
67
-
68
-
69
-
70
-
71
-
72
-
73
-
74
-
75
-
76
-
77
-
78
-
79
-
80
-
81
-
82
-
83
-
84
-
85
-
86
-
87
-
88
-
89
-
90
-
91
-
92
-
93
-
94
-
95
-
96
-
97
-
98
-
99
-
100
-
101
-
102
-
103
-
104
-
105
-
106
-
107
-
108
-
109
-
110
-
111
-
112
-
113
-
114
-
115
-
116
-
117
-
118
-
119
-
120
-
121
-
122
-
123
-
124
-
125
-
126
-
127
-
128
-
129
-
130
-
131
-
132
-
133
-
134
-
135
-
136
-
137
-
138
-
139
-
140
-
141
-
142
-
143
-
144
-
145
-
146
-
147
-
148
-
149
-
150
-
151
-
152
-
153
-
154
-
155
-
156
-
157
-
158
-
159
-
160
-
161
-
162
-
163
-
164
-
165
-
166
-
167
-
168
-
169
-
170
-
171
-
172
-
173
-
174
-
175
-
176
-
177
-
178
-
179
-
180
-
181
-
182
-
183
-
184
-
185
-
186
-
187
-
188
-
189
-
190
-
191
-
192
-
193
-
194
-
 195
195 -
 196
196 -
 197
197 -
 198
198 -
 199
199 -
 200
200 -
 201
201 -
 202
202 -
 203
203 -
 204
204 -
 205
205 -
206
-
207
-
208
-
209
-
210
-
211
-
212
-
213
-
214
-
215
-
216
-
217
-
218
-
219
-
220
-
221
-
222
-
223
-
224
-
225
-
226
-
227
-
228
-
229
-
230
-
231
-
232
-
233
-
234
-
235
-
236
-
237
-
238
-
239
-
240
-
241
-
242
 |
 |