Sony SLT-A77VM Instruction Manual (Large File - 18.35 MB) - Page 49
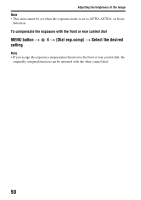
Adjusting the brightness of the image, Press the, button., Adjust the exposure
 |
View all Sony SLT-A77VM manuals
Add to My Manuals
Save this manual to your list of manuals |
Page 49 highlights
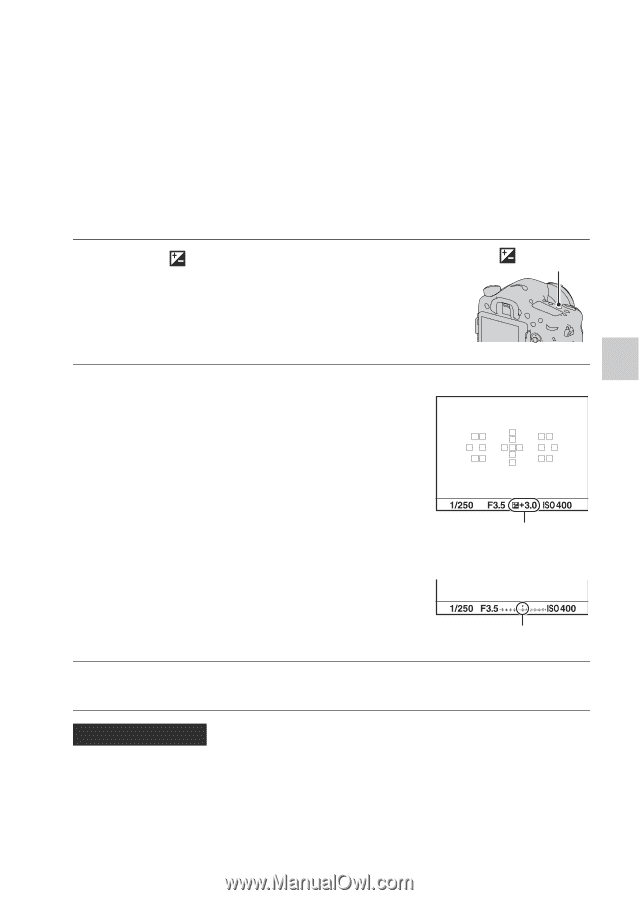
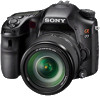
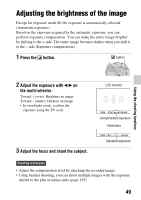
Adjusting the brightness of the image Except for exposure mode M, the exposure is automatically selected (Automatic exposure). Based on the exposure acquired by the automatic exposure, you can perform exposure compensation. You can make the entire image brighter by shifting to the + side. The entire image becomes darker when you shift it to the - side (Exposure compensation). 1 Press the button. button Using the shooting functions 2 Adjust the exposure with b/B on the multi-selector. Toward + (over): Brightens an image. Toward - (under): Darkens an image. • In viewfinder mode, confirm the exposure using the EV scale. LCD monitor Compensated exposure Viewfinder 3 Adjust the focus and shoot the subject. Standard exposure Shooting techniques • Adjust the compensation level by checking the recorded image. • Using bracket shooting, you can shoot multiple images with the exposure shifted to the plus or minus sides (page 155). 49
-
 1
1 -
2
-
3
-
4
-
5
-
6
-
7
-
8
-
9
-
10
-
11
-
12
-
13
-
14
-
15
-
16
-
17
-
18
-
19
-
20
-
21
-
22
-
23
-
24
-
25
-
26
-
27
-
28
-
29
-
30
-
31
-
32
-
33
-
34
-
35
-
36
-
37
-
38
-
39
-
40
-
41
-
42
-
43
-
 44
44 -
 45
45 -
 46
46 -
 47
47 -
 48
48 -
 49
49 -
 50
50 -
 51
51 -
 52
52 -
 53
53 -
 54
54 -
55
-
56
-
57
-
58
-
59
-
60
-
61
-
62
-
63
-
64
-
65
-
66
-
67
-
68
-
69
-
70
-
71
-
72
-
73
-
74
-
75
-
76
-
77
-
78
-
79
-
80
-
81
-
82
-
83
-
84
-
85
-
86
-
87
-
88
-
89
-
90
-
91
-
92
-
93
-
94
-
95
-
96
-
97
-
98
-
99
-
100
-
101
-
102
-
103
-
104
-
105
-
106
-
107
-
108
-
109
-
110
-
111
-
112
-
113
-
114
-
115
-
116
-
117
-
118
-
119
-
120
-
121
-
122
-
123
-
124
-
125
-
126
-
127
-
128
-
129
-
130
-
131
-
132
-
133
-
134
-
135
-
136
-
137
-
138
-
139
-
140
-
141
-
142
-
143
-
144
-
145
-
146
-
147
-
148
-
149
-
150
-
151
-
152
-
153
-
154
-
155
-
156
-
157
-
158
-
159
-
160
-
161
-
162
-
163
-
164
-
165
-
166
-
167
-
168
-
169
-
170
-
171
-
172
-
173
-
174
-
175
-
176
-
177
-
178
-
179
-
180
-
181
-
182
-
183
-
184
-
185
-
186
-
187
-
188
-
189
-
190
-
191
-
192
-
193
-
194
-
195
-
196
-
197
-
198
-
199
-
200
-
201
-
202
-
203
-
204
-
205
-
206
-
207
-
208
-
209
-
210
-
211
-
212
-
213
-
214
-
215
-
216
-
217
-
218
-
219
-
220
-
221
-
222
-
223
-
224
-
225
-
226
-
227
-
228
-
229
-
230
-
231
-
232
-
233
-
234
-
235
-
236
-
237
-
238
-
239
-
240
-
241
-
242
 |
 |