Sony SLT-A77VM Instruction Manual (Large File - 18.35 MB) - Page 36
Shooting and viewing images, Shooting still images, desired subject.
 |
View all Sony SLT-A77VM manuals
Add to My Manuals
Save this manual to your list of manuals |
Page 36 highlights
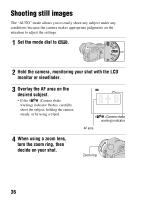
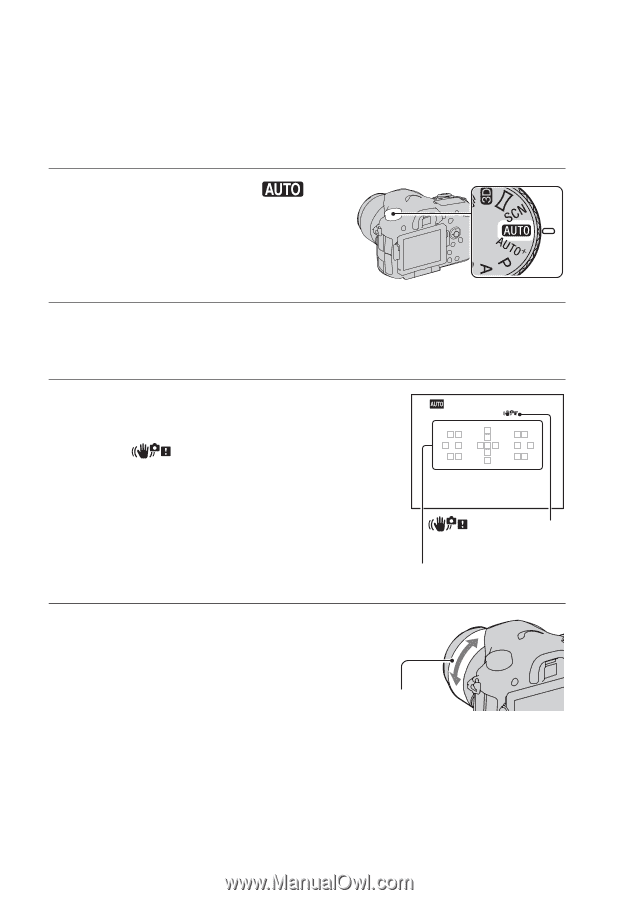
Shooting and viewing images Shooting still images The "AUTO" mode allows you to easily shoot any subject under any conditions because the camera makes appropriate judgments on the situation to adjust the settings. 1 Set the mode dial to . 2 Hold the camera, monitoring your shot with the LCD monitor or viewfinder. 3 Overlay the AF area on the desired subject. • If the (Camera shake warning) indicator flashes, carefully shoot the subject, holding the camera steady, or by using a tripod. AF area (Camera shake warning) indicator 4 When using a zoom lens, turn the zoom ring, then decide on your shot. Zoom ring 36
-
 1
1 -
2
-
3
-
4
-
5
-
6
-
7
-
8
-
9
-
10
-
11
-
12
-
13
-
14
-
15
-
16
-
17
-
18
-
19
-
20
-
21
-
22
-
23
-
24
-
25
-
26
-
27
-
28
-
29
-
30
-
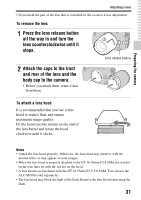 31
31 -
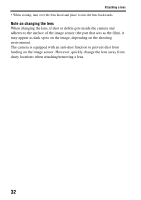 32
32 -
 33
33 -
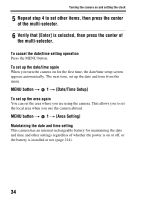 34
34 -
 35
35 -
 36
36 -
 37
37 -
 38
38 -
 39
39 -
 40
40 -
 41
41 -
42
-
43
-
44
-
45
-
46
-
47
-
48
-
49
-
50
-
51
-
52
-
53
-
54
-
55
-
56
-
57
-
58
-
59
-
60
-
61
-
62
-
63
-
64
-
65
-
66
-
67
-
68
-
69
-
70
-
71
-
72
-
73
-
74
-
75
-
76
-
77
-
78
-
79
-
80
-
81
-
82
-
83
-
84
-
85
-
86
-
87
-
88
-
89
-
90
-
91
-
92
-
93
-
94
-
95
-
96
-
97
-
98
-
99
-
100
-
101
-
102
-
103
-
104
-
105
-
106
-
107
-
108
-
109
-
110
-
111
-
112
-
113
-
114
-
115
-
116
-
117
-
118
-
119
-
120
-
121
-
122
-
123
-
124
-
125
-
126
-
127
-
128
-
129
-
130
-
131
-
132
-
133
-
134
-
135
-
136
-
137
-
138
-
139
-
140
-
141
-
142
-
143
-
144
-
145
-
146
-
147
-
148
-
149
-
150
-
151
-
152
-
153
-
154
-
155
-
156
-
157
-
158
-
159
-
160
-
161
-
162
-
163
-
164
-
165
-
166
-
167
-
168
-
169
-
170
-
171
-
172
-
173
-
174
-
175
-
176
-
177
-
178
-
179
-
180
-
181
-
182
-
183
-
184
-
185
-
186
-
187
-
188
-
189
-
190
-
191
-
192
-
193
-
194
-
195
-
196
-
197
-
198
-
199
-
200
-
201
-
202
-
203
-
204
-
205
-
206
-
207
-
208
-
209
-
210
-
211
-
212
-
213
-
214
-
215
-
216
-
217
-
218
-
219
-
220
-
221
-
222
-
223
-
224
-
225
-
226
-
227
-
228
-
229
-
230
-
231
-
232
-
233
-
234
-
235
-
236
-
237
-
238
-
239
-
240
-
241
-
242
 |
 |
36
Shooting and viewing images
Shooting still images
The “AUTO” mode allows you to easily shoot any subject under any
conditions because the camera makes appropriate judgments on the
situation to adjust the settings.
1
Set the mode dial to
.
2
Hold the camera, monitoring your shot with the LCD
monitor or viewfinder.
3
Overlay the AF area on the
desired subject.
•
If the
(Camera shake
warning) indicator flashes, carefully
shoot the subject, holding the camera
steady, or by using a tripod.
AF area
4
When using a zoom lens,
turn the zoom ring, then
decide on your shot.
(Camera shake
warning) indicator
Zoom ring