Sony STR-DH540 Operating Instructions - Page 28
Preparing the Receiver, Turning on the receiver, Setting up the receiver using the Easy Setup - test
 |
View all Sony STR-DH540 manuals
Add to My Manuals
Save this manual to your list of manuals |
Page 28 highlights
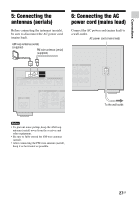
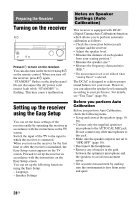
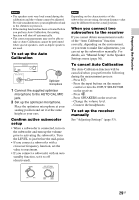
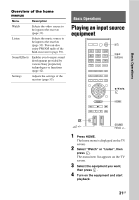
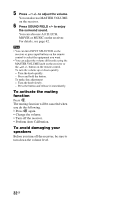
Preparing the Receiver Turning on the receiver ?/1 Press ?/1 to turn on the receiver. You can also turn on the receiver using ?/1 on the remote control. When you turn off the receiver, press ?/1 again. "STANDBY" flashes on the display panel. Do not disconnect the AC power cord (mains lead) while "STANDBY" is flashing. This may cause a malfunction. Setting up the receiver using the Easy Setup You can set the basic settings of the receiver easily by operating the receiver in accordance with the instructions on the TV screen. Switch the input of the TV to the input to which the receiver is connected. When you turn on the receiver for the first time or after the receiver is initialized, the Easy Setup screen appears on the TV screen. Proceed to set up the receiver in accordance with the instructions on the Easy Setup screen. You can set up the following functions using the Easy Setup. - Language - Speaker Settings Notes on Speaker Settings (Auto Calibration) This receiver is equipped with DCAC (Digital Cinema Auto Calibration) function which allows you to perform automatic calibration as follows: • Check the connection between each speaker and the receiver. • Adjust the speaker level. • Measure the distance of each speaker from your seating position.* • Measure the speaker size.* • Measure the frequency characteristics (EQ).* * The measurement result is not utilized when "Analog Direct" is selected. The DCAC is designed to achieve proper sound balance for your room. However, you can adjust the speaker levels manually according to your preference. For details, see "Test Tone" (page 58). Before you perform Auto Calibration Before you perform Auto Calibration, check the following items. • Set up and connect the speakers (page 19, 20). • Connect only the supplied optimizer microphone to the AUTO CAL MIC jack. Do not connect any other microphones to this jack. • Make sure the speaker output is not set to "SPK OFF" (page 10). • Disconnect the headphones. • Remove any obstacles in the path between the optimizer microphone and the speakers to avoid measurement errors. • Get accurate measurement by making sure the environment is free from noise and quiet. 28GB
-
 1
1 -
2
-
3
-
4
-
5
-
6
-
7
-
8
-
9
-
10
-
11
-
12
-
13
-
14
-
15
-
16
-
17
-
18
-
19
-
20
-
21
-
22
-
 23
23 -
 24
24 -
 25
25 -
 26
26 -
 27
27 -
 28
28 -
 29
29 -
 30
30 -
 31
31 -
 32
32 -
 33
33 -
34
-
35
-
36
-
37
-
38
-
39
-
40
-
41
-
42
-
43
-
44
-
45
-
46
-
47
-
48
-
49
-
50
-
51
-
52
-
53
-
54
-
55
-
56
-
57
-
58
-
59
-
60
-
61
-
62
-
63
-
64
-
65
-
66
-
67
-
68
-
69
-
70
-
71
-
72
-
73
-
74
-
75
-
76
-
77
-
78
-
79
-
80
 |
 |