Sony STR-DH540 Operating Instructions - Page 60
Input Settings menu, Pass Through, HDMI Audio Out, Subwoofer Level, Fast View, Input Mode - no stream
 |
View all Sony STR-DH540 manuals
Add to My Manuals
Save this manual to your list of manuals |
Page 60 highlights
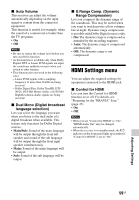
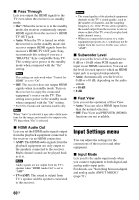
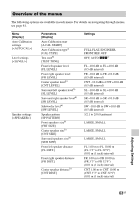
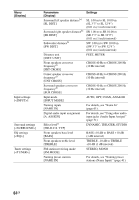
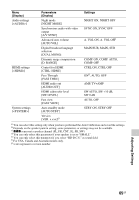
x Pass Through Lets you output the HDMI signals to the TV even when the receiver is in standby mode. • On*: When the receiver is in the standby mode, the receiver continuously outputs HDMI signals from the receiver's HDMI TV OUT jack. • Auto: When the TV is turned on while the receiver is in the standby mode, the receiver outputs HDMI signals from the receiver's HDMI TV OUT jack. Sony recommends this setting if you use a "BRAVIA" Sync compatible Sony TV. This setting saves power in the standby mode when compared with the "On" setting. Note This setting can only work when "Control for HDMI" is set to "On". • Off: The receiver does not output HDMI signals when in standby mode. Turn on the receiver to enjoy the connected equipment's source on the TV. This setting saves power in the standby mode when compared with the "On" setting. * For USA, Canada and Australia models only. Note When "Auto" is selected, it may take a little more time for the image and sound to be output to the TV than when "On" is selected. x HDMI Audio Out Lets you set the HDMI audio signals output from the playback equipment connected to the receiver via an HDMI connection. • AMP: The HDMI audio signals from the playback equipment are only output to the speakers connected to the receiver. Multi channel sound can be played back as it is. Note Audio signals are not output from the TV's speaker when "HDMI Audio Out" is set to "AMP". • TV+AMP: The sound is output from TV's speaker and the speakers connected to the receiver. Notes • The sound quality of the playback equipment depends on the TV's sound quality, such as the number of channels, and the sampling frequency, etc. If the TV has stereo speakers, the sound output from the receiver is also in stereo as that of the TV, even if you play back multi channel source. • When you connect the receiver to a video equipment (projector, etc.), sound may not be output from the receiver. In this case, select "AMP". x Subwoofer Level Lets you set the level of the subwoofer to 0 dB or +10 dB when PCM signals are input via an HDMI connection. You can set the level for each input to which an HDMI input jack is assigned independently. • Auto: Automatically sets the level to 0 dB or +10 dB, depending on the audio stream. • +10 dB • 0 dB x Fast View Lets you set the operation of Fast View. • Auto: You can select HDMI input faster than the normal selection. • Off: Fast View and PREVIEW (HDMI) functions are not available. Input Settings menu You can adjust the settings for the connections of the receiver and other equipment. x Input Mode Lets you fix the audio input mode when you connect equipment to both digital and analog audio input jacks. For details, see "Switching between digital and analog audio (INPUT MODE)" (page 51). 60GB
-
 1
1 -
2
-
3
-
4
-
5
-
6
-
7
-
8
-
9
-
10
-
11
-
12
-
13
-
14
-
15
-
16
-
17
-
18
-
19
-
20
-
21
-
22
-
23
-
24
-
25
-
26
-
27
-
28
-
29
-
30
-
31
-
32
-
33
-
34
-
35
-
36
-
37
-
38
-
39
-
40
-
41
-
42
-
43
-
44
-
45
-
46
-
47
-
48
-
49
-
50
-
51
-
52
-
53
-
54
-
 55
55 -
 56
56 -
 57
57 -
 58
58 -
 59
59 -
 60
60 -
 61
61 -
 62
62 -
 63
63 -
 64
64 -
 65
65 -
66
-
67
-
68
-
69
-
70
-
71
-
72
-
73
-
74
-
75
-
76
-
77
-
78
-
79
-
80
 |
 |