Sony VPL DX15 Operating Instructions - Page 61
Others, Troubleshooting
 |
UPC - 027242762039
View all Sony VPL DX15 manuals
Add to My Manuals
Save this manual to your list of manuals |
Page 61 highlights
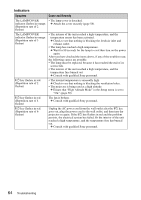
B Others Troubleshooting If the projector appears to be operating erratically, try to diagnose and correct the problem using the following instructions. If the problem persists, consult with qualified Sony personnel. Power Symptom Cause and Remedy The power is not turned on. • The AC power cable is not connected. c Connect the AC power cable firmly. • The lamp or lamp cover is not secured. c Close the lamp or lamp cover securely (page 59). Picture Symptom Cause and Remedy No picture. The power is not turned on. c Turn on the power (page 28). • A cable is disconnected or the connections are wrong. c Check that the proper connections have been made (page 22). • The Lens shutter is closed. c Open the Lens shutter (page 17, 37). • Input selection is incorrect. c Select the input source correctly (page 26). • The picture is muted. c Press the PIC MUTING key to release the picture muting (page 38). • The computer signal is not set to output to an external monitor or set to output both to an external monitor and a LCD monitor of a computer. c Set the computer signal to output only to an external monitor (page 23). The picture is noisy. The connecting cable may not be connected properly. c Check if the connecting cable is connected properly. On-screen display does not "Status" in the Setup menu has been set to "Off." appear. c Set "Status" in the Setup menu to "On" (page 50). Color balance is incorrect. • The image quality setting is not proper. c Set the image quality on the Picture menu. c You can reset all values to default (page 30). • The setting of "Input-A Signal Sel." in the Setup menu is incorrect. c Select "Computer," "Video GBR" or "Component" correctly according to the input signal (page 51). • The projector is set to the wrong color system. c Set "Color System" in the Setup menu to match the color system being input (page 51). The picture is too dark. • Contrast or brightness has not been adjusted properly. c Adjust the Contrast or Brightness in the Picture menu properly (page 45). c You can reset all values to default (page 30). • The lamp has burnt out or is dim. c Check "Lamp Timer" on the Information menu (page 56). Troubleshooting 61 Others
-
 1
1 -
2
-
3
-
4
-
5
-
6
-
7
-
8
-
9
-
10
-
11
-
12
-
13
-
14
-
15
-
16
-
17
-
18
-
19
-
20
-
21
-
22
-
23
-
24
-
25
-
26
-
27
-
28
-
29
-
30
-
31
-
32
-
33
-
34
-
35
-
36
-
37
-
38
-
39
-
40
-
41
-
42
-
43
-
44
-
45
-
46
-
47
-
48
-
49
-
50
-
51
-
52
-
53
-
54
-
55
-
 56
56 -
 57
57 -
 58
58 -
 59
59 -
 60
60 -
 61
61 -
 62
62 -
 63
63 -
 64
64 -
 65
65 -
 66
66 -
67
-
68
-
69
-
70
-
71
-
72
-
73
-
74
-
75
-
76
-
77
-
78
-
79
 |
 |
