TEAC DP-004 DP-004 Owners Manual (English) - Page 57
Assigning input channels, Track meters 1-4, Stereo meters L, R
 |
View all TEAC DP-004 manuals
Add to My Manuals
Save this manual to your list of manuals |
Page 57 highlights
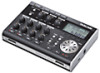
6-Basic Recording NOTE If an OL indicator in the input section is lighting even though the input meter is showing a suitable level, the input signal is too strong and the sound is distorted. Lower the volume output on the input source. Track meters (1-4) These meters show either the playback signal level or the input signal level for each track. The signal levels shown by the track meters depend on the operating conditions as shown below. •• REC indicator not lit during playback: track playback signal •• REC indicator blinking (record standby) during playback: track playback signal •• REC indicator blinking (record standby) when the transport is stopped: track input signal •• REC indicator lit (during recording): track input signal NOTE When the playback signal is shown, the level of the recorded signal of the track is shown, so the level shown by the meters cannot be changed. When the input signal is being shown, the input levels, and thus the meters, can be changed using the LEVEL knobs for INPUT A and INPUT B. Stereo meters (L, R) These show the stereo bus output level of this unit. Adjust the output level with the MASTER LEVEL knob. NOTE When an input source is a built-in mic, if the REC indicator is not lit on the track that is set to record the built-in mic, no signal is sent to the stereo bus, so the meters do not move. Assigning input channels In this unit, assigning an input channels allows you to assign the signal input from INPUT A or INPUT B as the source for recording on a track. This unit can simultaneously record a maximum of two tracks. You can also record one input channel to two tracks simultaneously (in this case, you cannot use the other input channel). You cannot assign two input channels to the same track. TASCAM DP-004 57
-
 1
1 -
2
-
3
-
4
-
5
-
6
-
7
-
8
-
9
-
10
-
11
-
12
-
13
-
14
-
15
-
16
-
17
-
18
-
19
-
20
-
21
-
22
-
23
-
24
-
25
-
26
-
27
-
28
-
29
-
30
-
31
-
32
-
33
-
34
-
35
-
36
-
37
-
38
-
39
-
40
-
41
-
42
-
43
-
44
-
45
-
46
-
47
-
48
-
49
-
50
-
51
-
 52
52 -
 53
53 -
 54
54 -
 55
55 -
 56
56 -
 57
57 -
 58
58 -
 59
59 -
 60
60 -
 61
61 -
 62
62 -
63
-
64
-
65
-
66
-
67
-
68
-
69
-
70
-
71
-
72
-
73
-
74
-
75
-
76
-
77
-
78
-
79
-
80
-
81
-
82
-
83
-
84
-
85
-
86
-
87
-
88
-
89
-
90
-
91
-
92
-
93
-
94
-
95
-
96
-
97
-
98
-
99
-
100
-
101
-
102
-
103
-
104
-
105
-
106
-
107
-
108
-
109
-
110
-
111
-
112
 |
 |
