TEAC DP-008 DP-008 Owner's Manual - Page 24
Names and Functions of Parts, Top panel
 |
View all TEAC DP-008 manuals
Add to My Manuals
Save this manual to your list of manuals |
Page 24 highlights
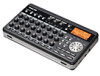
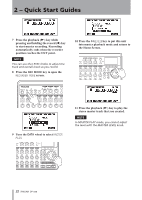
3 - Names and Functions of Parts Top panel 1 STANDBY/ON key Press and hold this key to turn the unit ON and OFF. (See "Start-up & shutdown" on page 32.) 2 REC MODE key Use this key to set the recorder mode. Select between MULTI TRACK, BOUNCE, MASTER REC and MASTER PLAY. (See "Recorder modes" on page 33.) 3 PHANTOM key and indicator Press this key to open the phantom power setting screen. When the phantom power is on, the indicator lights. 4 INPUT SETTING key Press this key to select the input source. (See "Selecting the input source" on page 41.) 5 ASSIGN key Use this to set (assign) the input (INPUT A, INPUT B) for each track. Press this key to open the INPUT ASSIGN screen on the display. The input signal of the input 24 TASCAM DP-008 assigned to a track becomes the track's recording source. (See "Assigning inputs" on page 43.) 6 INPUT A and INPUT B TRIM knobs and OL indicators Use these knobs to adjust the input levels for INPUT A and INPUT B. (See "Making the first recording" on page 44.) If the input source level is too high its OL (overload) indicator lights. 7 MASTER LEVEL knob Adjusts the monitoring level of the stereo output signal. This knob also adjusts the recording level when performing a bounce, mix down or mastering. 8 REVERB key Press this key to open the reverb setting screen. (See "Reverb" on page 46.) Press this key and EQ key at the same time to open the TRACK MUTE screen. (See "Muting tracks" on page 47.)
-
 1
1 -
2
-
3
-
4
-
5
-
6
-
7
-
8
-
9
-
10
-
11
-
12
-
13
-
14
-
15
-
16
-
17
-
18
-
 19
19 -
 20
20 -
 21
21 -
 22
22 -
 23
23 -
 24
24 -
 25
25 -
 26
26 -
 27
27 -
 28
28 -
 29
29 -
30
-
31
-
32
-
33
-
34
-
35
-
36
-
37
-
38
-
39
-
40
-
41
-
42
-
43
-
44
-
45
-
46
-
47
-
48
-
49
-
50
-
51
-
52
-
53
-
54
-
55
-
56
-
57
-
58
-
59
-
60
-
61
-
62
-
63
-
64
-
65
-
66
-
67
-
68
-
69
-
70
-
71
-
72
-
73
-
74
-
75
-
76
-
77
-
78
-
79
-
80
-
81
-
82
-
83
-
84
-
85
-
86
-
87
-
88
 |
 |
