TEAC LS-301 Owner's Manual (English, Français, Español, Deut - Page 3
Setting up the speakers, Connecting the speakers, Speaker cables, Precautions for installation
 |
View all TEAC LS-301 manuals
Add to My Manuals
Save this manual to your list of manuals |
Page 3 highlights
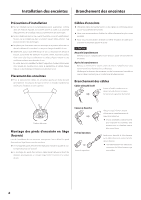
ENGLISH Setting up the speakers Connecting the speakers (1) Precautions for installation oo Do not install in a location that becomes hot, including places exposed to direct sunlight or near heating equipment. Doing so could cause damage. oo Do not install in a location that becomes humid, including near humidifiers. Moreover, do not install in a location that become smoky. Doing so could cause damage. oo Do not place obstacles between the speakers and the listening position. Obstacles block the direct sound, which can change the sound quality. oo Ideally, no items that reflect sound or resonate should be in the nearby environment. For example, glass doors sometimes resonate. To prevent this, fix them securely or use thick curtains or similar materials to absorb sound. In addition, parallel walls make it easy for standing waves to occur, so place furniture to disrupt parallel surfaces and use thick curtains or similar materials to absorb sound. Speaker placement oo For stereo playback, the left and right speakers should usually be placed so that they form an equilateral or isosceles triangle with the listener at the top corner. Speaker cables oo Use the included speaker cables or commercially-available cables designed for speakers. oo We recommend using the shortest speaker cables possible. oo We recommend using left and right speaker cables of the same length. CAUTION Before connecting Always turn the amplifier's power OFF before connecting speakers. After connecting Turn the volume down completely before turning the amplifier's power ON to prevent sudden loud noises. Confirm that the speaker terminals have been connected correctly and that cables are not contacting other terminals. Connecting the cables Bare/sleeved wire Insert the core wire through the hole in the terminal completely and tighten the cap firmly. Spade lugs Listening position Attaching cork speaker feet (included) When installing these speakers, you can attach the included cork speaker feet to the bottoms of the speakers if desired. oo Attaching the cork speaker feet could change the sound quality. Use of the feet is optional. oo Attaching the cork speaker feet should reduce rattling caused by uneven contact between the speaker and floor surfaces. Banana plugs Tighten the cap Place the spade around the terminal and tighten the cap firmly. oo When using spade lugs to connect the speakers, they should have an inside diameter of at least 8 mm (3/8"). After connecting the banana plug to the speaker cable, insert the plug into the terminal. oo Carefully read the instructions for the banana plugs that you are using. 3
-
 1
1 -
 2
2 -
 3
3 -
 4
4 -
 5
5 -
 6
6 -
 7
7 -
 8
8 -
 9
9 -
10
-
11
-
12
-
13
-
14
-
15
-
16
-
17
-
18
-
19
-
20
-
21
-
22
-
23
-
24
 |
 |
