TP-Link 3G/4G TL-MR3220 V2 User Guide - Page 71
Access Control
 |
View all TP-Link 3G/4G manuals
Add to My Manuals
Save this manual to your list of manuals |
Page 71 highlights
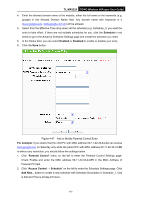
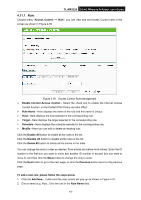
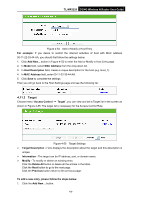
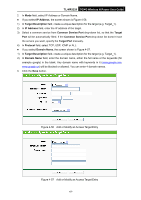
TL-MR3220 3G/4G Wireless N Router User Guide 3. Click "Parental Control" menu on the left to go back to the Add or Modify Parental Control Entry page: Click Add New... button. Enter 00-11-22-33-44-AA in the MAC Address of Child PC field. Enter "Allow Google" in the Website Description field. Enter "www.google.com" in the Allowed Domain Name field. Select "Schedule_1" you create just now from the Effective Time drop-down list. In Status field, select Enable. 4. Click Save to complete the settings. Then you will go back to the Parental Control Settings page and see the following list, as shown in Figure 4-48. Figure 4-48 Parental Control Settings 4.11 Access Control Figure 4-49 Access Control There are four submenus under the Access Control menu as shown in Figure 4-49: Rule, Host, Target and Schedule. Click any of them, and you will be able to configure the corresponding function. -62-
-
 1
1 -
2
-
3
-
4
-
5
-
6
-
7
-
8
-
9
-
10
-
11
-
12
-
13
-
14
-
15
-
16
-
17
-
18
-
19
-
20
-
21
-
22
-
23
-
24
-
25
-
26
-
27
-
28
-
29
-
30
-
31
-
32
-
33
-
34
-
35
-
36
-
37
-
38
-
39
-
40
-
41
-
42
-
43
-
44
-
45
-
46
-
47
-
48
-
49
-
50
-
51
-
52
-
53
-
54
-
55
-
56
-
57
-
58
-
59
-
60
-
61
-
62
-
63
-
64
-
65
-
 66
66 -
 67
67 -
 68
68 -
 69
69 -
 70
70 -
 71
71 -
 72
72 -
 73
73 -
 74
74 -
 75
75 -
 76
76 -
77
-
78
-
79
-
80
-
81
-
82
-
83
-
84
-
85
-
86
-
87
-
88
-
89
-
90
-
91
-
92
-
93
-
94
-
95
-
96
-
97
-
98
-
99
-
100
-
101
-
102
-
103
-
104
-
105
-
106
-
107
-
108
-
109
 |
 |
