Toshiba 55SL417U User Manual - Page 24
Initial Setup and Menu, Initial Setup - will not turn on
 |
View all Toshiba 55SL417U manuals
Add to My Manuals
Save this manual to your list of manuals |
Page 24 highlights
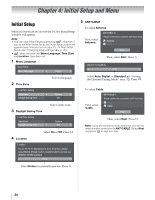
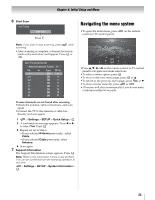
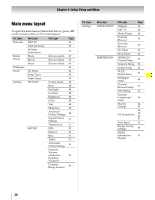
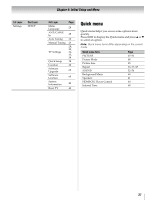
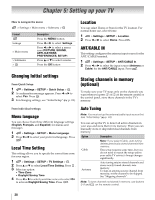
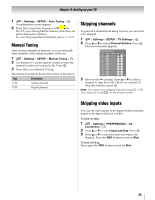
Chapter 4: Initial Setup and Menu Initial Setup When you first turn on or reset the TV, the Initial Setup window will appear. Note: • You can stop Initial Setup by pressing . However, if you do not finish Initial Setup, the Initial Setup screen will appear every time you turn on your TV. To finish Initial Setup, see "Changing Initial settings" (- p. 28). • does not work until Menu Language, Time Zone, and Location have been set. 1 Menu Language Quick Setup Menu Language English 2 Time Zone Local Time Setting Time Zone Daylight Saving Time Select a language. Eastern Off 3 Daylight Saving Time Local Time Setting Time Zone Daylight Saving Time Select a time zone. Eastern Off Select On or Off. Press . OK 4 Location Location To use the TV for displaying in a store showroom, please select [Store]. [Home] mode is recommended for normal use. (ENERGY STAR® qualified) Home 5 ANT/CABLE To select Antenna: First, select Antenna. ANT/CABLE In Please confirm the connection with Tuner Input. Antenna Cable Next Then, select Next. Press . OK Channel Tuning Mode Auto Select Auto, Digital, or Standard (- "Setting the Channel Tuning Mode" on p. 32). Press . OK To select Cable: First, select Cable. ANT/CABLE In Please confirm the connection with Tuner Input. Antenna Cable Next Then, select Next. Press . OK Note: If you do not want to scan channels, you do not need to make a selection for ANT/CABLE. Select Next and press OK to skip this step. Select Home for normal home use. Press . OK 24
-
 1
1 -
2
-
3
-
4
-
5
-
6
-
7
-
8
-
9
-
10
-
11
-
12
-
13
-
14
-
15
-
16
-
17
-
18
-
 19
19 -
 20
20 -
 21
21 -
 22
22 -
 23
23 -
 24
24 -
 25
25 -
 26
26 -
 27
27 -
 28
28 -
 29
29 -
30
-
31
-
32
-
33
-
34
-
35
-
36
-
37
-
38
-
39
-
40
-
41
-
42
-
43
-
44
-
45
-
46
-
47
-
48
-
49
-
50
-
51
-
52
-
53
-
54
-
55
-
56
-
57
-
58
-
59
-
60
-
61
-
62
-
63
-
64
-
65
-
66
-
67
-
68
-
69
-
70
-
71
-
72
-
73
-
74
-
75
-
76
-
77
-
78
-
79
-
80
-
81
-
82
-
83
-
84
-
85
-
86
-
87
-
88
-
89
-
90
-
91
-
92
-
93
 |
 |
