Toshiba 55SL417U User Manual - Page 58
Advanced Network Setup, IP Address Setup, DNS Setup, MAC Address - service manual
 |
View all Toshiba 55SL417U manuals
Add to My Manuals
Save this manual to your list of manuals |
Page 58 highlights
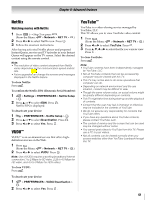
Chapter 8: Advanced features Advanced Network Setup Note: • When the DHCP function of the router connected to this TV is On, you can set Auto Setup to On or Off. (Usually set it to On.) • When the DHCP function of the router is Off, set Auto Setup to Off, and manually set the IP Address or DNS Address. IP Address Setup Note: The settings in Auto Setup is linked to that selected in the DNS Setup menu. If Auto Setup is set to On, then Auto Setup in the DNS menu will also be set to On. Auto Setup: 1 > Settings > PREFERENCES > Network Setup > . OK 2 Press B or b to select Advanced Network Setup. Press . OK 3 Press B or b to select IP Address Setup. Press . OK 4 Select Auto Setup. Press C or c to select On. Note: Other items will be grayed out when Auto Setup is set to On. Manual Setup: 1 > Settings > PREFERENCES > Network Setup > . OK 2 Press B or b to select Advanced Network Setup. Press . OK 3 Press B or b to select IP Address Setup. Press . OK 4 Select Auto Setup. Press C or c to select Off. 5 Press B or b to highlight IP Address. 6 Press C or c to highlight the field you want to change and use the number buttons to input the IP address. To save the setting, press . OK Note: • IP address field numbers must be between 0 and 255. If you input an incompatible number and press OK , the field number will be reset to the previous value. 7 Press B or b to highlight Subnet Mask, and edit in the same way as IP Address. 8 Press B or b to highlight Default Gateway, and edit in the same way as IP Address. Note: If you manually set the IP address, you must not use the same IP address for any other device. The IP address you use should be a private address. If you do not know the correct values to use, please contact your network administrator or internet service provider. DNS Setup Note: • When the DHCP function of the router connected to this TV is Off, set Auto Setup to Off, and manually set the DNS address(es). Your internet service provider should have provided these to you. • The settings in Auto Setup is linked to that selected in the IP Address Setup menu. If Auto Setup is set to On, then Auto Setup in the UP Address Setup menu will also be set to On. Auto setup: 1 > Settings > PREFERENCES > Network Setup > . OK 2 Press B or b to select Advanced Network Setup. Press . OK 3 Press B or b to select DNS Setup. Press . OK 4 Select Auto Setup. Press C or c to select On. Note: Other items will be grayed out when Auto Setup is set to On. Manual setup: 1 > Settings > PREFERENCES > Network Setup > . OK 2 Press B or b to select Advanced Network Setup. Press . OK 3 Press B or b to select DNS Setup. Press . OK 4 Select Auto Setup. Press C or c to select Off. 5 Press B or b to highlight Primary DNS Address. 6 Press C or c to highlight the field you want to change, and then use the number buttons to input the Primary DNS Address. To save the setting, press . OK Note: • DNS address field numbers must be between 0 and 255. If you input an incompatible number and press OK , the field number will be reset to the previous value. 7 Press B or b to highlight Secondary DNS Address, and edit in the same way as Primary DNS Address. MAC Address You can view the fixed MAC address for the TV. 1 > Settings > PREFERENCES > Network Setup > . OK 2 Press B or b to select Advanced Network Setup. Press . OK 3 Press B or b to select MAC Address. Press . OK 58
-
 1
1 -
2
-
3
-
4
-
5
-
6
-
7
-
8
-
9
-
10
-
11
-
12
-
13
-
14
-
15
-
16
-
17
-
18
-
19
-
20
-
21
-
22
-
23
-
24
-
25
-
26
-
27
-
28
-
29
-
30
-
31
-
32
-
33
-
34
-
35
-
36
-
37
-
38
-
39
-
40
-
41
-
42
-
43
-
44
-
45
-
46
-
47
-
48
-
49
-
50
-
51
-
52
-
 53
53 -
 54
54 -
 55
55 -
 56
56 -
 57
57 -
 58
58 -
 59
59 -
 60
60 -
 61
61 -
 62
62 -
 63
63 -
64
-
65
-
66
-
67
-
68
-
69
-
70
-
71
-
72
-
73
-
74
-
75
-
76
-
77
-
78
-
79
-
80
-
81
-
82
-
83
-
84
-
85
-
86
-
87
-
88
-
89
-
90
-
91
-
92
-
93
 |
 |
