Turtle Beach Ear Force XP500 User's Guide - Page 15
Uploading all Presets to the Headset, Editing Presets
 |
View all Turtle Beach Ear Force XP500 manuals
Add to My Manuals
Save this manual to your list of manuals |
Page 15 highlights
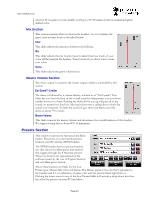
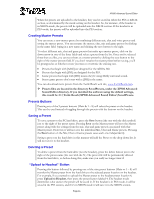
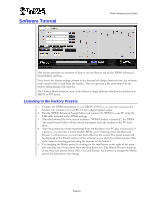
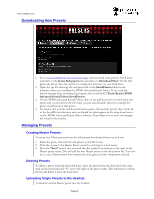
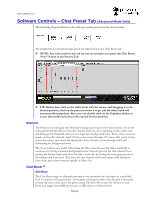
XP500 Advanced Sound Editor 1. Click on "Upload to Headset" and the Presets buttons will start flashing. 2. Click on one of the preset buttons to load the Master preset into that location on the headset. 3. After you've unplugged the USB cable from the headset, the preset will remain in the headset so you can select it with the headset presets button without the need for the software. Uploading all Presets to the Headset If you've changed all of the presets using the XP500 Advanced Sound Editor software, you can upload all of them into the headset by clicking the "Restore Presets from Files" button. This uploads all 18 presets listed in the manifest file of the SavedPresets directory into the headset and is faster than transferring them one at a time using the "Upload to Headset" button. Editing Presets Complete editing of presets requires that you run the XP500 Advanced Sound Editor software in Advanced Mode by clicking on the Advanced button at the bottom of the program screen. Any changes made with the chat, game and Mic tabs in Advanced Mode, or with the Mic, Mix and Master Volume controls in Basic Mode, will be lost unless you save them as part of the Master Preset. So if you change any of the settings, be sure to click on the Save button next to the Master preset name. Note that this will not save the changes into the individual sub-presets. For example, if you changed the Pitch Shift setting on the mic and you want to save it as part of the Mic sub-preset so you can use it with a different Master preset, you'll have to click on the save button next to the Mic sub-preset name. Changing Mic Preset Settings 1. While talking into the mic, move the Mic slider in the Mix section up and down so you can hear how it changes the loudness of your voice in the headset. This feature is called "mic monitoring" and you can set the level to your preference. For now, turn it up all the way so you can hear your voice as you speak into the mic. 2. Move the Morph slider from Normal to Shift. Then change the Pitch Shift slider up and down and listen to how it changes the pitch of your voice. These two sliders let you control the voice morph feature. Moving the Morph slider towards the middle will mix your normal voice with the pitch-shifted voice, so you can balance between the two. 3. Lightly blow into the microphone as you move the Silencer (Noise Gate) slider up and down. Notice that the mic will shut off at a certain point, so the blowing sound is blocked. If you blow harder the mic will turn on, softer and it turns off. The higher you move the slider, the louder you'll have to speak in order to turn on the mic. By adjusting this slider, you can eliminate room noise so the mic will only pick up your voice when you speak and not the sounds around you. Changing the Chat Setting Adjust the Chat slider in the Mix section to change the level of the chat voices from other players. The more you turn this up, the louder the other players will be. Changing the Master Volume Settings The Volume slider sets the maximum volume level you'll hear in the headset. Don't turn this up all the way to Max, or the headset might distort. A comfortable setting is between 5 and 15. Page 15
-
 1
1 -
2
-
3
-
4
-
5
-
6
-
7
-
8
-
9
-
 10
10 -
 11
11 -
 12
12 -
 13
13 -
 14
14 -
 15
15 -
 16
16 -
 17
17 -
 18
18 -
 19
19 -
 20
20 -
21
-
22
-
23
-
24
-
25
-
26
-
27
-
28
 |
 |