Uniden UM525 English Owners Manual - Page 15
Using a WHAM or WHAM x 4 Microphone With the Radio, A Look at the Radio - um525es marine radio
 |
View all Uniden UM525 manuals
Add to My Manuals
Save this manual to your list of manuals |
Page 15 highlights
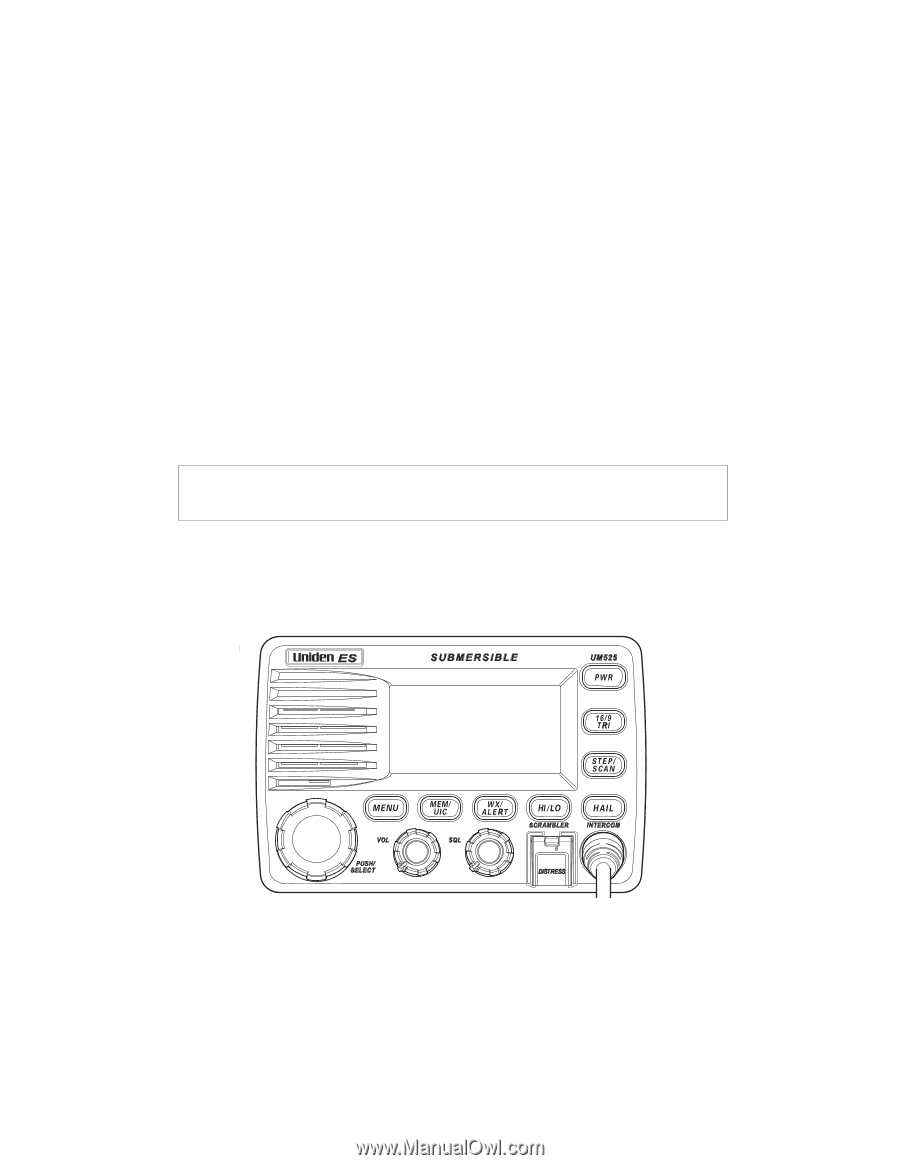
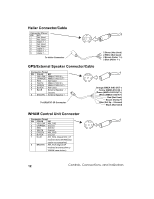
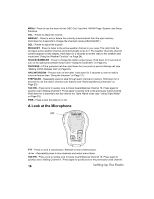
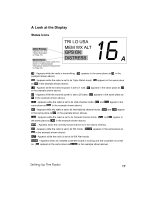
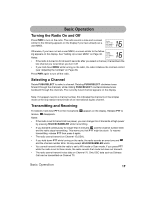
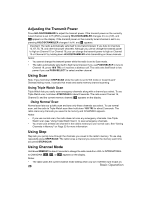
4. Drill the holes and mount the bracket with hardware compatible with the material of the mounting surface. Note: Do not use mounting knobs other than the ones supplied. Do not insert the knobs without attaching the bracket. 5. Connect all other auxiliary cables and accessories. 6. Install the radio in the mounting bracket and connect all cables and accessories to the appropriate jacks and connectors. Using a WHAM or WHAM x 4 Microphone With the Radio To connect a WHAM or WHAM x 4 microphone to the radio, follow the steps listed in "Setting Up a WHAM" on Page 36. Then, if you are connecting a WHAM microphone, follow the steps listed in "Setting a WHAM Base ID" on Page 36 and "Setting a WHAM Link Channel" on Page 37. Otherwise, if you are connecting a WHAM x 4 microphone, follow the steps listed in "Setting a WHAM x 4 Base ID" on Page 37 and "Setting the WHAM Sub Radio Mode" on Page 37. Then refer to the owners manual provided with the WHAM or WHAM x 4 microphone for more information about connecting it to the radio. Important: If you want to use an external antenna for your WHAM x 4 with a UM525 marine radio, it must be installed by a professional installer. Do not attempt to connect an external antenna to a radio yourself. Note: You cannot use a WHAM or WHAM x 4 wireless microphone to set the user MMSI, WHAM setup, system setup, or self test on the radio. You cannot use a WHAM wireless microphone to use the scrambler, intercom, GPS display, channel tag, or status message display on the radio. A Look at the Radio PUSH/SELECT - Rotate to tune channels and highlight menu items you want to select, then press to select the channel you tuned or the item you selected. Setting Up The Radio 15
-
 1
1 -
2
-
3
-
4
-
5
-
6
-
7
-
8
-
9
-
 10
10 -
 11
11 -
 12
12 -
 13
13 -
 14
14 -
 15
15 -
 16
16 -
 17
17 -
 18
18 -
 19
19 -
 20
20 -
21
-
22
-
23
-
24
-
25
-
26
-
27
-
28
-
29
-
30
-
31
-
32
-
33
-
34
-
35
-
36
-
37
-
38
-
39
-
40
-
41
-
42
-
43
-
44
-
45
-
46
-
47
-
48
-
49
-
50
-
51
-
52
-
53
-
54
-
55
-
56
-
57
-
58
-
59
-
60
-
61
-
62
-
63
-
64
-
65
-
66
-
67
-
68
-
69
-
70
-
71
-
72
-
73
-
74
-
75
-
76
-
77
-
78
-
79
-
80
-
81
-
82
-
83
-
84
-
85
-
86
-
87
-
88
-
89
-
90
-
91
-
92
-
93
-
94
-
95
-
96
-
97
-
98
-
99
-
100
-
101
-
102
-
103
-
104
-
105
-
106
-
107
-
108
-
109
-
110
-
111
-
112
-
113
-
114
-
115
-
116
-
117
-
118
-
119
-
120
-
121
-
122
-
123
-
124
-
125
-
126
-
127
-
128
-
129
-
130
-
131
-
132
-
133
-
134
-
135
-
136
-
137
-
138
-
139
-
140
-
141
-
142
-
143
-
144
-
145
-
146
-
147
-
148
-
149
-
150
-
151
-
152
-
153
-
154
-
155
-
156
-
157
 |
 |