ViewSonic PJD7583wi PJD7383, PJD7383I, PJD7583W, PJD7583WI User Guide (English - Page 41
Creating your own startup screen
 |
UPC - 766907511123
View all ViewSonic PJD7583wi manuals
Add to My Manuals
Save this manual to your list of manuals |
Page 41 highlights
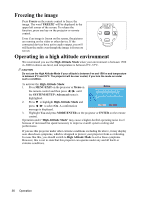
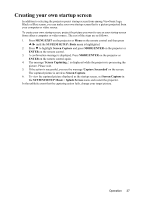
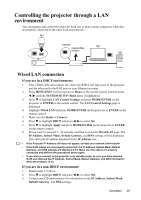
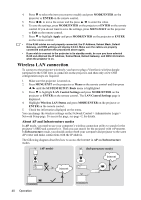
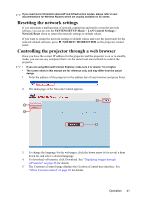
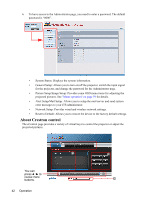
Creating your own startup screen In addition to selecting the projector preset startup screen from among ViewSonic logo, Black or Blue screen, you can make your own startup screen that is a picture projected from your computer or video source. To create your own startup screen, project the picture you want to use as your startup screen from either a computer or video source. The rest of the steps are as follows. 1. Press MENU/EXIT on the projector or Menu on the remote control and then press / until the SYSTEM SETUP: Basic menu is highlighted. 2. Press to highlight Screen Capture and press MODE/ENTER on the projector or ENTER on the remote control. 3. A confirmation message is displayed. Press MODE/ENTER on the projector or ENTER on the remote control again. 4. The message 'Screen Capturing...' is displayed while the projector is processing the picture. Please wait. 5. If the action is successful, you see the message 'Capture Succeeded' on the screen. The captured picture is saved as Screen Capture. 6. To view the captured picture displayed as the startup screen, set Screen Capture in the SYSTEM SETUP: Basic > Splash Screen menu and restart the projector. In the unlikely event that the capturing action fails, change your target picture. Operation 37
-
 1
1 -
2
-
3
-
4
-
5
-
6
-
7
-
8
-
9
-
10
-
11
-
12
-
13
-
14
-
15
-
16
-
17
-
18
-
19
-
20
-
21
-
22
-
23
-
24
-
25
-
26
-
27
-
28
-
29
-
30
-
31
-
32
-
33
-
34
-
35
-
 36
36 -
 37
37 -
 38
38 -
 39
39 -
 40
40 -
 41
41 -
 42
42 -
 43
43 -
 44
44 -
 45
45 -
 46
46 -
47
-
48
-
49
-
50
-
51
-
52
-
53
-
54
-
55
-
56
-
57
-
58
-
59
-
60
-
61
-
62
-
63
-
64
-
65
-
66
-
67
-
68
-
69
-
70
-
71
-
72
-
73
-
74
-
75
-
76
-
77
-
78
-
79
-
80
-
81
-
82
-
83
-
84
-
85
-
86
-
87
-
88
-
89
-
90
-
91
-
92
-
93
-
94
-
95
 |
 |
