ViewSonic PJD7583wi PJD7383, PJD7383I, PJD7583W, PJD7583WI User Guide (English - Page 51
If you want to freeze the projected image on the screen, press
 |
UPC - 766907511123
View all ViewSonic PJD7583wi manuals
Add to My Manuals
Save this manual to your list of manuals |
Page 51 highlights
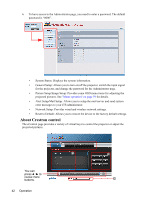
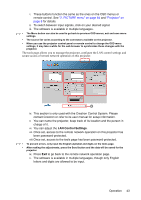
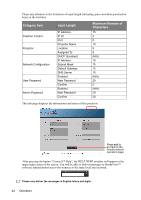
ii. If you want to project your computer screen after connection, click Directly. If you want to connect to the projector via Network Control system, click Connect to webpage. The main page of Network Control will be displayed after connection. iii. Click Connect. • To search for projectors, simply click Search to list all the projectors on the same local area network. Click the desired projector in the Search result list, and click Connect directly. You can also type a desired projector name and click Search. • If you are the first time user, choose your identity as a Normal user or Administrator. Both require no password. But if you choose to be an Administrator, you have the authority to set a password for connecting to the projector. That password should be kept and used next when you try to connect to the same projector. • If there are multiple computers connected to the projector, you can decide a display zone by clicking 1, 2, 3, 4, L, R, All, or Background. 2. If you want to freeze the projected image on the screen, press . Any further movements will be not been seen on the screen until 3. You can choose a capture mode from here. is pressed. • To display a full screen, click FullScreen. • To display a partial screen, click FixedSize. A square appears on your screen. You can place it where you want to project. If you wish to change the square, click Alterable. Operation 47
-
 1
1 -
2
-
3
-
4
-
5
-
6
-
7
-
8
-
9
-
10
-
11
-
12
-
13
-
14
-
15
-
16
-
17
-
18
-
19
-
20
-
21
-
22
-
23
-
24
-
25
-
26
-
27
-
28
-
29
-
30
-
31
-
32
-
33
-
34
-
35
-
36
-
37
-
38
-
39
-
40
-
41
-
42
-
43
-
44
-
45
-
 46
46 -
 47
47 -
 48
48 -
 49
49 -
 50
50 -
 51
51 -
 52
52 -
 53
53 -
 54
54 -
 55
55 -
 56
56 -
57
-
58
-
59
-
60
-
61
-
62
-
63
-
64
-
65
-
66
-
67
-
68
-
69
-
70
-
71
-
72
-
73
-
74
-
75
-
76
-
77
-
78
-
79
-
80
-
81
-
82
-
83
-
84
-
85
-
86
-
87
-
88
-
89
-
90
-
91
-
92
-
93
-
94
-
95
 |
 |
