ViewSonic PJD7583wi PJD7383, PJD7383I, PJD7583W, PJD7583WI User Guide (English - Page 44
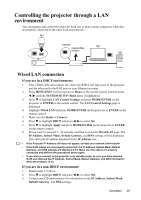
Wireless LAN connection
 |
UPC - 766907511123
View all ViewSonic PJD7583wi manuals
Add to My Manuals
Save this manual to your list of manuals |
Page 44 highlights
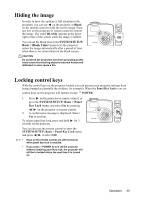
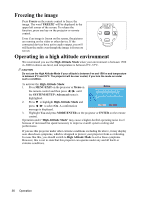
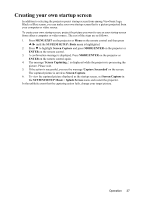
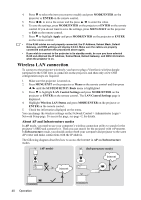
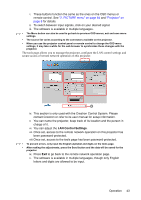
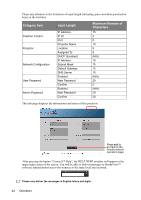
4. Press to select the item you want to modify and press MODE/ENTER on the projector or ENTER on the remote control. 5. Press / to move the cursor and the press / to enter the value. 6. To save the settings, press MODE/ENTER on the projector or ENTER on the remote control. If you do not want to save the settings, press MENU/EXIT on the projector or Exit on the remote control. 7. Press to highlight Apply and press MODE/ENTER on the projector or ENTER on the remote control. • If the RJ45 cables are not properly connected, the IP Address, Subnet Mask, Default Gateway, and DNS settings will display 0.0.0.0. Make sure the cables are properly connected and perform the procedures above again. • If you wish to connect to the projector in its standby mode, be sure you have selected RJ45 and obtained the IP Address, Subnet Mask, Default Gateway, and DNS information when the projector is on. Wireless LAN connection To connect to the projector wirelessly, you have to plug a ViewSonic wireless dongle (optional) to the USB Type A connector on the projector, and then only a few OSD configuration steps are required. 1. Make sure the projector is turned on. 2. Press MENU/EXIT on the projector or Menu on the remote control and then press / until the SYSTEM SETUP: Basic menu is highlighted. 3. Press to highlight LAN Control Settings and press MODE/ENTER on the projector or ENTER on the remote control. The LAN Control Settings page is displayed. 4. Highlight Wireless LAN Status and press MODE/ENTER on the projector or ENTER on the remote control. 5. Check the information displayed on the menu. You can change the wireless settings on the Network Control > Administrator Login > Network Setup page. To access the page, see page 42 for details. About AP and Infrastructure modes In AP mode, you need to use your computer's wireless connection utility to search for the projector's SSID and connect to it. Then you can search for the projector with vsPresenter. In Infrastructure mode, you should connect both your computer and projector to the same AP router and make connections with the IP address. The following diagram describes how to access the Internet in AP and Infrastructure modes. (AP mode) (Infrastructure mode) Internet Internet 40 Operation
-
 1
1 -
2
-
3
-
4
-
5
-
6
-
7
-
8
-
9
-
10
-
11
-
12
-
13
-
14
-
15
-
16
-
17
-
18
-
19
-
20
-
21
-
22
-
23
-
24
-
25
-
26
-
27
-
28
-
29
-
30
-
31
-
32
-
33
-
34
-
35
-
36
-
37
-
38
-
 39
39 -
 40
40 -
 41
41 -
 42
42 -
 43
43 -
 44
44 -
 45
45 -
 46
46 -
 47
47 -
 48
48 -
 49
49 -
50
-
51
-
52
-
53
-
54
-
55
-
56
-
57
-
58
-
59
-
60
-
61
-
62
-
63
-
64
-
65
-
66
-
67
-
68
-
69
-
70
-
71
-
72
-
73
-
74
-
75
-
76
-
77
-
78
-
79
-
80
-
81
-
82
-
83
-
84
-
85
-
86
-
87
-
88
-
89
-
90
-
91
-
92
-
93
-
94
-
95
 |
 |
