ViewSonic PJD7583wi PJD7383, PJD7383I, PJD7583W, PJD7583WI User Guide (English - Page 47
LAN Control Settings
 |
UPC - 766907511123
View all ViewSonic PJD7583wi manuals
Add to My Manuals
Save this manual to your list of manuals |
Page 47 highlights
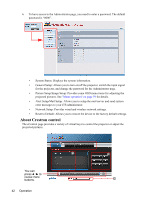
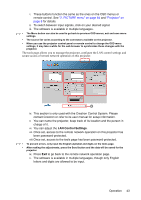
i. These buttons function the same as the ones on the OSD menus or remote control. See "2. PICTURE menu" on page 64 and "Projector" on page 8 for details. ii. To switch between input signals, click on your desired signal. iii. The software is available in multiple languages. • The Menu button can also be used to go back to previous OSD menus, exit and save menu settings. • The source list varies according to the connectors available on the projector. • When you use the projector control panel or remote control to change the OSD menu settings, it may take a while for the web browser to synchronize these changes with the projector. The tools page allows you to manage the projector, configure the LAN control settings and secure access of remote network operation on this projector. iv v vii vi viii ix x iv. This section is only used with the Crestron Control System. Please contact Crestron or refer to its user manual for setup information. v. You can name the projector, keep track of its location and the person in charge of it. vi. You can adjust the LAN Control Settings. vii. Once set, access to the remote network operation on this projector has been password-protected. viii.Once set, access to the tools page has been password-protected. • To prevent errors, only input the English alphabet and digits on the tools page. • After making the adjustments, press the Send button and the data will be saved for the projector. ix. Press Exit to go back to the remote network operation page. x. The software is available in multiple languages, though only English letters and digits are allowed to be input. Operation 43
-
 1
1 -
2
-
3
-
4
-
5
-
6
-
7
-
8
-
9
-
10
-
11
-
12
-
13
-
14
-
15
-
16
-
17
-
18
-
19
-
20
-
21
-
22
-
23
-
24
-
25
-
26
-
27
-
28
-
29
-
30
-
31
-
32
-
33
-
34
-
35
-
36
-
37
-
38
-
39
-
40
-
41
-
 42
42 -
 43
43 -
 44
44 -
 45
45 -
 46
46 -
 47
47 -
 48
48 -
 49
49 -
 50
50 -
 51
51 -
 52
52 -
53
-
54
-
55
-
56
-
57
-
58
-
59
-
60
-
61
-
62
-
63
-
64
-
65
-
66
-
67
-
68
-
69
-
70
-
71
-
72
-
73
-
74
-
75
-
76
-
77
-
78
-
79
-
80
-
81
-
82
-
83
-
84
-
85
-
86
-
87
-
88
-
89
-
90
-
91
-
92
-
93
-
94
-
95
 |
 |
