Whirlpool MH2175XSB Service Guide - Page 20
Removing The Turntable Motor &, Hood Cooktop Lamp Assembly - 0 parts
 |
View all Whirlpool MH2175XSB manuals
Add to My Manuals
Save this manual to your list of manuals |
Page 20 highlights
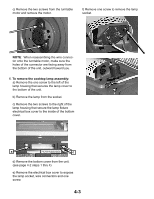
Removing the Turntable Motor & Hood (Cooktop) Lamp Assembly 4. Remove the wire from the wire clip towards the middle of the bottom cover. IMPORTANT: When you work on the microwave oven, be careful when handling the sheet metal parts. Sharp edges may be present, and you can cut yourself if you are not careful. 1. Unplug microwave oven or disconnect power. 5. To remove the turntable motor: a) Remove the glass turntable, roller assembly, and spindle from inside the oven cavity. 2. Remove the ten screws from the bottom cover and partially lower the top edge of the cover so you can access the component wiring below it. 3. Disconnect the wire connector at the right side. b) There are two small holes on the connector. Lower the bottom cover just far enough to get a sharp tool with the right size (diameter less than 2mm) to press into the two access holes one by one and release the connector. 4-2
-
 1
1 -
2
-
3
-
4
-
5
-
6
-
7
-
8
-
9
-
10
-
11
-
12
-
13
-
14
-
 15
15 -
 16
16 -
 17
17 -
 18
18 -
 19
19 -
 20
20 -
 21
21 -
 22
22 -
 23
23 -
 24
24 -
 25
25 -
26
-
27
-
28
-
29
-
30
-
31
-
32
-
33
-
34
-
35
-
36
-
37
-
38
-
39
-
40
-
41
-
42
-
43
-
44
-
45
-
46
-
47
-
48
-
49
-
50
-
51
-
52
-
53
-
54
 |
 |
