Whirlpool MH2175XSB Service Guide - Page 23
Screws
 |
View all Whirlpool MH2175XSB manuals
Add to My Manuals
Save this manual to your list of manuals |
Page 23 highlights
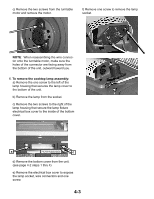
7. To remove the microcomputer board: a) Remove 2 screws at the top and release 2 tabs at the bottom to be able to lift the top board. Screws c) Press in on the locking tab end of the arm and lift the arm to release the touch panel ribbon cable. d) You can now remove the microcomputer board assembly. Tabs b) Remove 5 screws from the bottom board to release it from the touch panel assembly. e) To remove the microcomputer board mounting bracket release 4 tabs. f) Pull the bracket out of the touch panel assembly. 4-5
-
 1
1 -
2
-
3
-
4
-
5
-
6
-
7
-
8
-
9
-
10
-
11
-
12
-
13
-
14
-
15
-
16
-
17
-
 18
18 -
 19
19 -
 20
20 -
 21
21 -
 22
22 -
 23
23 -
 24
24 -
 25
25 -
 26
26 -
 27
27 -
 28
28 -
29
-
30
-
31
-
32
-
33
-
34
-
35
-
36
-
37
-
38
-
39
-
40
-
41
-
42
-
43
-
44
-
45
-
46
-
47
-
48
-
49
-
50
-
51
-
52
-
53
-
54
 |
 |

4-5
7. To remove the m±crocomputer board:
a) Remove 2 screws at the top and release
2 tabs at the bottom to be able to lift the top
board.
Screws
Tabs
b) Remove 5 screws from the bottom board to
release it from the touch panel assembly.
c) Press in on the locking tab end of the arm
and lift the arm to release the touch panel rib-
bon cable.
d) You can now remove the microcomputer
board assembly.
e) To remove the microcomputer board mount-
ing bracket release 4 tabs.
f) Pull the bracket out of the touch panel as-
sembly.