Xerox 3450B Service Manual - Page 102
Fuser Removal PL 9.3.40), Service Parts Disassembly
 |
UPC - 095205120011
View all Xerox 3450B manuals
Add to My Manuals
Save this manual to your list of manuals |
Page 102 highlights
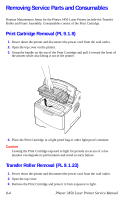
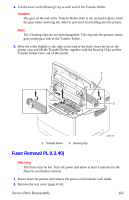
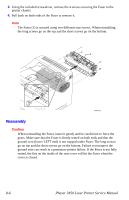
4. Lift the lever on the Bearing Clip at each end of the Transfer Roller. Caution The gear on the end of the Transfer Roller shaft is not secured in place. Hold the gear when removing the roller to prevent it from falling into the printer. Note The 2 bearing clips are not interchangeable. The clip with the ground contact goes on the gear side of the Transfer Roller. 5. Slide the roller slightly to the right so the end of the shaft clears the lip on the printer case and lift the Transfer Roller, together with the Bearing Clips and the Transfer Roller Gear, out of the printer. 1 2 1. Transfer Roller 2. Bearing Clip s3450-002 Fuser Removal PL 9.3.40) Warning The Fuser may be hot. Turn off power and allow at least 5 minutes for the Fuser to cool before removal. 1. Power down the printer and remove the power cord from the wall outlet. 2. Remove the rear cover (page 8-14). Service Parts Disassembly 8-5
-
 1
1 -
2
-
3
-
4
-
5
-
6
-
7
-
8
-
9
-
10
-
11
-
12
-
13
-
14
-
15
-
16
-
17
-
18
-
19
-
20
-
21
-
22
-
23
-
24
-
25
-
26
-
27
-
28
-
29
-
30
-
31
-
32
-
33
-
34
-
35
-
36
-
37
-
38
-
39
-
40
-
41
-
42
-
43
-
44
-
45
-
46
-
47
-
48
-
49
-
50
-
51
-
52
-
53
-
54
-
55
-
56
-
57
-
58
-
59
-
60
-
61
-
62
-
63
-
64
-
65
-
66
-
67
-
68
-
69
-
70
-
71
-
72
-
73
-
74
-
75
-
76
-
77
-
78
-
79
-
80
-
81
-
82
-
83
-
84
-
85
-
86
-
87
-
88
-
89
-
90
-
91
-
92
-
93
-
94
-
95
-
96
-
 97
97 -
 98
98 -
 99
99 -
 100
100 -
 101
101 -
 102
102 -
 103
103 -
 104
104 -
 105
105 -
 106
106 -
 107
107 -
108
-
109
-
110
-
111
-
112
-
113
-
114
-
115
-
116
-
117
-
118
-
119
-
120
-
121
-
122
-
123
-
124
-
125
-
126
-
127
-
128
-
129
-
130
-
131
-
132
-
133
-
134
-
135
-
136
-
137
-
138
-
139
-
140
-
141
-
142
-
143
-
144
-
145
-
146
-
147
-
148
-
149
-
150
-
151
-
152
-
153
-
154
-
155
-
156
-
157
-
158
-
159
-
160
-
161
-
162
-
163
-
164
-
165
-
166
-
167
-
168
-
169
-
170
-
171
-
172
-
173
-
174
-
175
-
176
-
177
-
178
-
179
-
180
 |
 |
