Xerox 3450B Service Manual - Page 63
Jam At Tray [1] [2] [3] or 0x01
 |
UPC - 095205120011
View all Xerox 3450B manuals
Add to My Manuals
Save this manual to your list of manuals |
Page 63 highlights
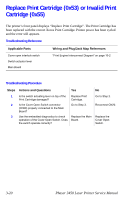
Jam At Tray [1] [2] [3] or 0x01 The printer's front panel displays "Jam At Tray [1] [2] [3]". The active tray (Tray 2 or Tray 3) has been removed, reseated, and locked into place. Any obstructions, media, or debris has been removed from the input paper path. Printer power has been cycled and the error still appears. Troubleshooting Reference Applicable Parts Pickup unit Tray 1, 2, or 3 Solenoid Regi Clutch or Feed Clutch Feed Sensor Wiring and Plug/Jack Map References "Print Engine Interconnect Diagram" on page 10-2 Troubleshooting Procedure Steps Actions and Questions Yes No 1 Using the embedded diagnostics, check Go to Step 2. operation of the tray solenoids. Do the tray solenoids operate correctly? Replace the inoperative solenoid. 2 Using the embedded diagnostics, check Go to Step 3. operation of the Regi Clutch and Feed Clutch. Do the clutches operate correctly? Replace the defective clutch. 3 If paper feeds into the printer and the Jam Go to Step 4. error message appears, use the embedded diagnostics to check feed sensor operation. Does the feed sensor operate correctly? Replace the defective sensor or actuator. 4 Check the side guides for the inoperative Replace damaged Go to Step 5. tray for damage or improper seating. part. Are guides damaged or loose? 5 Check the surface of the pick-up rollers for Clean rollers with Replace Main dirt or damage. Are the rollers dirty or a soft cloth very Board. damaged? slightly dampened with water or replace if damaged. 3-16 Phaser 3450 Laser Printer Service Manual
-
 1
1 -
2
-
3
-
4
-
5
-
6
-
7
-
8
-
9
-
10
-
11
-
12
-
13
-
14
-
15
-
16
-
17
-
18
-
19
-
20
-
21
-
22
-
23
-
24
-
25
-
26
-
27
-
28
-
29
-
30
-
31
-
32
-
33
-
34
-
35
-
36
-
37
-
38
-
39
-
40
-
41
-
42
-
43
-
44
-
45
-
46
-
47
-
48
-
49
-
50
-
51
-
52
-
53
-
54
-
55
-
56
-
57
-
 58
58 -
 59
59 -
 60
60 -
 61
61 -
 62
62 -
 63
63 -
 64
64 -
 65
65 -
 66
66 -
 67
67 -
 68
68 -
69
-
70
-
71
-
72
-
73
-
74
-
75
-
76
-
77
-
78
-
79
-
80
-
81
-
82
-
83
-
84
-
85
-
86
-
87
-
88
-
89
-
90
-
91
-
92
-
93
-
94
-
95
-
96
-
97
-
98
-
99
-
100
-
101
-
102
-
103
-
104
-
105
-
106
-
107
-
108
-
109
-
110
-
111
-
112
-
113
-
114
-
115
-
116
-
117
-
118
-
119
-
120
-
121
-
122
-
123
-
124
-
125
-
126
-
127
-
128
-
129
-
130
-
131
-
132
-
133
-
134
-
135
-
136
-
137
-
138
-
139
-
140
-
141
-
142
-
143
-
144
-
145
-
146
-
147
-
148
-
149
-
150
-
151
-
152
-
153
-
154
-
155
-
156
-
157
-
158
-
159
-
160
-
161
-
162
-
163
-
164
-
165
-
166
-
167
-
168
-
169
-
170
-
171
-
172
-
173
-
174
-
175
-
176
-
177
-
178
-
179
-
180
 |
 |
