Xerox 3450B Service Manual - Page 103
Reassembly, Caution
 |
UPC - 095205120011
View all Xerox 3450B manuals
Add to My Manuals
Save this manual to your list of manuals |
Page 103 highlights
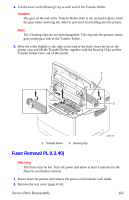
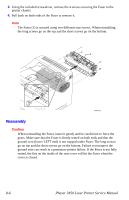
3. Using the included screwdriver, remove the 4 screws securing the Fuser to the printer chassis. 4. Pull back on both ends of the Fuser to remove it. Note The Fuser (1) is secured using two different size screws. When reinstalling, the long screws go on the top and the short screws go on the bottom. 1 s3450-043 Reassembly Caution When reinstalling the Fuser, insert it gently and be careful not to force the gears. Make sure that the Fuser is firmly seated on both ends and that the ground wire (lower LEFT end) is not trapped under Fuser. The long screws go on top and the short screws go on the bottom. Failure to reconnect the ground wire can result in a premature printer failure. If the Fuser is not fully seated, the fins on the inside of the rear cover will hit the Fuser when the cover is closed. 8-6 Phaser 3450 Laser Printer Service Manual
-
 1
1 -
2
-
3
-
4
-
5
-
6
-
7
-
8
-
9
-
10
-
11
-
12
-
13
-
14
-
15
-
16
-
17
-
18
-
19
-
20
-
21
-
22
-
23
-
24
-
25
-
26
-
27
-
28
-
29
-
30
-
31
-
32
-
33
-
34
-
35
-
36
-
37
-
38
-
39
-
40
-
41
-
42
-
43
-
44
-
45
-
46
-
47
-
48
-
49
-
50
-
51
-
52
-
53
-
54
-
55
-
56
-
57
-
58
-
59
-
60
-
61
-
62
-
63
-
64
-
65
-
66
-
67
-
68
-
69
-
70
-
71
-
72
-
73
-
74
-
75
-
76
-
77
-
78
-
79
-
80
-
81
-
82
-
83
-
84
-
85
-
86
-
87
-
88
-
89
-
90
-
91
-
92
-
93
-
94
-
95
-
96
-
97
-
 98
98 -
 99
99 -
 100
100 -
 101
101 -
 102
102 -
 103
103 -
 104
104 -
 105
105 -
 106
106 -
 107
107 -
 108
108 -
109
-
110
-
111
-
112
-
113
-
114
-
115
-
116
-
117
-
118
-
119
-
120
-
121
-
122
-
123
-
124
-
125
-
126
-
127
-
128
-
129
-
130
-
131
-
132
-
133
-
134
-
135
-
136
-
137
-
138
-
139
-
140
-
141
-
142
-
143
-
144
-
145
-
146
-
147
-
148
-
149
-
150
-
151
-
152
-
153
-
154
-
155
-
156
-
157
-
158
-
159
-
160
-
161
-
162
-
163
-
164
-
165
-
166
-
167
-
168
-
169
-
170
-
171
-
172
-
173
-
174
-
175
-
176
-
177
-
178
-
179
-
180
 |
 |
