Xerox 4150S Getting Started Guide - Page 20
Image Overwrite, Apply, Access - workcentre
 |
UPC - 095205228731
View all Xerox 4150S manuals
Add to My Manuals
Save this manual to your list of manuals |
Page 20 highlights
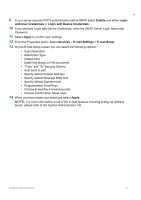
4 In the Default File Destination box select Add and enter a name to describe the filing destination. 5 Select the correct protocol for the repository in the Protocol menu. 6 Select and enter either the IP Address or Host Name of the server you want to send your scanned images to. 7 In Document Path enter the path to the location of the folder on the server where you want to store your images. Enter the full path to the folder, starting from the root of FTP services. 8 Enter the Login Name and Password of the Server to enable the WorkCentre to access the default repository. 9 Click Apply. 10 A default template can now be used on the WorkCentre. You can modify the template or create new templates from Internet Services. For more detailed information on Network Scanning, repositories and templates, refer to the System Administration CD. Image Overwrite The Image Overwrite Security Kit is an option kit available for purchase from your Xerox Sales Representative for all connected WorkCentres. When a job is processed it is stored on the hard drive. For security, you can delete the processed jobs from the hard drive using either Immediate Image Overwrite or On Demand Image Overwrite. On Demand Image Overwrite is initiated as required by the WorkCentre administrator whereas Immediate Image Overwrite clears the memory on a job by job basis immediately after each job has been processed. NOTE: Copy jobs are not sent across the network or stored in the same way as other types of jobs, so they do not need to be overwritten. Installing the kit 1 Install the kit. Refer to Installing Option Kits on page 15. Enable Immediate Image Overwrite 2 Press the Access button to access the Tools pathway. 3 On the keypad enter [1111] or the current passcode. Touch Enter. 4 Select Go to Tools > More > Optional Services > Immediate Image Overwrite. 5 Select Enable, Save and Exit Tools. The feature becomes immediately operational and requires no further configuration by the System Administrator. 16 getting started guide
-
 1
1 -
2
-
3
-
4
-
5
-
6
-
7
-
8
-
9
-
10
-
11
-
12
-
13
-
14
-
 15
15 -
 16
16 -
 17
17 -
 18
18 -
 19
19 -
 20
20 -
 21
21 -
 22
22 -
 23
23 -
 24
24 -
 25
25 -
26
-
27
-
28
-
29
-
30
-
31
-
32
-
33
-
34
-
35
-
36
-
37
-
38
 |
 |
