Xerox 6280N User Guide - Page 83
Printing on Custom Size Paper, Using the PostScript Driver
 |
UPC - 095205747430
View all Xerox 6280N manuals
Add to My Manuals
Save this manual to your list of manuals |
Page 83 highlights
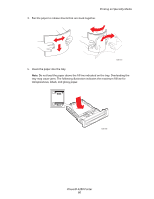
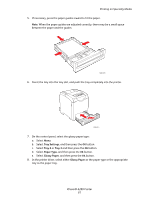
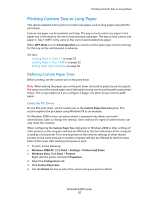
Printing Custom Size or Long Paper 5. Specify the length of the short edge and long edge under Settings For. You can specify the values either by entering them directly or using the Up Arrow and Down Arrow buttons. The length of the short edge cannot be longer than the long edge, even if it is within the specified range. The length of the long edge cannot be shorter than the short edge, even if it is within the specified range. 6. To assign a paper name, select the Name Paper Size check box, and then enter the name in Paper Name. Up to 14 characters can be used for the paper name. 7. If necessary, repeat steps 4 to 6 to define another custom size. 8. Click OK twice. Using the PostScript Driver On the PostScript print driver, set the custom size in the Custom Paper Size dialog box. This section explains the procedure using Windows XP as an example. 1. To start, do the following: • Windows 2000-XP: Click Start > Settings > Printers and Faxes. • Windows Vista: Click Start > Printers. Right-click the printer and select Properties. 2. Select the General tab. 3. Click the Printing Preferences button. 4. From Paper Size, select Custom Paper Size. 5. Specify the length of the short edge and long edge under Custom Size Settings. You can specify the values either by entering them directly. The length of the short edge cannot be longer than the long edge, even if it is within the specified range. The length of the long edge cannot be shorter than the short edge, even if it is within the specified range. 6. Click OK three times. Printing on Custom Size Paper Use the following procedures to print using either the PCL or PostScript drivers. Using the PCL Driver The procedure to print on custom size paper using the PCL print driver is as follows. 1. From the File menu, select Print. 2. Select this printer as the printer to be used and click Preferences or Properties. 3. Select the Paper/Output tab. 4. Select the appropriate paper tray from Paper Tray. 5. Select the appropriate paper type from Paper Type. 6. From Paper Size, select the size of the original document. 7. Click the Layout tab. 8. The Fit to New Paper Size menu defaults to Same As Paper Size. 9. Click OK. 10. Click Print in the Print dialog box to start printing. Phaser® 6280 Printer 83
-
 1
1 -
2
-
3
-
4
-
5
-
6
-
7
-
8
-
9
-
10
-
11
-
12
-
13
-
14
-
15
-
16
-
17
-
18
-
19
-
20
-
21
-
22
-
23
-
24
-
25
-
26
-
27
-
28
-
29
-
30
-
31
-
32
-
33
-
34
-
35
-
36
-
37
-
38
-
39
-
40
-
41
-
42
-
43
-
44
-
45
-
46
-
47
-
48
-
49
-
50
-
51
-
52
-
53
-
54
-
55
-
56
-
57
-
58
-
59
-
60
-
61
-
62
-
63
-
64
-
65
-
66
-
67
-
68
-
69
-
70
-
71
-
72
-
73
-
74
-
75
-
76
-
77
-
 78
78 -
 79
79 -
 80
80 -
 81
81 -
 82
82 -
 83
83 -
 84
84 -
 85
85 -
 86
86 -
 87
87 -
 88
88 -
89
-
90
-
91
-
92
-
93
-
94
-
95
-
96
-
97
-
98
-
99
-
100
-
101
-
102
-
103
-
104
-
105
-
106
-
107
-
108
-
109
-
110
-
111
-
112
-
113
-
114
-
115
-
116
-
117
-
118
-
119
-
120
-
121
-
122
-
123
-
124
-
125
-
126
-
127
-
128
-
129
-
130
-
131
-
132
-
133
-
134
-
135
-
136
-
137
-
138
-
139
-
140
-
141
-
142
-
143
-
144
-
145
-
146
-
147
-
148
-
149
-
150
-
151
-
152
-
153
-
154
-
155
-
156
-
157
-
158
 |
 |
