Zenith P50W26B Operating Guide - Page 19
Clock, Manual Config., Phase, Reset, Screen Adj., Position
 |
View all Zenith P50W26B manuals
Add to My Manuals
Save this manual to your list of manuals |
Page 19 highlights
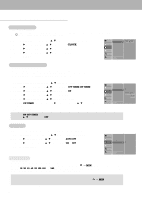
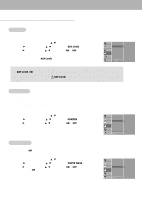
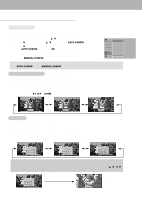
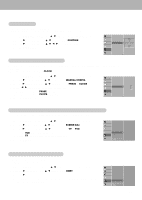
Screen Position - This function works in the following mode: RGB1-PC, RGB1-DTV 480p,720p,1080i, COMPONENT 480p,720p,1080i. 1. Press the MENU button and then use D / E button to select the SCREEN menu. 2. Press the G button and then use D / E button to select POSITION. 3. Press the G button and then use D / E / F / G button to adjust the position. 4. Press the MENU button. VIDEO AUDIO TIME SPECIAL SCREEN AUTO CONFIG. ARC ZOOM IN/OUT POSITION G MANUAL CONFIG. SCREEN ADJ. RESET TWIN MENU PREV. § ÚÜ © Manual Configure (RGB1 [PC] mode only) - If the picture isn't clear after auto adjustment and especially if characters are still jittery, adjust the picture phase manually. - To correct the screen size, adjust CLOCK. 1. Press the MENU button and then use D / E button to select the SCREEN menu. 2. Press the G button and then use D / E button to select MANUAL CONFIG.. 3. Press the G button and then use D / E button to to select PHASE or CLOCK. 4. Use the F / G button to make appropriate adjustments. • The adjustment range of PHASE is 0 ~ 31. • The adjustment range of CLOCK is -50 ~ +50. 5. Press the MENU button. VIDEO AUTO CONFIG. AUDIO ARC TIME ZOOM IN/OUT POSITION MANUAL CONFIG.G PHASE 0 SPECIAL SCREEN ADJ. CLOCK 0 RESET SCREEN TWIN MENU PREV. Screen Adjustments (VIDEO, S-VIDEO and COMPONENT 480i mode only) - Use this function to correct jittering or picture instability while viewing a video tape. 1. Press the MENU button and then use D / E button to select the SCREEN menu. 2. Press the G button and then use D / E button to select SCREEN ADJ.. 3. Press the G button and then use D / E button to to select TV or VCR. • Select the VCR option if watching a VCR. • Select the TV option for other equipment.(Except VCR) 4. Press the MENU button. VIDEO AUDIO TIME SPECIAL SCREEN AUTO CONFIG. ARC ZOOM IN/OUT POSITION MANUAL CONFIG. SCREEN ADJ. G RESET TWIN MENU PREV. TV VCR Initializing (Reset to original factory value) - This function operates in every mode. - To initialize the adjusted value 1. Press the MENU button and then use D / E button to select the SCREEN menu. 2. Press the G button and then use D / E button to select RESET. 3. Press the G button. • You can initialize ZOOM IN/OUT, POSITION, SPLIT ZOOM, PIP size, PIP position and sub picture size for twin picture. VIDEO AUDIO TIME SPECIAL SCREEN AUTO CONFIG. ARC ZOOM IN/OUT POSITION MANUAL CONFIG. SCREEN ADJ. RESET G TO SET TWIN MENU PREV. 19
-
 1
1 -
2
-
3
-
4
-
5
-
6
-
7
-
8
-
9
-
10
-
11
-
12
-
13
-
 14
14 -
 15
15 -
 16
16 -
 17
17 -
 18
18 -
 19
19 -
 20
20 -
 21
21 -
 22
22 -
 23
23 -
 24
24 -
25
-
26
-
27
-
28
-
29
-
30
-
31
-
32
 |
 |
