eMachines D620 Service Guide - Page 45
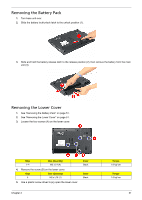
Remove the two screws D on the HDD bracket., Remove the bracket as shown.
 |
View all eMachines D620 manuals
Add to My Manuals
Save this manual to your list of manuals |
Page 45 highlights
5. Remove the HDD rubber enclosure by gently prying open the enclosure, starting on either side (3) and proceeding down the bottom (4) and towards the top of the disk (5), then pull it up to detach from the HDD module (6). NOTE: The HDD on this model does not have the rubber enclosure as above images show. Please skip these steps and got to next step directly. 6. Remove the two screws (D) on the HDD bracket. Step 7 Size (Quantity) M3 x L4 (2) 7. Remove the bracket as shown. Color Silver Torque 1.6 kgf-cm Chapter 3 55
-
 1
1 -
2
-
3
-
4
-
5
-
6
-
7
-
8
-
9
-
10
-
11
-
12
-
13
-
14
-
15
-
16
-
17
-
18
-
19
-
20
-
21
-
22
-
23
-
24
-
25
-
26
-
27
-
28
-
29
-
30
-
31
-
32
-
33
-
34
-
35
-
36
-
37
-
38
-
39
-
 40
40 -
 41
41 -
 42
42 -
 43
43 -
 44
44 -
 45
45 -
 46
46 -
 47
47 -
 48
48 -
 49
49 -
 50
50 -
51
-
52
-
53
-
54
-
55
-
56
-
57
-
58
-
59
-
60
-
61
-
62
-
63
-
64
-
65
-
66
-
67
-
68
-
69
-
70
-
71
-
72
-
73
-
74
-
75
-
76
-
77
-
78
-
79
-
80
-
81
-
82
-
83
-
84
-
85
-
86
-
87
-
88
-
89
-
90
-
91
-
92
-
93
-
94
-
95
-
96
-
97
-
98
-
99
-
100
-
101
-
102
-
103
-
104
-
105
-
106
-
107
-
108
-
109
-
110
-
111
-
112
-
113
-
114
-
115
-
116
-
117
-
118
 |
 |

Chapter 3
55
5.
Remove the HDD rubber enclosure by gently prying open the enclosure, starting on either side (3) and
proceeding down the bottom (4) and towards the top of the disk (5), then pull it up to detach from the HDD
module (6).
NOTE:
The HDD on this model does not have the rubber enclosure as above images show. Please skip these
steps and got to next step directly.
6.
Remove the two screws (D) on the HDD bracket.
7.
Remove the bracket as shown.
Step
Size (Quantity)
Color
Torque
7
M3 x L4 (2)
Silver
1.6 kgf-cm