eMachines EL1852 eMachines EL1852 Service Guide - Page 75
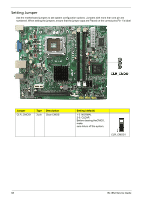
Jumper Setting - motherboard
 |
View all eMachines EL1852 manuals
Add to My Manuals
Save this manual to your list of manuals |
Page 75 highlights
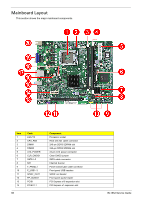
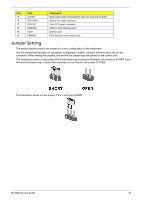
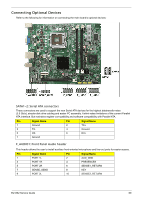
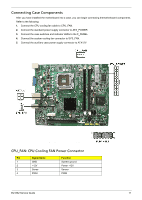
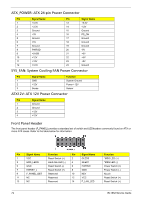
Item 15 16 17 18 19 20 Code AUDIO1 SYS_FAN1 ATX12V1 USBLAN1 VGA1 PSKBM2 Component Rear audio jacks (microphone, line-out, and line-in jacks) System fan cable connector 4-pin ATX power connector USB 2.0 and Ethernet ports Monitor port PS/2 keyboard and mouse ports Jumper Setting The section explains how to set jumper for correct configuration of the mainboard. Use the motherboard jumpers to set system configuration options. Jumpers withmore than one pin are numbered. When setting the jumpers, ensure that the jumpercaps are placed on the correct pins. The illustrations show a 2-pin jumper.When the jumper cap is placed on bothpins, the jumper is SHORT. If you re-move the jumper cap, or place the jumpercap on just one pin, the jumper is OPEN. This illustration shows a 3-pin jumper. Pins 1 and 2 are SHORT. EL1852 Service Guide 67
-
 1
1 -
2
-
3
-
4
-
5
-
6
-
7
-
8
-
9
-
10
-
11
-
12
-
13
-
14
-
15
-
16
-
17
-
18
-
19
-
20
-
21
-
22
-
23
-
24
-
25
-
26
-
27
-
28
-
29
-
30
-
31
-
32
-
33
-
34
-
35
-
36
-
37
-
38
-
39
-
40
-
41
-
42
-
43
-
44
-
45
-
46
-
47
-
48
-
49
-
50
-
51
-
52
-
53
-
54
-
55
-
56
-
57
-
58
-
59
-
60
-
61
-
62
-
63
-
64
-
65
-
66
-
67
-
68
-
69
-
 70
70 -
 71
71 -
 72
72 -
 73
73 -
 74
74 -
 75
75 -
 76
76 -
 77
77 -
 78
78 -
 79
79 -
 80
80 -
81
-
82
-
83
-
84
-
85
-
86
-
87
-
88
-
89
-
90
-
91
-
92
-
93
-
94
-
95
-
96
-
97
-
98
-
99
-
100
-
101
-
102
 |
 |
