2009 Mercedes CLK-Class Owner's Manual - Page 357
2009 Mercedes CLK-Class Manual
Page 357 highlights
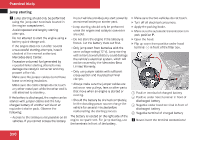
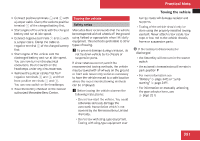
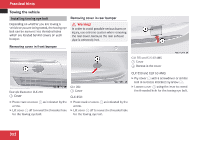
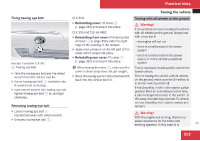
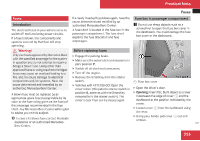
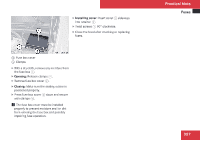
Practical hints Fuses Fuses Introduction The electrical fuses in your vehicle serve to switch off malfunctioning power circuits. If a fuse is blown, the components and systems secured by that fuse will stop operating. If a newly inserted fuse blows again, have the cause determined and rectified by an authorized Mercedes-Benz Center. A fuse chart is located in the fuse box in the passenger compartment. The fuse chart explains the fuse allocation and fuse amperages. Fuse box in passenger compartment ! Do not use sharp objects such as a screwdriver to open the fuse box cover in the dashboard. You could damage the fuse box cover or the dashboard. G Warning! Only use fuses approved by Mercedes-Benz with the specified amperage for the system in question and do not attempt to repair or bridge a blown fuse. Using other than approved fuses or using repaired or bridged fuses may cause an overload leading to a fire, and/or cause damage to electrical components and/or systems. Have the cause determined and remedied by an authorized Mercedes-Benz Center. A blown fuse must be replaced by an appropriate spare fuse (recognizable by its color or the fuse rating given on the fuse) of the amperage recommended in the fuse chart. Any Mercedes-Benz Center will be glad to advise you on this subject. Before replacing fuses X X Engage the parking brake. Make sure the automatic transmission is in park position P. X Switch off all electrical consumers. X Turn off the engine. X Remove the SmartKey from the starter switch. X Vehicles with KEYLESS-GO: Open the driver's door (this puts the starter switch in position 0, same as with the SmartKey removed from the starter switch). The driver's door then can be closed again. 1 Fuse box cover X X i In case of a blown fuse contact Roadside Assistance or an authorized MercedesBenz Center. Open the driver's door. Opening: Insert flat, blunt object as a lever in-between the edge of cover 1 and the dashboard at the position indicated by the arrow. X Loosen cover 1 from the dashboard using the lever. X Using your hands, pull cover 1 out and remove. Z 355
-
 1
1 -
2
-
3
-
4
-
5
-
6
-
7
-
8
-
9
-
10
-
11
-
12
-
13
-
14
-
15
-
16
-
17
-
18
-
19
-
20
-
21
-
22
-
23
-
24
-
25
-
26
-
27
-
28
-
29
-
30
-
31
-
32
-
33
-
34
-
35
-
36
-
37
-
38
-
39
-
40
-
41
-
42
-
43
-
44
-
45
-
46
-
47
-
48
-
49
-
50
-
51
-
52
-
53
-
54
-
55
-
56
-
57
-
58
-
59
-
60
-
61
-
62
-
63
-
64
-
65
-
66
-
67
-
68
-
69
-
70
-
71
-
72
-
73
-
74
-
75
-
76
-
77
-
78
-
79
-
80
-
81
-
82
-
83
-
84
-
85
-
86
-
87
-
88
-
89
-
90
-
91
-
92
-
93
-
94
-
95
-
96
-
97
-
98
-
99
-
100
-
101
-
102
-
103
-
104
-
105
-
106
-
107
-
108
-
109
-
110
-
111
-
112
-
113
-
114
-
115
-
116
-
117
-
118
-
119
-
120
-
121
-
122
-
123
-
124
-
125
-
126
-
127
-
128
-
129
-
130
-
131
-
132
-
133
-
134
-
135
-
136
-
137
-
138
-
139
-
140
-
141
-
142
-
143
-
144
-
145
-
146
-
147
-
148
-
149
-
150
-
151
-
152
-
153
-
154
-
155
-
156
-
157
-
158
-
159
-
160
-
161
-
162
-
163
-
164
-
165
-
166
-
167
-
168
-
169
-
170
-
171
-
172
-
173
-
174
-
175
-
176
-
177
-
178
-
179
-
180
-
181
-
182
-
183
-
184
-
185
-
186
-
187
-
188
-
189
-
190
-
191
-
192
-
193
-
194
-
195
-
196
-
197
-
198
-
199
-
200
-
201
-
202
-
203
-
204
-
205
-
206
-
207
-
208
-
209
-
210
-
211
-
212
-
213
-
214
-
215
-
216
-
217
-
218
-
219
-
220
-
221
-
222
-
223
-
224
-
225
-
226
-
227
-
228
-
229
-
230
-
231
-
232
-
233
-
234
-
235
-
236
-
237
-
238
-
239
-
240
-
241
-
242
-
243
-
244
-
245
-
246
-
247
-
248
-
249
-
250
-
251
-
252
-
253
-
254
-
255
-
256
-
257
-
258
-
259
-
260
-
261
-
262
-
263
-
264
-
265
-
266
-
267
-
268
-
269
-
270
-
271
-
272
-
273
-
274
-
275
-
276
-
277
-
278
-
279
-
280
-
281
-
282
-
283
-
284
-
285
-
286
-
287
-
288
-
289
-
290
-
291
-
292
-
293
-
294
-
295
-
296
-
297
-
298
-
299
-
300
-
301
-
302
-
303
-
304
-
305
-
306
-
307
-
308
-
309
-
310
-
311
-
312
-
313
-
314
-
315
-
316
-
317
-
318
-
319
-
320
-
321
-
322
-
323
-
324
-
325
-
326
-
327
-
328
-
329
-
330
-
331
-
332
-
333
-
334
-
335
-
336
-
337
-
338
-
339
-
340
-
341
-
342
-
343
-
344
-
345
-
346
-
347
-
348
-
349
-
350
-
351
-
 352
352 -
 353
353 -
 354
354 -
 355
355 -
 356
356 -
 357
357 -
 358
358 -
 359
359 -
 360
360 -
 361
361 -
 362
362 -
363
-
364
-
365
-
366
-
367
-
368
-
369
-
370
-
371
-
372
-
373
-
374
-
375
-
376
-
377
-
378
-
379
-
380
-
381
-
382
-
383
-
384
 |
 |
