1999 Nissan Pathfinder Owner's Manual - Page 145
1999 Nissan Pathfinder Manual
Page 145 highlights
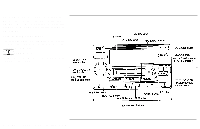
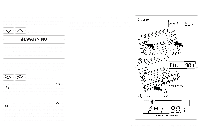
Station memory operations: Twelve stations can be set for the FM band (six for FM1, six for FM2). Six stations can be set for the AM band. 1. Tune to the desired station using the SEEK/SCAN or TUNE button. 2. Push the desired station select button for more than 1.5 seconds. (For example, in the diagram ch2 is to be memorized. The radio mutes when the select button is pushed.) 3. The indicator ch2 will then come on and the sound will resume. Memorizing is now complete. 4. Other buttons can be set in the same manner. If the battery cable is disconnected, or if the fuse blows, the radio memory will be cancelled. In that case, reset the desired stations. or loose labels. If used, the label could jam in the player. Do not force the cassette tape into the tape door. This could cause player damage. If the system is turned off by pushing the ON⋅OFF/VOL control knob with the cassette tape still in the player, the tape will resume playing when the system is turned back on. Precautions on cassette tape player operation: ¼ To maintain good quality sound, NISSAN recommends that you use cassette tapes of 60 minutes or shorter in length. ¼ Cassette tapes should be removed from the player when not in use. Store cassettes in their protective cases and away from direct sunlight, heat, dust, moisture or magnetic sources. Direct sunlight can cause the cassette to become deformed. The use of deformed cassettes may cause the cassette to jam in the player. ¼ Do not use cassettes that have peeling ¼ If a cassette has loose tape, insert a pencil through one of the cassette hubs and rewind the tape firmly. Loose tape may cause jamming and wavering sound quality. ¼ Over a period of time, the playback head, capstan and pinch roller may gather a tape coating residue as the tape passes over the head. This residue accumulation can cause a weak or wavering sound and should be removed periodically with a head cleaning tape. If the residue is not removed periodically, the player may need to be disassembled for cleaning. PLAY: ¼ When the TAPE button is pushed with the system turned off and a tape loaded, the system will come on and the tape will play. ¼ When the TAPE button is pushed with either the radio or compact disc turned on and the tape loaded, the compact disc or the radio will automatically be turned off and the tape will play. Cassette tape player operation Turn the ignition key to ACC or ON, and then lightly insert the cassette tape into the tape door. The cassette tape will be automatically pulled into the player. The radio or CD will turn off (if it is on) and the cassette tape will begin to play. 4-22 Heater, air conditioner and audio systems
-
 1
1 -
2
-
3
-
4
-
5
-
6
-
7
-
8
-
9
-
10
-
11
-
12
-
13
-
14
-
15
-
16
-
17
-
18
-
19
-
20
-
21
-
22
-
23
-
24
-
25
-
26
-
27
-
28
-
29
-
30
-
31
-
32
-
33
-
34
-
35
-
36
-
37
-
38
-
39
-
40
-
41
-
42
-
43
-
44
-
45
-
46
-
47
-
48
-
49
-
50
-
51
-
52
-
53
-
54
-
55
-
56
-
57
-
58
-
59
-
60
-
61
-
62
-
63
-
64
-
65
-
66
-
67
-
68
-
69
-
70
-
71
-
72
-
73
-
74
-
75
-
76
-
77
-
78
-
79
-
80
-
81
-
82
-
83
-
84
-
85
-
86
-
87
-
88
-
89
-
90
-
91
-
92
-
93
-
94
-
95
-
96
-
97
-
98
-
99
-
100
-
101
-
102
-
103
-
104
-
105
-
106
-
107
-
108
-
109
-
110
-
111
-
112
-
113
-
114
-
115
-
116
-
117
-
118
-
119
-
120
-
121
-
122
-
123
-
124
-
125
-
126
-
127
-
128
-
129
-
130
-
131
-
132
-
133
-
134
-
135
-
136
-
137
-
138
-
139
-
 140
140 -
 141
141 -
 142
142 -
 143
143 -
 144
144 -
 145
145 -
 146
146 -
 147
147 -
 148
148 -
 149
149 -
 150
150 -
151
-
152
-
153
-
154
-
155
-
156
-
157
-
158
-
159
-
160
-
161
-
162
-
163
-
164
-
165
-
166
-
167
-
168
-
169
-
170
-
171
-
172
-
173
-
174
-
175
-
176
-
177
-
178
-
179
-
180
-
181
-
182
-
183
-
184
-
185
-
186
-
187
-
188
-
189
-
190
-
191
-
192
-
193
-
194
-
195
-
196
-
197
-
198
-
199
-
200
-
201
-
202
-
203
-
204
-
205
-
206
-
207
-
208
-
209
-
210
-
211
-
212
-
213
-
214
-
215
-
216
-
217
-
218
-
219
-
220
-
221
-
222
-
223
-
224
-
225
-
226
-
227
-
228
-
229
-
230
-
231
-
232
-
233
-
234
-
235
-
236
-
237
-
238
-
239
-
240
-
241
-
242
-
243
-
244
-
245
-
246
-
247
-
248
-
249
-
250
-
251
-
252
-
253
-
254
-
255
-
256
-
257
-
258
-
259
-
260
-
261
-
262
-
263
-
264
-
265
-
266
-
267
-
268
-
269
-
270
-
271
-
272
-
273
-
274
 |
 |
