2003 Pontiac Bonneville Owner's Manual - Page 208
2003 Pontiac Bonneville Manual

Page 208 highlights
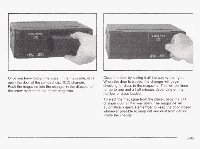
SEEK : Press the down arrow while playing a CD to go to the start of the current track if more than eight seconds have played. Press the up arrow to go to the next track. If you hold the button or press it more than once, the player will continue moving backward or forward through the disc. v 4 (Eject): Press this button, located next to the CD slot, to eject a CD. Eject may be activated with either the ignition or radio off. CDs may be loaded with the radio and ignition off if this button is pressed first. Compact Disc Messages CHECK CD: If this message appears on the radio display and the disc comes out, it could be for one of the following reasons: You're driving on a very rough road. When the road becomes smoother, the disc should play. The disc is dirty, scratched, wet or upside down. SCAN : Press and hold one of the arrows for more than two seconds until SCAN and the track number appear on the display and you hear a beep. The disc will go to the next track, play for a few seconds, then go on to the next track. Press this button again to stop scanning. RCL (Recall): Push this knob to see how long the current track has been piaying. To change 'rhe default on the display (track or elapsed time), push the knob until you see the display you want, then hold the knob until the display flashes. The selected display will now be the default. While elapsed time is showing, CD TIME will appear on the display. YMIbY. r~ A v The air is very humid. If so, wait about an hour and try again. If the CD is not playing correctly, for any other reason, try a known good CD. If any error occurs repeatedly or if an error can't be corrected, contact your dealer. If your radio displays an eyer ~ P S S ~ write, it down and provide it to vour ~ P dealer when reporting the problem. * ~ n ID~ - e ~+hie hl I++nn .r u a aa t tc IIU VUIIVS m !isfen the r21in \!/hen 8 CD is playing. CD TAPE: Press this button to switch between playing a cassette tape and a compact disc if both are loaded, when listening to the radio. The inactive tape or CD will remain safely inside the radio for future listening. The display will show tape and CD symbols. 3-93
-
 1
1 -
2
-
3
-
4
-
5
-
6
-
7
-
8
-
9
-
10
-
11
-
12
-
13
-
14
-
15
-
16
-
17
-
18
-
19
-
20
-
21
-
22
-
23
-
24
-
25
-
26
-
27
-
28
-
29
-
30
-
31
-
32
-
33
-
34
-
35
-
36
-
37
-
38
-
39
-
40
-
41
-
42
-
43
-
44
-
45
-
46
-
47
-
48
-
49
-
50
-
51
-
52
-
53
-
54
-
55
-
56
-
57
-
58
-
59
-
60
-
61
-
62
-
63
-
64
-
65
-
66
-
67
-
68
-
69
-
70
-
71
-
72
-
73
-
74
-
75
-
76
-
77
-
78
-
79
-
80
-
81
-
82
-
83
-
84
-
85
-
86
-
87
-
88
-
89
-
90
-
91
-
92
-
93
-
94
-
95
-
96
-
97
-
98
-
99
-
100
-
101
-
102
-
103
-
104
-
105
-
106
-
107
-
108
-
109
-
110
-
111
-
112
-
113
-
114
-
115
-
116
-
117
-
118
-
119
-
120
-
121
-
122
-
123
-
124
-
125
-
126
-
127
-
128
-
129
-
130
-
131
-
132
-
133
-
134
-
135
-
136
-
137
-
138
-
139
-
140
-
141
-
142
-
143
-
144
-
145
-
146
-
147
-
148
-
149
-
150
-
151
-
152
-
153
-
154
-
155
-
156
-
157
-
158
-
159
-
160
-
161
-
162
-
163
-
164
-
165
-
166
-
167
-
168
-
169
-
170
-
171
-
172
-
173
-
174
-
175
-
176
-
177
-
178
-
179
-
180
-
181
-
182
-
183
-
184
-
185
-
186
-
187
-
188
-
189
-
190
-
191
-
192
-
193
-
194
-
195
-
196
-
197
-
198
-
199
-
200
-
201
-
202
-
 203
203 -
 204
204 -
 205
205 -
 206
206 -
 207
207 -
 208
208 -
 209
209 -
 210
210 -
 211
211 -
 212
212 -
 213
213 -
214
-
215
-
216
-
217
-
218
-
219
-
220
-
221
-
222
-
223
-
224
-
225
-
226
-
227
-
228
-
229
-
230
-
231
-
232
-
233
-
234
-
235
-
236
-
237
-
238
-
239
-
240
-
241
-
242
-
243
-
244
-
245
-
246
-
247
-
248
-
249
-
250
-
251
-
252
-
253
-
254
-
255
-
256
-
257
-
258
-
259
-
260
-
261
-
262
-
263
-
264
-
265
-
266
-
267
-
268
-
269
-
270
-
271
-
272
-
273
-
274
-
275
-
276
-
277
-
278
-
279
-
280
-
281
-
282
-
283
-
284
-
285
-
286
-
287
-
288
-
289
-
290
-
291
-
292
-
293
-
294
-
295
-
296
-
297
-
298
-
299
-
300
-
301
-
302
-
303
-
304
-
305
-
306
-
307
-
308
-
309
-
310
-
311
-
312
-
313
-
314
-
315
-
316
-
317
-
318
-
319
-
320
-
321
-
322
-
323
-
324
-
325
-
326
-
327
-
328
-
329
-
330
-
331
-
332
-
333
-
334
-
335
-
336
-
337
-
338
-
339
-
340
-
341
-
342
-
343
-
344
-
345
-
346
-
347
-
348
-
349
-
350
-
351
-
352
-
353
-
354
-
355
-
356
-
357
-
358
-
359
-
360
-
361
-
362
-
363
-
364
-
365
-
366
-
367
-
368
-
369
-
370
-
371
-
372
-
373
-
374
-
375
-
376
-
377
-
378
-
379
-
380
-
381
-
382
-
383
-
384
-
385
-
386
-
387
-
388
-
389
-
390
-
391
-
392
-
393
-
394
-
395
-
396
-
397
-
398
-
399
-
400
-
401
-
402
-
403
-
404
-
405
-
406
-
407
-
408
-
409
-
410
-
411
-
412
-
413
-
414
-
415
-
416
-
417
-
418
 |
 |